OAuth2.0在golang下的使用
一、简介
1、OAuth2.0使用https来做安全保护,避免了OAuth1.0的复杂加密,让开发人员更容易使用。
2、接入的四种模式,一般采用授权码模式,比较安全,其次是密码模式,不建议使用,其他2种更不推荐。
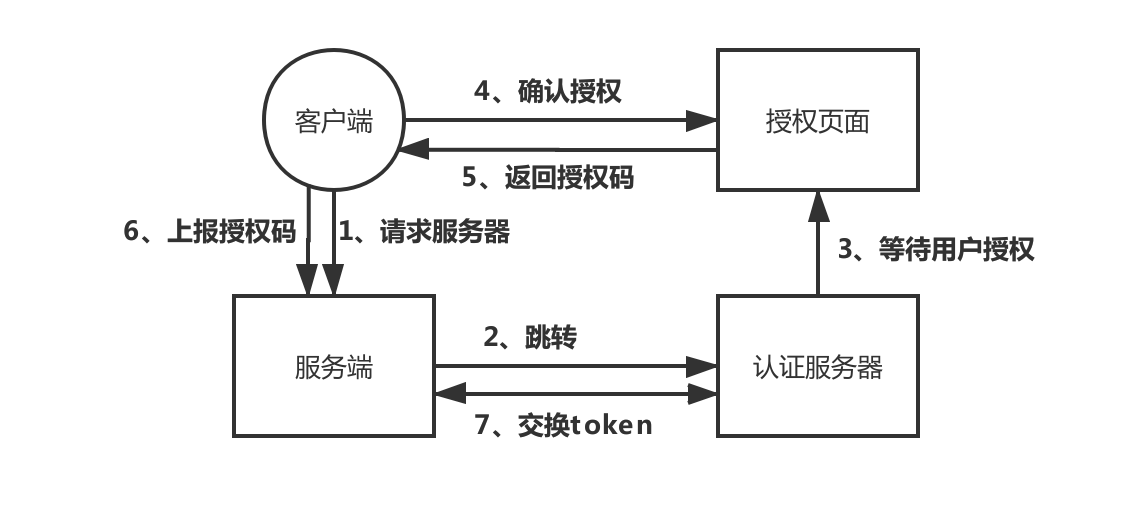
二、接入流程

- 1、客户端可以是手机app,也可以是web浏览器,开始请求自己的服务端。
- 2、服务端发现没有登陆,则重定向跳转到认证服务器。
- 3、认证服务器展示授权页面,等待用户手动确认授权。
- 4、用户点击确认后,授权页面请求认证服务器,获取授权码
- 5、客户端获取上一步返回的授权码。
- 6、客户端将授权码上报给自己的服务端。
- 7、服务端拿着授权码去认证服务器换取access_token。
- 8、服务端通过access_token去认证服务器获取用户资料,如openid,用户昵称,性别等信息。
三、使用golang开发oauth2服务端
1、导入fasthttp版本的oauth2三方工具包
go get -u github.com/wyanlord/oauth2
2、先看一个示例代码
package main

import (
    "github.com/dgrijalva/jwt-go"
    "github.com/wyanlord/oauth2/generates"
    "github.com/wyanlord/oauth2/server"
    "github.com/wyanlord/oauth2/store"
    "github.com/wyanlord/oauth2/manage"
    "github.com/wyanlord/oauth2/errors"
    "github.com/wyanlord/oauth2/models"
    "github.com/valyala/fasthttp"
    "log"
)

func main() {
    manager := manage.NewDefaultManager()
    manager.SetAuthorizeCodeTokenCfg(manage.DefaultAuthorizeCodeTokenCfg)

    // token store
    manager.MustTokenStorage(store.NewMemoryTokenStore())

    // generate jwt access token
    manager.MapAccessGenerate(generates.NewJWTAccessGenerate([]byte("00000000"), jwt.SigningMethodHS512))

    clientStore := store.NewClientStore()
    _ = clientStore.Set("222222", &models.Client{
        ID:     "222222",
        Secret: "22222222",
        Domain: "http://localhost:9094",
    })
    manager.MapClientStorage(clientStore)

    srv := server.NewServer(server.NewConfig(), manager)

    srv.SetClientInfoHandler(server.ClientFormHandler)

    srv.SetPasswordAuthorizationHandler(func(username, password string) (userID string, err error) {
        if username == "test" && password == "test" {
            return "123456", nil
        }

        return "", errors.ErrAccessDenied
    })

    srv.SetUserAuthorizationHandler(func(ctx *fasthttp.RequestCtx) (userID string, err error) {
        // 根据您的项目登录权限的方式来判断用户的身份,获取用户的id
        return "123456", nil
    })

    srv.SetInternalErrorHandler(func(err error) (re *errors.Response) {
        log.Println("Internal Error:", err.Error())
        return
    })

    srv.SetResponseErrorHandler(func(re *errors.Response) {
        log.Println("Response Error:", re.Error.Error())
    })

    h := fasthttp.CompressHandler(func(ctx *fasthttp.RequestCtx) {
        switch string(ctx.Path()) {
        case "/authorize":
            err := srv.HandleAuthorizeRequest(ctx)
            if err != nil {
                ctx.SetStatusCode(fasthttp.StatusBadRequest)
                _, _ = ctx.WriteString(err.Error())
            }
        case "/token":
            _ = srv.HandleTokenRequest(ctx)
        default:
            ctx.SetStatusCode(fasthttp.StatusNotFound)
        }
    })

    log.Fatal(fasthttp.ListenAndServe(":9096", h))
}
3、示例代码讲解
- 创建一个默认的管理器manage,用来管理授权码code和access_token的创建方式和存取方式,以及client_id和client_secret的存取方式。
- 临时创建了一个client_id为222222,client_secret为22222222,跳转地址为http://localhost:9094的三方应用。
- 设置三方应用上报client_id和client_secret的方式,是通过basic auth方式还是url参数方式。
- 设置获取用户ID的方式。
- 定义了2个函数,/authorize用来获取授权码, /token用来交换access_token。
4、请求示例
- 获取授权码的地址:
http://localhost:9096/authorize?client_id=222222&redirect_uri=http%3A%2F%2Flocalhost%3A9094&response_type=code - 请在上述的请求头或者路由里带上认证服务器信任的用户登录凭证,因为用户必须是登录状态,才能去认证服务器获取到携带用户ID的授权码。
- 交换access_token的地址:
http://localhost:9096/token?client_id=222222&client_secret=22222222&grant_type=authorization_code&redirect_uri=http%3A%2F%2Flocalhost%3A9094&code=SDUF7-HFNXON8V809VVMZW - 最终获取的access_token格式如下:
{
  "access_token": "eyJhbGciOiJIUzUxMiIsInR5cCI6IkpXVCJ9.eyJhdWQiOiIyMjIyMjIiLCJleHAiOjE1NzQ1MzA5OTIsInN1YiI6IjEyMzQ1NiJ9.CTwRImAbgIi82_hrfrhLRzkyzepxtTm-NrI9FaiiOUOFLbey2YYXMywMjPQS6KyTckhOIvctQAdeH48rsJ9HPg",
  "expires_in": 7200,
  "refresh_token": "JUBVTTJQX5S4SEF2LFASHQ",
  "token_type": "Bearer"
}
有疑问加站长微信联系(非本文作者))


