「Go工具箱」go语言csrf库的使用方式和实现原理

yudotyang · · 7119 次点击 · · 开始浏览    
这是一个创建于 的文章,其中的信息可能已经有所发展或是发生改变。

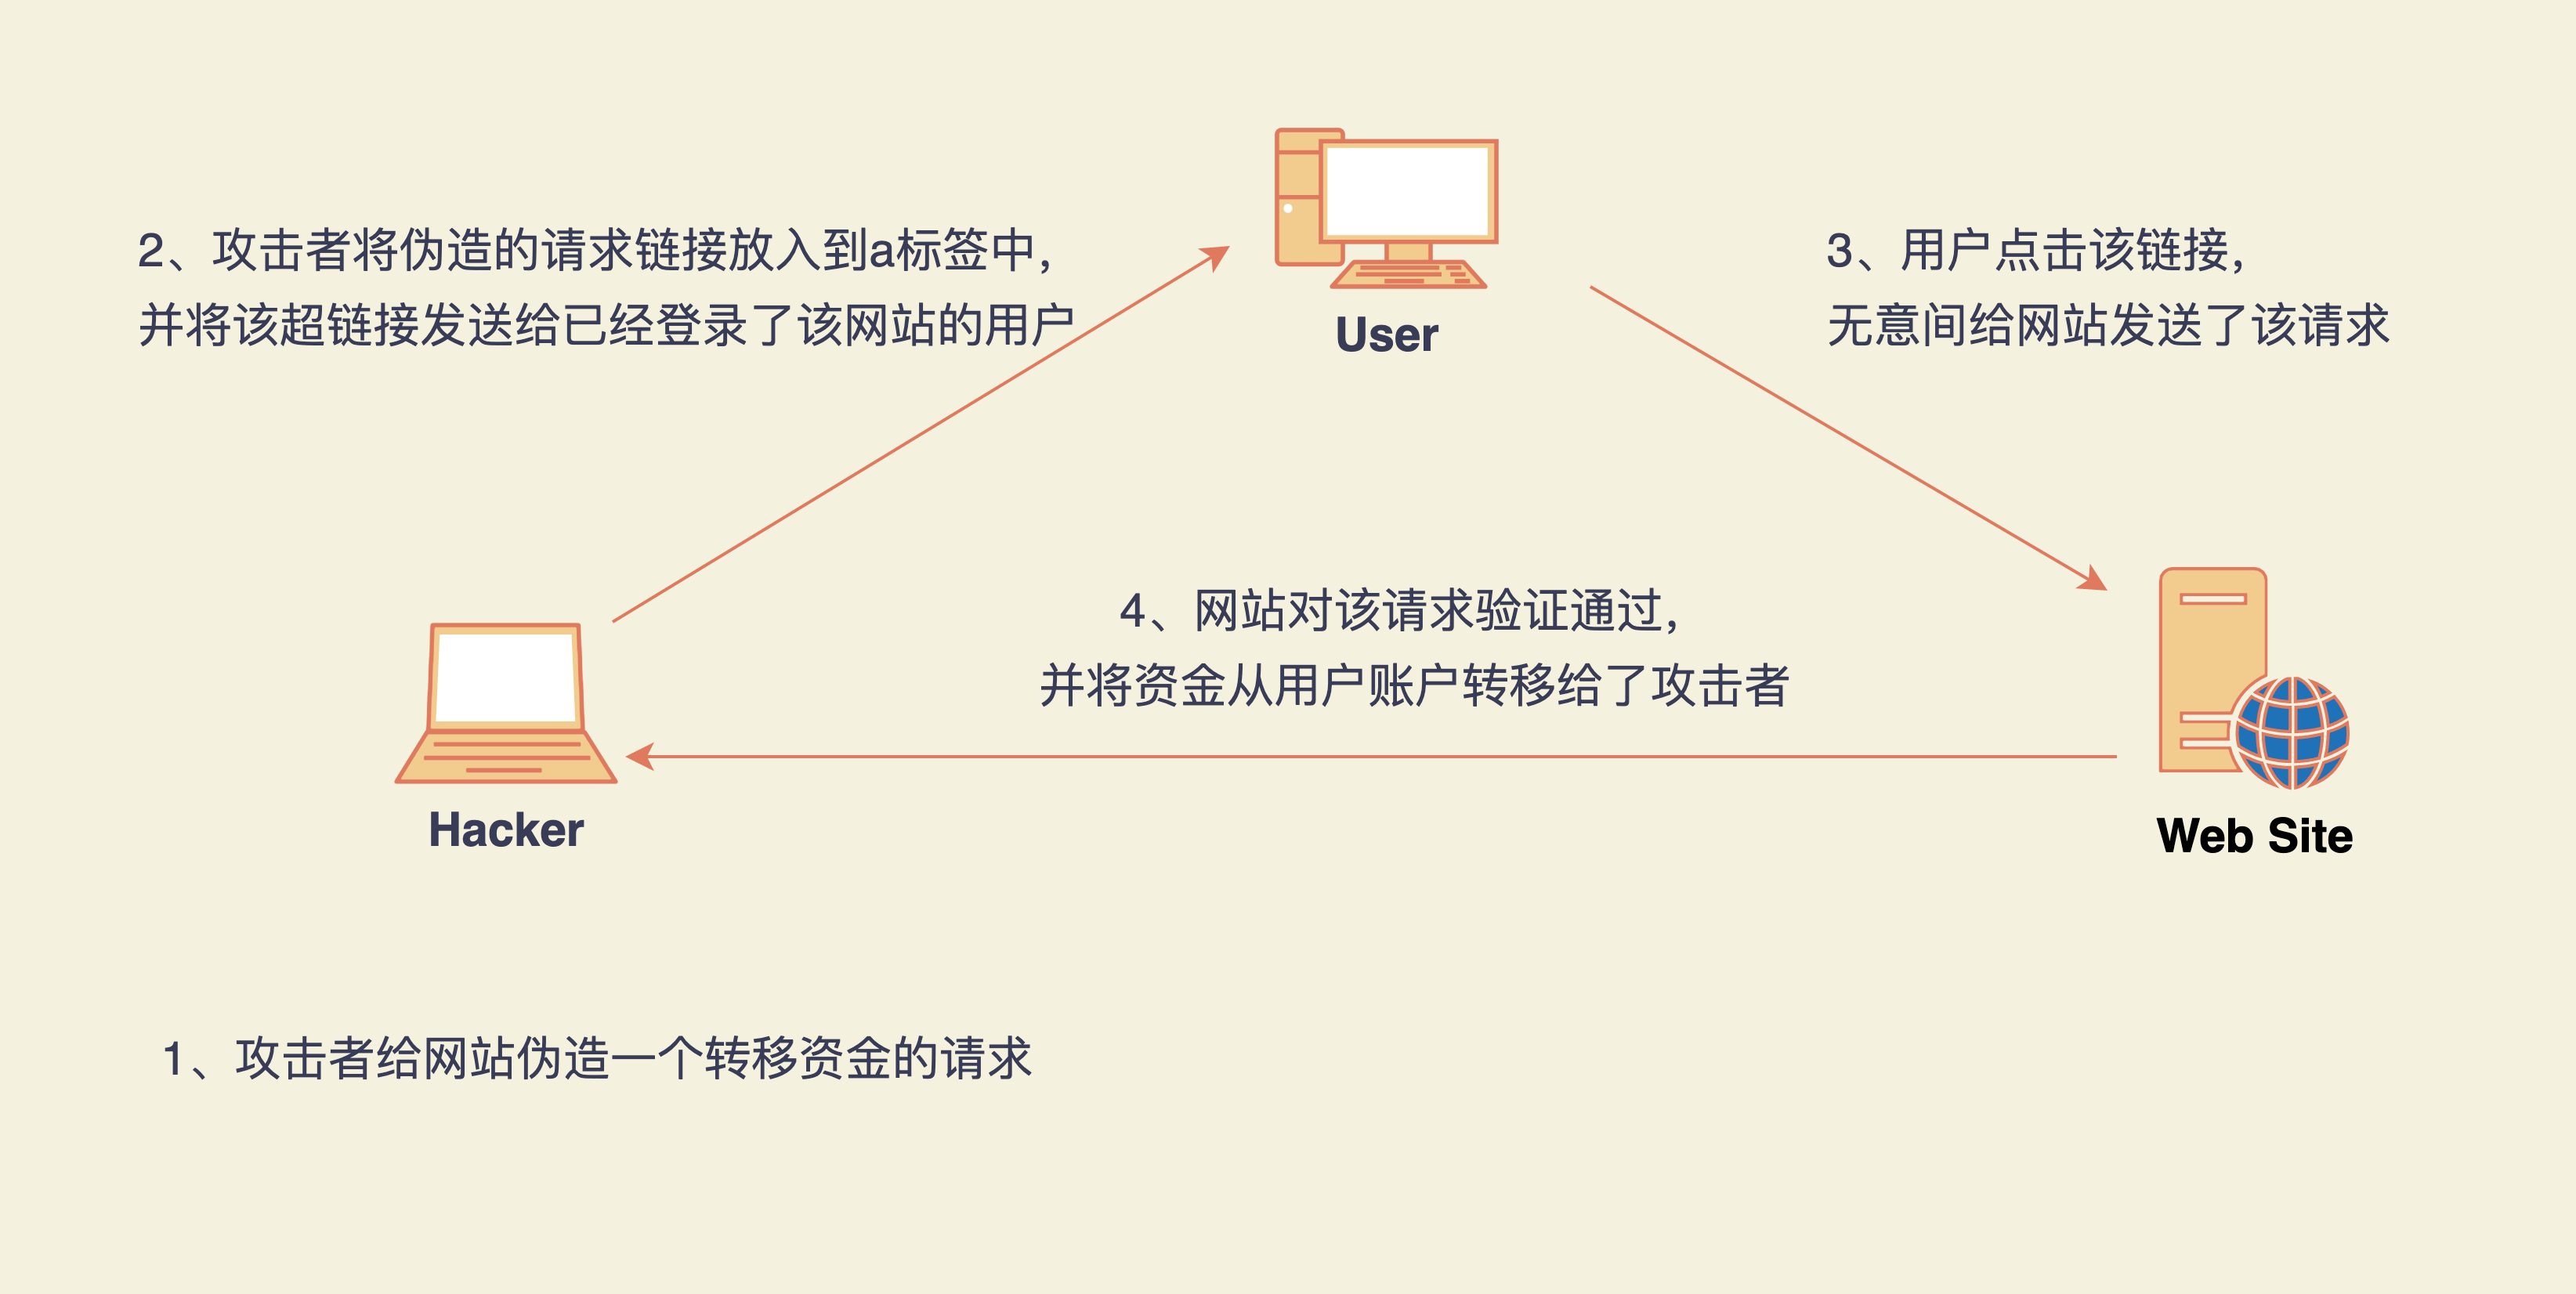
<section id="nice" data-tool="mdnice编辑器" data-website="https://www.mdnice.com" style="font-size: 16px; padding: 0 10px; word-spacing: 0px; word-break: break-word; word-wrap: break-word; text-align: left; line-height: 1.35; color: #333; letter-spacing: 1.5px; font-family: Optima-Regular, Optima, PingFangSC-light, PingFangTC-light, 'PingFang SC', Cambria, Cochin, Georgia, Times, 'Times New Roman', serif;"><blockquote class="multiquote-1" data-tool="mdnice编辑器" style="display: block; font-size: 0.9em; overflow: auto; overflow-scrolling: touch; padding-top: 10px; padding-bottom: 10px; padding-left: 20px; padding-right: 10px; margin-bottom: 20px; margin-top: 20px; text-size-adjust: 100%; line-height: 1.55em; font-weight: 400; border-radius: 6px; color: #595959; font-style: normal; text-align: left; box-sizing: inherit; border-left: none; border: 1px solid #1b900d; background: #fff;"><span style="color: #74b56d; font-size: 34px; line-height: 1; font-weight: 700;">❝</span> <p style="padding-top: 8px; padding-bottom: 8px; letter-spacing: 2px; font-size: 16px; word-spacing: 2px; margin: 0px; color: black; line-height: 26px;">上帝只垂青主动的人 --- 吴军 《格局》</p> <span style="float: right; color: #74b56d;">❞</span></blockquote> <p data-tool="mdnice编辑器" style="padding-top: 8px; padding-bottom: 8px; line-height: 26px; color: #2b2b2b; margin: 10px 0px; letter-spacing: 2px; font-size: 16px; word-spacing: 2px;">大家好,我是渔夫子。本号新推出「Go工具箱」系列,意在给大家分享使用go语言编写的、实用的、好玩的工具。</p> <p data-tool="mdnice编辑器" style="padding-top: 8px; padding-bottom: 8px; line-height: 26px; color: #2b2b2b; margin: 10px 0px; letter-spacing: 2px; font-size: 16px; word-spacing: 2px;">今天给大家推荐的是web应用安全防护方面的一个包:csrf。该包为Go web应用中常见的跨站请求伪造(CSRF)攻击提供预防功能。</p> <h2 data-tool="mdnice编辑器" style="margin-top: 30px; margin-bottom: 15px; padding: 0px; font-weight: bold; color: black; font-size: 22px; display: block; border-bottom: 4px solid #4CAF50;"><span class="prefix" style="display: none;"></span><span class="content" style="display: flex; color: #4CAF50; font-size: 20px;">csrf小档案</span><span class="suffix" style="display: flex; box-sizing: border-box; width: 20px; height: 10px; border-top-left-radius: 20px; border-top-right-radius: 20px; background: RGBA(76, 175, 80, .5); color: rgb(255, 255, 255); font-size: 16px; letter-spacing: 0.544px; justify-content: flex-end; float: right; margin-top: -10px; box-sizing: border-box !important; overflow-wrap: break-word !important;"></span></h2> <section class="table-container" data-tool="mdnice编辑器" style="overflow-x: auto;"><table style="display: table; text-align: left;"> <thead> <tr style="border: 0; border-top: 1px solid #ccc; background-color: white;"> <th style="border: 1px solid #ccc; padding: 5px 10px; text-align: left; font-weight: bold; background-color: #f0f0f0; font-size: 16px; color: #595959; min-width: 85px;"><strong style="color: #399003; font-weight: bold;"><span>「</span>csrf小档案<span>」</span></strong></th> <th style="border: 1px solid #ccc; padding: 5px 10px; text-align: left; font-weight: bold; background-color: #f0f0f0; font-size: 16px; color: #595959; min-width: 85px;"></th> <th style="border: 1px solid #ccc; padding: 5px 10px; text-align: left; font-weight: bold; background-color: #f0f0f0; font-size: 16px; color: #595959; min-width: 85px;"></th> <th style="border: 1px solid #ccc; padding: 5px 10px; text-align: left; font-weight: bold; background-color: #f0f0f0; font-size: 16px; color: #595959; min-width: 85px;"></th> </tr> </thead> <tbody style="border: 0;"> <tr style="border: 0; border-top: 1px solid #ccc; background-color: white;"> <td style="border: 1px solid #ccc; padding: 5px 10px; text-align: left; font-size: 16px; color: #595959; min-width: 85px;">star</td> <td style="border: 1px solid #ccc; padding: 5px 10px; text-align: left; font-size: 16px; color: #595959; min-width: 85px;">837</td> <td style="border: 1px solid #ccc; padding: 5px 10px; text-align: left; font-size: 16px; color: #595959; min-width: 85px;">used by</td> <td style="border: 1px solid #ccc; padding: 5px 10px; text-align: left; font-size: 16px; color: #595959; min-width: 85px;">-</td> </tr> <tr style="border: 0; border-top: 1px solid #ccc; background-color: #F8F8F8;"> <td style="border: 1px solid #ccc; padding: 5px 10px; text-align: left; font-size: 16px; color: #595959; min-width: 85px;">contributors</td> <td style="border: 1px solid #ccc; padding: 5px 10px; text-align: left; font-size: 16px; color: #595959; min-width: 85px;">25</td> <td style="border: 1px solid #ccc; padding: 5px 10px; text-align: left; font-size: 16px; color: #595959; min-width: 85px;">作者</td> <td style="border: 1px solid #ccc; padding: 5px 10px; text-align: left; font-size: 16px; color: #595959; min-width: 85px;">Gorilla</td> </tr> <tr style="border: 0; border-top: 1px solid #ccc; background-color: white;"> <td style="border: 1px solid #ccc; padding: 5px 10px; text-align: left; font-size: 16px; color: #595959; min-width: 85px;">功能简介</td> <td style="border: 1px solid #ccc; padding: 5px 10px; text-align: left; font-size: 16px; color: #595959; min-width: 85px;">为Go web应用程序和服务提供跨站点请求伪造(csrf)预防功能。可作为gin、echo等主流框架的中间件使用。</td> <td style="border: 1px solid #ccc; padding: 5px 10px; text-align: left; font-size: 16px; color: #595959; min-width: 85px;"></td> <td style="border: 1px solid #ccc; padding: 5px 10px; text-align: left; font-size: 16px; color: #595959; min-width: 85px;"></td> </tr> <tr style="border: 0; border-top: 1px solid #ccc; background-color: #F8F8F8;"> <td style="border: 1px solid #ccc; padding: 5px 10px; text-align: left; font-size: 16px; color: #595959; min-width: 85px;">项目地址</td> <td style="border: 1px solid #ccc; padding: 5px 10px; text-align: left; font-size: 16px; color: #595959; min-width: 85px;"><a href="https://github.com/gorilla/csrf" style="text-decoration: none; word-wrap: break-word; color: #399003; font-weight: normal; border-bottom: 1px solid #399003;">https://github.com/gorilla/csrf</a></td> <td style="border: 1px solid #ccc; padding: 5px 10px; text-align: left; font-size: 16px; color: #595959; min-width: 85px;"></td> <td style="border: 1px solid #ccc; padding: 5px 10px; text-align: left; font-size: 16px; color: #595959; min-width: 85px;"></td> </tr> <tr style="border: 0; border-top: 1px solid #ccc; background-color: white;"> <td style="border: 1px solid #ccc; padding: 5px 10px; text-align: left; font-size: 16px; color: #595959; min-width: 85px;">相关知识</td> <td style="border: 1px solid #ccc; padding: 5px 10px; text-align: left; font-size: 16px; color: #595959; min-width: 85px;">跨站请求伪造(CSRF)、contex.Contex、异或操作</td> <td style="border: 1px solid #ccc; padding: 5px 10px; text-align: left; font-size: 16px; color: #595959; min-width: 85px;"></td> <td style="border: 1px solid #ccc; padding: 5px 10px; text-align: left; font-size: 16px; color: #595959; min-width: 85px;"></td> </tr> </tbody> </table> </section><h1 data-tool="mdnice编辑器" style="margin-top: 30px; margin-bottom: 15px; padding: 0px; font-weight: bold; color: black; font-size: 25px;"><span class="prefix" style="font-weight: bold; color: #4CAF50; display: none;"></span><span class="content" style="display: inline-block; font-weight: bold; color: #4CAF50;">第一部分 CSRF相关知识</span><span class="suffix" style="display: inline-block; font-weight: bold; color: #4CAF50;"></span></h1> <h2 data-tool="mdnice编辑器" style="margin-top: 30px; margin-bottom: 15px; padding: 0px; font-weight: bold; color: black; font-size: 22px; display: block; border-bottom: 4px solid #4CAF50;"><span class="prefix" style="display: none;"></span><span class="content" style="display: flex; color: #4CAF50; font-size: 20px;">一、CSRF及其实现原理</span><span class="suffix" style="display: flex; box-sizing: border-box; width: 20px; height: 10px; border-top-left-radius: 20px; border-top-right-radius: 20px; background: RGBA(76, 175, 80, .5); color: rgb(255, 255, 255); font-size: 16px; letter-spacing: 0.544px; justify-content: flex-end; float: right; margin-top: -10px; box-sizing: border-box !important; overflow-wrap: break-word !important;"></span></h2> <p data-tool="mdnice编辑器" style="padding-top: 8px; padding-bottom: 8px; line-height: 26px; color: #2b2b2b; margin: 10px 0px; letter-spacing: 2px; font-size: 16px; word-spacing: 2px;">CSRF是CROSS Site Request Forgy的缩写,即跨站请求伪造。我们看下他的攻击原理。如下图:</p> <figure data-tool="mdnice编辑器" style="margin: 0; margin-top: 10px; margin-bottom: 10px; display: flex; flex-direction: column; justify-content: center; align-items: center;">![算法反作弊系统流程图-csrf.png](https://static.golangjob.cn/221028/b747cebf6eaee6ee9d00945602c76cf7.png)</figure> <p data-tool="mdnice编辑器" style="padding-top: 8px; padding-bottom: 8px; line-height: 26px; color: #2b2b2b; margin: 10px 0px; letter-spacing: 2px; font-size: 16px; word-spacing: 2px;">当用户访问一个网站的时候,第一次登录完成后,网站会将验证的相关信息保存在浏览器的cookie中。在对该网站的后续访问中,浏览器会自动携带该站点下的cookie信息,以便服务器校验认证信息。</p> <p data-tool="mdnice编辑器" style="padding-top: 8px; padding-bottom: 8px; line-height: 26px; color: #2b2b2b; margin: 10px 0px; letter-spacing: 2px; font-size: 16px; word-spacing: 2px;">因此,当服务器经过用户认证之后,服务器对后续的请求就只认cookie中的认证信息,不再区分请求的来源了。那么,攻击者就可以模拟一个正常的请求来做一些影响正常用户利益的事情(比如对于银行来说可以把用户的钱转账到攻击者账户中。或获取用户的敏感、重要的信息等)</p> <blockquote class="multiquote-1" data-tool="mdnice编辑器" style="display: block; font-size: 0.9em; overflow: auto; overflow-scrolling: touch; padding-top: 10px; padding-bottom: 10px; padding-left: 20px; padding-right: 10px; margin-bottom: 20px; margin-top: 20px; text-size-adjust: 100%; line-height: 1.55em; font-weight: 400; border-radius: 6px; color: #595959; font-style: normal; text-align: left; box-sizing: inherit; border-left: none; border: 1px solid #1b900d; background: #fff;"><span style="color: #74b56d; font-size: 34px; line-height: 1; font-weight: 700;">❝</span> <p style="padding-top: 8px; padding-bottom: 8px; letter-spacing: 2px; font-size: 16px; word-spacing: 2px; margin: 0px; color: black; line-height: 26px;">相关知识:因为登录信息是基于session-cookie的。浏览器在访问网站时会自动发送该网站的cookie信息,网站只要能识别cookie中的信息,就会认为是认证已通过,而不会区分该请求的来源的。所以给攻击者创造了攻击的机会。</p> <span style="float: right; color: #74b56d;">❞</span></blockquote> <h3 data-tool="mdnice编辑器" style="padding: 0px; color: black; font-size: 17px; font-weight: bold; text-align: center; position: relative; margin-top: 20px; margin-bottom: 20px;"><span class="prefix" style="display: none;"></span><span class="content" style="color: #2b2b2b; padding-bottom: 2px;"><span style="width: 30px; height: 30px; display: block; background-image: url(https://files.mdnice.com/grass-green.png); background-position: center; background-size: 30px; margin: auto; opacity: 1; background-repeat: no-repeat; margin-bottom: -8px;"></span>CSRF攻击示例</span><span class="suffix" style="display: none;"></span></h3> <p data-tool="mdnice编辑器" style="padding-top: 8px; padding-bottom: 8px; line-height: 26px; color: #2b2b2b; margin: 10px 0px; letter-spacing: 2px; font-size: 16px; word-spacing: 2px;">假设有一个银行网站A,下面的是一个转给账户5000元的请求,使用Get方法</p> <pre class="custom" data-tool="mdnice编辑器" style="margin-top: 10px; margin-bottom: 10px; border-radius: 5px; box-shadow: rgba(0, 0, 0, 0.55) 0px 2px 10px;"><span style="display: block; background: url(https://files.mdnice.com/user/3441/876cad08-0422-409d-bb5a-08afec5da8ee.svg); height: 30px; width: 100%; background-size: 40px; background-repeat: no-repeat; background-color: #282c34; margin-bottom: -7px; border-radius: 5px; background-position: 10px 10px;"></span><code class="hljs" style="overflow-x: auto; padding: 16px; color: #abb2bf; display: -webkit-box; font-family: Operator Mono, Consolas, Monaco, Menlo, monospace; font-size: 12px; -webkit-overflow-scrolling: touch; letter-spacing: 0px; padding-top: 15px; background: #282c34; border-radius: 5px;">GET&nbsp;https:<span class="hljs-comment" style="color: #5c6370; font-style: italic; line-height: 26px;">//abank.com/transfer.do?account=RandPerson&amp;amount=$5000&nbsp;HTTP/1.1</span><br></code></pre> <p data-tool="mdnice编辑器" style="padding-top: 8px; padding-bottom: 8px; line-height: 26px; color: #2b2b2b; margin: 10px 0px; letter-spacing: 2px; font-size: 16px; word-spacing: 2px;">然后,攻击者修改了该请求中的参数,将收款账户更改成了自己的,如下:</p> <pre class="custom" data-tool="mdnice编辑器" style="margin-top: 10px; margin-bottom: 10px; border-radius: 5px; box-shadow: rgba(0, 0, 0, 0.55) 0px 2px 10px;"><span style="display: block; background: url(https://files.mdnice.com/user/3441/876cad08-0422-409d-bb5a-08afec5da8ee.svg); height: 30px; width: 100%; background-size: 40px; background-repeat: no-repeat; background-color: #282c34; margin-bottom: -7px; border-radius: 5px; background-position: 10px 10px;"></span><code class="hljs" style="overflow-x: auto; padding: 16px; color: #abb2bf; display: -webkit-box; font-family: Operator Mono, Consolas, Monaco, Menlo, monospace; font-size: 12px; -webkit-overflow-scrolling: touch; letter-spacing: 0px; padding-top: 15px; background: #282c34; border-radius: 5px;">GET&nbsp;https:<span class="hljs-comment" style="color: #5c6370; font-style: italic; line-height: 26px;">//abank.com/transfer.do?account=SomeAttacker&amp;amount=$5000&nbsp;HTTP/1.1</span><br></code></pre> <p data-tool="mdnice编辑器" style="padding-top: 8px; padding-bottom: 8px; line-height: 26px; color: #2b2b2b; margin: 10px 0px; letter-spacing: 2px; font-size: 16px; word-spacing: 2px;">然后,攻击者将该请求地址放入到一个<a style="text-decoration: none; word-wrap: break-word; color: #399003; font-weight: normal; border-bottom: 1px solid #399003;">标签中:</a></p><a data-tool="mdnice编辑器" style="text-decoration: none; word-wrap: break-word; color: #399003; font-weight: normal; border-bottom: 1px solid #399003;"> <pre class="custom" style="margin-top: 10px; margin-bottom: 10px; border-radius: 5px; box-shadow: rgba(0, 0, 0, 0.55) 0px 2px 10px;"><span style="display: block; background: url(https://files.mdnice.com/user/3441/876cad08-0422-409d-bb5a-08afec5da8ee.svg); height: 30px; width: 100%; background-size: 40px; background-repeat: no-repeat; background-color: #282c34; margin-bottom: -7px; border-radius: 5px; background-position: 10px 10px;"></span><code class="hljs" style="overflow-x: auto; padding: 16px; color: #abb2bf; display: -webkit-box; font-family: Operator Mono, Consolas, Monaco, Menlo, monospace; font-size: 12px; -webkit-overflow-scrolling: touch; letter-spacing: 0px; padding-top: 15px; background: #282c34; border-radius: 5px;">&lt;a&nbsp;href=<span class="hljs-string" style="color: #98c379; line-height: 26px;">"https://abank.com/transfer.do?account=SomeAttacker&amp;amount=$5000"</span>&gt;Click&nbsp;<span class="hljs-keyword" style="color: #c678dd; line-height: 26px;">for</span>&nbsp;more&nbsp;information&lt;/a&gt;<br></code></pre> <p style="padding-top: 8px; padding-bottom: 8px; line-height: 26px; color: #2b2b2b; margin: 10px 0px; letter-spacing: 2px; font-size: 16px; word-spacing: 2px;">最后,攻击者会以各种方式(放到自己的网站中、email、社交通讯工具等)引诱用户点击该链接。只要是用户点击了该链接,并且在之前已经登录了该网站,那么浏览器就会将带认证信息的cookie自动发送给该网站,网站认为这是一个正常的请求,由此,将给黑客转账5000元。造成合法用户的损失。</p> <p style="padding-top: 8px; padding-bottom: 8px; line-height: 26px; color: #2b2b2b; margin: 10px 0px; letter-spacing: 2px; font-size: 16px; word-spacing: 2px;">当然,如果是post表单形式,那么攻击者会将伪造的链接放到form表达中,并用js的方法让表单自动发送:</p> <pre class="custom" style="margin-top: 10px; margin-bottom: 10px; border-radius: 5px; box-shadow: rgba(0, 0, 0, 0.55) 0px 2px 10px;"><span style="display: block; background: url(https://files.mdnice.com/user/3441/876cad08-0422-409d-bb5a-08afec5da8ee.svg); height: 30px; width: 100%; background-size: 40px; background-repeat: no-repeat; background-color: #282c34; margin-bottom: -7px; border-radius: 5px; background-position: 10px 10px;"></span><code class="hljs" style="overflow-x: auto; padding: 16px; color: #abb2bf; display: -webkit-box; font-family: Operator Mono, Consolas, Monaco, Menlo, monospace; font-size: 12px; -webkit-overflow-scrolling: touch; letter-spacing: 0px; padding-top: 15px; background: #282c34; border-radius: 5px;"><span class="hljs-tag" style="line-height: 26px;">&lt;<span class="hljs-name" style="color: #e06c75; line-height: 26px;">body</span>&nbsp;<span class="hljs-attr" style="color: #d19a66; line-height: 26px;">onload</span>=<span class="hljs-string" style="color: #98c379; line-height: 26px;">"document.forms[0].submit()&gt;<br>&nbsp;&nbsp;&lt;form&nbsp;id=”csrf”&nbsp;action="</span><span class="hljs-attr" style="color: #d19a66; line-height: 26px;">https:</span>//<span class="hljs-attr" style="color: #d19a66; line-height: 26px;">abank.com</span>/<span class="hljs-attr" style="color: #d19a66; line-height: 26px;">transfer.do</span>"&nbsp;<span class="hljs-attr" style="color: #d19a66; line-height: 26px;">method</span>=<span class="hljs-string" style="color: #98c379; line-height: 26px;">"POST"</span>&gt;</span><br>&nbsp;&nbsp;&nbsp;<span class="hljs-tag" style="line-height: 26px;">&lt;<span class="hljs-name" style="color: #e06c75; line-height: 26px;">input</span>&nbsp;<span class="hljs-attr" style="color: #d19a66; line-height: 26px;">type</span>=<span class="hljs-string" style="color: #98c379; line-height: 26px;">"hidden"</span>&nbsp;<span class="hljs-attr" style="color: #d19a66; line-height: 26px;">name</span>=<span class="hljs-string" style="color: #98c379; line-height: 26px;">"account"</span>&nbsp;<span class="hljs-attr" style="color: #d19a66; line-height: 26px;">value</span>=<span class="hljs-string" style="color: #98c379; line-height: 26px;">"SomeAttacker"</span>/&gt;</span><br>&nbsp;&nbsp;&nbsp;<span class="hljs-tag" style="line-height: 26px;">&lt;<span class="hljs-name" style="color: #e06c75; line-height: 26px;">input</span>&nbsp;<span class="hljs-attr" style="color: #d19a66; line-height: 26px;">type</span>=<span class="hljs-string" style="color: #98c379; line-height: 26px;">"hidden"</span>&nbsp;<span class="hljs-attr" style="color: #d19a66; line-height: 26px;">name</span>=<span class="hljs-string" style="color: #98c379; line-height: 26px;">"amount"</span>&nbsp;<span class="hljs-attr" style="color: #d19a66; line-height: 26px;">value</span>=<span class="hljs-string" style="color: #98c379; line-height: 26px;">"$5000"</span>/&gt;</span><br>&nbsp;<span class="hljs-tag" style="line-height: 26px;">&lt;/<span class="hljs-name" style="color: #e06c75; line-height: 26px;">form</span>&gt;</span><br><span class="hljs-tag" style="line-height: 26px;">&lt;/<span class="hljs-name" style="color: #e06c75; line-height: 26px;">body</span>&gt;</span><br><br><span class="hljs-tag" style="line-height: 26px;">&lt;<span class="hljs-name" style="color: #e06c75; line-height: 26px;">script</span>&gt;</span><span class="javascript" style="line-height: 26px;"><br>&nbsp;&nbsp;<span class="hljs-built_in" style="color: #e6c07b; line-height: 26px;">document</span>.getElementById(<span class="hljs-string" style="color: #98c379; line-height: 26px;">'csrf'</span>).submit();<br></span><span class="hljs-tag" style="line-height: 26px;">&lt;/<span class="hljs-name" style="color: #e06c75; line-height: 26px;">script</span>&gt;</span><br></code></pre> <h2 style="margin-top: 30px; margin-bottom: 15px; padding: 0px; font-weight: bold; color: black; font-size: 22px; display: block; border-bottom: 4px solid #4CAF50;"><span class="prefix" style="display: none;"></span><span class="content" style="display: flex; color: #4CAF50; font-size: 20px;">二、如何预防</span><span class="suffix" style="display: flex; box-sizing: border-box; width: 20px; height: 10px; border-top-left-radius: 20px; border-top-right-radius: 20px; background: RGBA(76, 175, 80, .5); color: rgb(255, 255, 255); font-size: 16px; letter-spacing: 0.544px; justify-content: flex-end; float: right; margin-top: -10px; box-sizing: border-box !important; overflow-wrap: break-word !important;"></span></h2> <p style="padding-top: 8px; padding-bottom: 8px; line-height: 26px; color: #2b2b2b; margin: 10px 0px; letter-spacing: 2px; font-size: 16px; word-spacing: 2px;">常见的有3种方法:</p> <ul style="margin-top: 8px; margin-bottom: 8px; padding-left: 25px; font-size: 15px; color: #595959; list-style-type: circle;"> <li><section style="margin-top: 5px; margin-bottom: 5px; line-height: 26px; text-align: left; font-size: 16px; font-weight: normal; color: #595959;">一种是在网站中增加对请求来源的验证,比如在请求头中增加REFFER信息。</section></li><li><section style="margin-top: 5px; margin-bottom: 5px; line-height: 26px; text-align: left; font-size: 16px; font-weight: normal; color: #595959;">一种是在浏览器中启用SameSite策略。该策略是告诉浏览器,只有请求来源是同网站的才能发送cookie,跨站的请求不要发送cookie。但这种也有漏洞,就是依赖于浏览器是否支持这种策略。</section></li><li><section style="margin-top: 5px; margin-bottom: 5px; line-height: 26px; text-align: left; font-size: 16px; font-weight: normal; color: #595959;">一种是使用Token信息。由网站自己决定token的生成策略以及对token的验证。</section></li></ul> <p style="padding-top: 8px; padding-bottom: 8px; line-height: 26px; color: #2b2b2b; margin: 10px 0px; letter-spacing: 2px; font-size: 16px; word-spacing: 2px;">其中使用Token信息这种是三种方法中最安全的一种。接下来我们就看看今天要推荐的CSRF包是如何利用token进行预防的。</p> <h1 style="margin-top: 30px; margin-bottom: 15px; padding: 0px; font-weight: bold; color: black; font-size: 25px;"><span class="prefix" style="font-weight: bold; color: #4CAF50; display: none;"></span><span class="content" style="display: inline-block; font-weight: bold; color: #4CAF50;">第二部分 CSRF包的使用及其实现原理</span><span class="suffix" style="display: inline-block; font-weight: bold; color: #4CAF50;"></span></h1> <h2 style="margin-top: 30px; margin-bottom: 15px; padding: 0px; font-weight: bold; color: black; font-size: 22px; display: block; border-bottom: 4px solid #4CAF50;"><span class="prefix" style="display: none;"></span><span class="content" style="display: flex; color: #4CAF50; font-size: 20px;">三、CSRF包的使用及实现原理</span><span class="suffix" style="display: flex; box-sizing: border-box; width: 20px; height: 10px; border-top-left-radius: 20px; border-top-right-radius: 20px; background: RGBA(76, 175, 80, .5); color: rgb(255, 255, 255); font-size: 16px; letter-spacing: 0.544px; justify-content: flex-end; float: right; margin-top: -10px; box-sizing: border-box !important; overflow-wrap: break-word !important;"></span></h2> <h3 style="padding: 0px; color: black; font-size: 17px; font-weight: bold; text-align: center; position: relative; margin-top: 20px; margin-bottom: 20px;"><span class="prefix" style="display: none;"></span><span class="content" style="color: #2b2b2b; padding-bottom: 2px;"><span style="width: 30px; height: 30px; display: block; background-image: url(https://files.mdnice.com/grass-green.png); background-position: center; background-size: 30px; margin: auto; opacity: 1; background-repeat: no-repeat; margin-bottom: -8px;"></span>csrf包的安装</span><span class="suffix" style="display: none;"></span></h3> <pre class="custom" style="margin-top: 10px; margin-bottom: 10px; border-radius: 5px; box-shadow: rgba(0, 0, 0, 0.55) 0px 2px 10px;"><span style="display: block; background: url(https://files.mdnice.com/user/3441/876cad08-0422-409d-bb5a-08afec5da8ee.svg); height: 30px; width: 100%; background-size: 40px; background-repeat: no-repeat; background-color: #282c34; margin-bottom: -7px; border-radius: 5px; background-position: 10px 10px;"></span><code class="hljs" style="overflow-x: auto; padding: 16px; color: #abb2bf; display: -webkit-box; font-family: Operator Mono, Consolas, Monaco, Menlo, monospace; font-size: 12px; -webkit-overflow-scrolling: touch; letter-spacing: 0px; padding-top: 15px; background: #282c34; border-radius: 5px;"><span class="hljs-keyword" style="color: #c678dd; line-height: 26px;">go</span>&nbsp;get&nbsp;github.com/gorilla/csrf<br></code></pre> <h3 style="padding: 0px; color: black; font-size: 17px; font-weight: bold; text-align: center; position: relative; margin-top: 20px; margin-bottom: 20px;"><span class="prefix" style="display: none;"></span><span class="content" style="color: #2b2b2b; padding-bottom: 2px;"><span style="width: 30px; height: 30px; display: block; background-image: url(https://files.mdnice.com/grass-green.png); background-position: center; background-size: 30px; margin: auto; opacity: 1; background-repeat: no-repeat; margin-bottom: -8px;"></span>基本使用</span><span class="suffix" style="display: none;"></span></h3> <p style="padding-top: 8px; padding-bottom: 8px; line-height: 26px; color: #2b2b2b; margin: 10px 0px; letter-spacing: 2px; font-size: 16px; word-spacing: 2px;">该包主要包括三个功能:</p> <ul style="margin-top: 8px; margin-bottom: 8px; padding-left: 25px; font-size: 15px; color: #595959; list-style-type: circle;"> <li><section style="margin-top: 5px; margin-bottom: 5px; line-height: 26px; text-align: left; font-size: 16px; font-weight: normal; color: #595959;">通过csrf.Protect函数生成一个csrf中间件或请求处理器,用于后续的生成及校验token的流程。</section></li><li><section style="margin-top: 5px; margin-bottom: 5px; line-height: 26px; text-align: left; font-size: 16px; font-weight: normal; color: #595959;">通过csrf.Token函数,可以在响应中输出当前生成的token值。</section></li><li><section style="margin-top: 5px; margin-bottom: 5px; line-height: 26px; text-align: left; font-size: 16px; font-weight: normal; color: #595959;">通过csrf.TemplateField函数,可以在html模版中输出一个hidden的input,用于在form表单中提交token。</section></li></ul> <p style="padding-top: 8px; padding-bottom: 8px; line-height: 26px; color: #2b2b2b; margin: 10px 0px; letter-spacing: 2px; font-size: 16px; word-spacing: 2px;">该包的使用很简单。首先通过csrf.Protect函数生成一个中间件或请求处理器,然后在启动web server时对真实的请求处理器进行包装。</p> <p style="padding-top: 8px; padding-bottom: 8px; line-height: 26px; color: #2b2b2b; margin: 10px 0px; letter-spacing: 2px; font-size: 16px; word-spacing: 2px;">我们来看下该包和主流web框架结合使用的实例。</p> <h4 style="margin-top: 30px; margin-bottom: 15px; padding: 0px; font-weight: bold; color: black; font-size: 18px;"><span class="prefix" style="display: none;"></span><span class="content" style="height: 16px; line-height: 16px; font-size: 16px;">使用net/http包启动的服务</span><span class="suffix" style="display: none;"></span></h4> <pre class="custom" style="margin-top: 10px; margin-bottom: 10px; border-radius: 5px; box-shadow: rgba(0, 0, 0, 0.55) 0px 2px 10px;"><span style="display: block; background: url(https://files.mdnice.com/user/3441/876cad08-0422-409d-bb5a-08afec5da8ee.svg); height: 30px; width: 100%; background-size: 40px; background-repeat: no-repeat; background-color: #282c34; margin-bottom: -7px; border-radius: 5px; background-position: 10px 10px;"></span><code class="hljs" style="overflow-x: auto; padding: 16px; color: #abb2bf; display: -webkit-box; font-family: Operator Mono, Consolas, Monaco, Menlo, monospace; font-size: 12px; -webkit-overflow-scrolling: touch; letter-spacing: 0px; padding-top: 15px; background: #282c34; border-radius: 5px;"><span class="hljs-keyword" style="color: #c678dd; line-height: 26px;">package</span>&nbsp;main<br><br><span class="hljs-keyword" style="color: #c678dd; line-height: 26px;">import</span>&nbsp;(<br>&nbsp;<span class="hljs-string" style="color: #98c379; line-height: 26px;">"fmt"</span><br>&nbsp;<span class="hljs-string" style="color: #98c379; line-height: 26px;">"github.com/gorilla/csrf"</span><br>&nbsp;<span class="hljs-string" style="color: #98c379; line-height: 26px;">"net/http"</span><br>)<br><br><span class="hljs-function" style="line-height: 26px;"><span class="hljs-keyword" style="color: #c678dd; line-height: 26px;">func</span>&nbsp;<span class="hljs-title" style="color: #61aeee; line-height: 26px;">main</span><span class="hljs-params" style="line-height: 26px;">()</span></span>&nbsp;{<br>&nbsp;muxServer&nbsp;:=&nbsp;http.NewServeMux()<br><br>&nbsp;muxServer.HandleFunc(<span class="hljs-string" style="color: #98c379; line-height: 26px;">"/"</span>,&nbsp;IndexHandler)<br><br>&nbsp;CSRF&nbsp;:=&nbsp;csrf.Protect([]<span class="hljs-keyword" style="color: #c678dd; line-height: 26px;">byte</span>(<span class="hljs-string" style="color: #98c379; line-height: 26px;">"32-byte-long-auth-key"</span>))<br><br>&nbsp;http.ListenAndServe(<span class="hljs-string" style="color: #98c379; line-height: 26px;">":8000"</span>,&nbsp;CSRF(muxServer))<br>}<br><br><span class="hljs-function" style="line-height: 26px;"><span class="hljs-keyword" style="color: #c678dd; line-height: 26px;">func</span>&nbsp;<span class="hljs-title" style="color: #61aeee; line-height: 26px;">IndexHandler</span><span class="hljs-params" style="line-height: 26px;">(w&nbsp;http.ResponseWriter,&nbsp;r&nbsp;*http.Request)</span></span>&nbsp;{<br>&nbsp;&nbsp;&nbsp;&nbsp;<span class="hljs-comment" style="color: #5c6370; font-style: italic; line-height: 26px;">//&nbsp;获取token值</span><br>&nbsp;token&nbsp;:=&nbsp;csrf.Token(r)<br>&nbsp;&nbsp;&nbsp;&nbsp;<span class="hljs-comment" style="color: #5c6370; font-style: italic; line-height: 26px;">//&nbsp;将token写入到header中</span><br>&nbsp;w.Header().Set(<span class="hljs-string" style="color: #98c379; line-height: 26px;">"X-CSRF-Token"</span>,&nbsp;token)<br>&nbsp;fmt.Fprintln(w,&nbsp;<span class="hljs-string" style="color: #98c379; line-height: 26px;">"hello&nbsp;world.Go"</span>)<br>}<br></code></pre> <h4 style="margin-top: 30px; margin-bottom: 15px; padding: 0px; font-weight: bold; color: black; font-size: 18px;"><span class="prefix" style="display: none;"></span><span class="content" style="height: 16px; line-height: 16px; font-size: 16px;">echo框架下使用csrf包</span><span class="suffix" style="display: none;"></span></h4> <pre class="custom" style="margin-top: 10px; margin-bottom: 10px; border-radius: 5px; box-shadow: rgba(0, 0, 0, 0.55) 0px 2px 10px;"><span style="display: block; background: url(https://files.mdnice.com/user/3441/876cad08-0422-409d-bb5a-08afec5da8ee.svg); height: 30px; width: 100%; background-size: 40px; background-repeat: no-repeat; background-color: #282c34; margin-bottom: -7px; border-radius: 5px; background-position: 10px 10px;"></span><code class="hljs" style="overflow-x: auto; padding: 16px; color: #abb2bf; display: -webkit-box; font-family: Operator Mono, Consolas, Monaco, Menlo, monospace; font-size: 12px; -webkit-overflow-scrolling: touch; letter-spacing: 0px; padding-top: 15px; background: #282c34; border-radius: 5px;"><span class="hljs-keyword" style="color: #c678dd; line-height: 26px;">package</span>&nbsp;main<br><br><span class="hljs-keyword" style="color: #c678dd; line-height: 26px;">import</span>&nbsp;(<br>&nbsp;<span class="hljs-string" style="color: #98c379; line-height: 26px;">"github.com/gorilla/csrf"</span><br>&nbsp;<span class="hljs-string" style="color: #98c379; line-height: 26px;">"net/http"</span><br><br>&nbsp;<span class="hljs-string" style="color: #98c379; line-height: 26px;">"github.com/labstack/echo"</span><br>)<br><br><span class="hljs-function" style="line-height: 26px;"><span class="hljs-keyword" style="color: #c678dd; line-height: 26px;">func</span>&nbsp;<span class="hljs-title" style="color: #61aeee; line-height: 26px;">main</span><span class="hljs-params" style="line-height: 26px;">()</span></span>&nbsp;{<br>&nbsp;e&nbsp;:=&nbsp;echo.New()<br>&nbsp;e.POST(<span class="hljs-string" style="color: #98c379; line-height: 26px;">"/"</span>,&nbsp;<span class="hljs-function" style="line-height: 26px;"><span class="hljs-keyword" style="color: #c678dd; line-height: 26px;">func</span><span class="hljs-params" style="line-height: 26px;">(c&nbsp;echo.Context)</span>&nbsp;<span class="hljs-title" style="color: #61aeee; line-height: 26px;">error</span></span>&nbsp;{<br>&nbsp;&nbsp;<span class="hljs-keyword" style="color: #c678dd; line-height: 26px;">return</span>&nbsp;c.String(http.StatusOK,&nbsp;<span class="hljs-string" style="color: #98c379; line-height: 26px;">"Hello,&nbsp;World!"</span>)<br>&nbsp;})<br>&nbsp;&nbsp;&nbsp;&nbsp;<br>&nbsp;&nbsp;&nbsp;&nbsp;<span class="hljs-comment" style="color: #5c6370; font-style: italic; line-height: 26px;">//&nbsp;使用自定义的CSRF中间件</span><br>&nbsp;e.Use(CSRFMiddle())<br>&nbsp;e.Logger.Fatal(e.Start(<span class="hljs-string" style="color: #98c379; line-height: 26px;">":8080"</span>))<br>}<br><br><span class="hljs-comment" style="color: #5c6370; font-style: italic; line-height: 26px;">//&nbsp;自定义CSRF中间件</span><br><span class="hljs-function" style="line-height: 26px;"><span class="hljs-keyword" style="color: #c678dd; line-height: 26px;">func</span>&nbsp;<span class="hljs-title" style="color: #61aeee; line-height: 26px;">CSRFMiddle</span><span class="hljs-params" style="line-height: 26px;">()</span>&nbsp;<span class="hljs-title" style="color: #61aeee; line-height: 26px;">echo</span>.<span class="hljs-title" style="color: #61aeee; line-height: 26px;">MiddlewareFunc</span></span>&nbsp;{<br>&nbsp;csrfMiddleware&nbsp;:=&nbsp;csrf.Protect([]<span class="hljs-keyword" style="color: #c678dd; line-height: 26px;">byte</span>(<span class="hljs-string" style="color: #98c379; line-height: 26px;">"32-byte-long-auth-key"</span>))<br>&nbsp;<span class="hljs-comment" style="color: #5c6370; font-style: italic; line-height: 26px;">//&nbsp;这里使用echo的WrapMiddleware函数将csrfMiddleware转换成echo的中间件返回值</span><br>&nbsp;<span class="hljs-keyword" style="color: #c678dd; line-height: 26px;">return</span>&nbsp;echo.WrapMiddleware(csrfMiddleware)<br>}<br></code></pre> <h4 style="margin-top: 30px; margin-bottom: 15px; padding: 0px; font-weight: bold; color: black; font-size: 18px;"><span class="prefix" style="display: none;"></span><span class="content" style="height: 16px; line-height: 16px; font-size: 16px;">gin框架下使用csrf包</span><span class="suffix" style="display: none;"></span></h4> <pre class="custom" style="margin-top: 10px; margin-bottom: 10px; border-radius: 5px; box-shadow: rgba(0, 0, 0, 0.55) 0px 2px 10px;"><span style="display: block; background: url(https://files.mdnice.com/user/3441/876cad08-0422-409d-bb5a-08afec5da8ee.svg); height: 30px; width: 100%; background-size: 40px; background-repeat: no-repeat; background-color: #282c34; margin-bottom: -7px; border-radius: 5px; background-position: 10px 10px;"></span><code class="hljs" style="overflow-x: auto; padding: 16px; color: #abb2bf; display: -webkit-box; font-family: Operator Mono, Consolas, Monaco, Menlo, monospace; font-size: 12px; -webkit-overflow-scrolling: touch; letter-spacing: 0px; padding-top: 15px; background: #282c34; border-radius: 5px;"><span class="hljs-keyword" style="color: #c678dd; line-height: 26px;">import</span>&nbsp;(<br>&nbsp;<span class="hljs-string" style="color: #98c379; line-height: 26px;">"fmt"</span><br>&nbsp;<span class="hljs-string" style="color: #98c379; line-height: 26px;">"github.com/gin-gonic/gin"</span><br>&nbsp;<span class="hljs-string" style="color: #98c379; line-height: 26px;">"github.com/gorilla/csrf"</span><br>&nbsp;adapter&nbsp;<span class="hljs-string" style="color: #98c379; line-height: 26px;">"github.com/gwatts/gin-adapter"</span><br>)<br><br><span class="hljs-comment" style="color: #5c6370; font-style: italic; line-height: 26px;">//&nbsp;&nbsp;定义中间件</span><br><span class="hljs-function" style="line-height: 26px;"><span class="hljs-keyword" style="color: #c678dd; line-height: 26px;">func</span>&nbsp;<span class="hljs-title" style="color: #61aeee; line-height: 26px;">CSRFMiddle</span><span class="hljs-params" style="line-height: 26px;">()</span>&nbsp;<span class="hljs-title" style="color: #61aeee; line-height: 26px;">gin</span>.<span class="hljs-title" style="color: #61aeee; line-height: 26px;">HandlerFunc</span></span>&nbsp;{<br>&nbsp;csrfMiddleware&nbsp;:=&nbsp;csrf.Protect([]<span class="hljs-keyword" style="color: #c678dd; line-height: 26px;">byte</span>(<span class="hljs-string" style="color: #98c379; line-height: 26px;">"32-byte-long-auth-key"</span>))<br>&nbsp;&nbsp;&nbsp;&nbsp;<span class="hljs-comment" style="color: #5c6370; font-style: italic; line-height: 26px;">//&nbsp;这里使用adpater包将csrfMiddleware转换成gin的中间件返回值</span><br>&nbsp;<span class="hljs-keyword" style="color: #c678dd; line-height: 26px;">return</span>&nbsp;adapter.Wrap(csrfMiddleware)<br>}<br><br><br><span class="hljs-function" style="line-height: 26px;"><span class="hljs-keyword" style="color: #c678dd; line-height: 26px;">func</span>&nbsp;<span class="hljs-title" style="color: #61aeee; line-height: 26px;">main</span><span class="hljs-params" style="line-height: 26px;">()</span></span>&nbsp;{<br>&nbsp;r&nbsp;:=&nbsp;gin.New()<br><br>&nbsp;&nbsp;&nbsp;&nbsp;<span class="hljs-comment" style="color: #5c6370; font-style: italic; line-height: 26px;">//&nbsp;在路由中使用中间件</span><br>&nbsp;r.Use(CSRFMiddle())<br><br>&nbsp;&nbsp;&nbsp;&nbsp;<span class="hljs-comment" style="color: #5c6370; font-style: italic; line-height: 26px;">//&nbsp;定义路由</span><br>&nbsp;r.POST(<span class="hljs-string" style="color: #98c379; line-height: 26px;">"/"</span>,&nbsp;IndexHandler)<br><br>&nbsp;&nbsp;&nbsp;&nbsp;<span class="hljs-comment" style="color: #5c6370; font-style: italic; line-height: 26px;">//&nbsp;启动http服务</span><br>&nbsp;r.Run(<span class="hljs-string" style="color: #98c379; line-height: 26px;">":8080"</span>)<br>}<br><br><span class="hljs-function" style="line-height: 26px;"><span class="hljs-keyword" style="color: #c678dd; line-height: 26px;">func</span>&nbsp;<span class="hljs-title" style="color: #61aeee; line-height: 26px;">IndexHandler</span><span class="hljs-params" style="line-height: 26px;">(ctx&nbsp;*gin.Context)</span></span>&nbsp;{<br>&nbsp;ctx.String(<span class="hljs-number" style="color: #d19a66; line-height: 26px;">200</span>,&nbsp;<span class="hljs-string" style="color: #98c379; line-height: 26px;">"hello&nbsp;world"</span>)<br>}<br></code></pre> <h4 style="margin-top: 30px; margin-bottom: 15px; padding: 0px; font-weight: bold; color: black; font-size: 18px;"><span class="prefix" style="display: none;"></span><span class="content" style="height: 16px; line-height: 16px; font-size: 16px;">beego框架下使用csrf包</span><span class="suffix" style="display: none;"></span></h4> <pre class="custom" style="margin-top: 10px; margin-bottom: 10px; border-radius: 5px; box-shadow: rgba(0, 0, 0, 0.55) 0px 2px 10px;"><span style="display: block; background: url(https://files.mdnice.com/user/3441/876cad08-0422-409d-bb5a-08afec5da8ee.svg); height: 30px; width: 100%; background-size: 40px; background-repeat: no-repeat; background-color: #282c34; margin-bottom: -7px; border-radius: 5px; background-position: 10px 10px;"></span><code class="hljs" style="overflow-x: auto; padding: 16px; color: #abb2bf; display: -webkit-box; font-family: Operator Mono, Consolas, Monaco, Menlo, monospace; font-size: 12px; -webkit-overflow-scrolling: touch; letter-spacing: 0px; padding-top: 15px; background: #282c34; border-radius: 5px;">package&nbsp;main<br><br>import&nbsp;(<br>&nbsp;"github.com/beego/beego"<br>&nbsp;"github.com/gorilla/csrf"<br>)<br><br><br>func&nbsp;main()&nbsp;{<br>&nbsp;beego.Router("/",&nbsp;&amp;MainController{})<br><br>&nbsp;beego.RunWithMiddleWares(":8080",&nbsp;CSRFMiddle())<br>}<br><br>type&nbsp;MainController&nbsp;struct&nbsp;{<br>&nbsp;beego.Controller<br>}<br><br>func&nbsp;(this&nbsp;*MainController)&nbsp;Get()&nbsp;{<br>&nbsp;this.Ctx.Output.Body([]byte("Hello&nbsp;World"))<br>}<br><br>func&nbsp;CSRFMiddle()&nbsp;beego.MiddleWare&nbsp;{<br>&nbsp;csrfMiddleware&nbsp;:=&nbsp;csrf.Protect([]byte("32-byte-long-auth-key"))<br>&nbsp;//&nbsp;这里使用adpater包将csrfMiddleware转换成gin的中间件返回值<br>&nbsp;return&nbsp;csrfMiddleware<br>}<br></code></pre> <p style="padding-top: 8px; padding-bottom: 8px; line-height: 26px; color: #2b2b2b; margin: 10px 0px; letter-spacing: 2px; font-size: 16px; word-spacing: 2px;">实际上,要通过token预防CSRF主要做以下3件事情:每次生成一个唯一的token、将token写入到cookie同时下发给客户端、校验token。接下来我们就来看看csrf包是如何实现如上步骤的。</p> <h3 style="padding: 0px; color: black; font-size: 17px; font-weight: bold; text-align: center; position: relative; margin-top: 20px; margin-bottom: 20px;"><span class="prefix" style="display: none;"></span><span class="content" style="color: #2b2b2b; padding-bottom: 2px;"><span style="width: 30px; height: 30px; display: block; background-image: url(https://files.mdnice.com/grass-green.png); background-position: center; background-size: 30px; margin: auto; opacity: 1; background-repeat: no-repeat; margin-bottom: -8px;"></span>实现原理</span><span class="suffix" style="display: none;"></span></h3> <h4 style="margin-top: 30px; margin-bottom: 15px; padding: 0px; font-weight: bold; color: black; font-size: 18px;"><span class="prefix" style="display: none;"></span><span class="content" style="height: 16px; line-height: 16px; font-size: 16px;">csrf结构体</span><span class="suffix" style="display: none;"></span></h4> <p style="padding-top: 8px; padding-bottom: 8px; line-height: 26px; color: #2b2b2b; margin: 10px 0px; letter-spacing: 2px; font-size: 16px; word-spacing: 2px;">该包的实现是基于csrf这样一个结构体:</p> <pre class="custom" style="margin-top: 10px; margin-bottom: 10px; border-radius: 5px; box-shadow: rgba(0, 0, 0, 0.55) 0px 2px 10px;"><span style="display: block; background: url(https://files.mdnice.com/user/3441/876cad08-0422-409d-bb5a-08afec5da8ee.svg); height: 30px; width: 100%; background-size: 40px; background-repeat: no-repeat; background-color: #282c34; margin-bottom: -7px; border-radius: 5px; background-position: 10px 10px;"></span><code class="hljs" style="overflow-x: auto; padding: 16px; color: #abb2bf; display: -webkit-box; font-family: Operator Mono, Consolas, Monaco, Menlo, monospace; font-size: 12px; -webkit-overflow-scrolling: touch; letter-spacing: 0px; padding-top: 15px; background: #282c34; border-radius: 5px;"><span class="hljs-keyword" style="color: #c678dd; line-height: 26px;">type</span>&nbsp;csrf&nbsp;<span class="hljs-keyword" style="color: #c678dd; line-height: 26px;">struct</span>&nbsp;{<br>&nbsp;h&nbsp;&nbsp;&nbsp;&nbsp;http.Handler<br>&nbsp;sc&nbsp;&nbsp;&nbsp;*securecookie.SecureCookie<br>&nbsp;st&nbsp;&nbsp;&nbsp;store<br>&nbsp;opts&nbsp;options<br>}<br></code></pre> <p style="padding-top: 8px; padding-bottom: 8px; line-height: 26px; color: #2b2b2b; margin: 10px 0px; letter-spacing: 2px; font-size: 16px; word-spacing: 2px;">该结构体同时实现了一个ServeHTTP方法:</p> <pre class="custom" style="margin-top: 10px; margin-bottom: 10px; border-radius: 5px; box-shadow: rgba(0, 0, 0, 0.55) 0px 2px 10px;"><span style="display: block; background: url(https://files.mdnice.com/user/3441/876cad08-0422-409d-bb5a-08afec5da8ee.svg); height: 30px; width: 100%; background-size: 40px; background-repeat: no-repeat; background-color: #282c34; margin-bottom: -7px; border-radius: 5px; background-position: 10px 10px;"></span><code class="hljs" style="overflow-x: auto; padding: 16px; color: #abb2bf; display: -webkit-box; font-family: Operator Mono, Consolas, Monaco, Menlo, monospace; font-size: 12px; -webkit-overflow-scrolling: touch; letter-spacing: 0px; padding-top: 15px; background: #282c34; border-radius: 5px;"><span class="hljs-function" style="line-height: 26px;"><span class="hljs-keyword" style="color: #c678dd; line-height: 26px;">func</span>&nbsp;<span class="hljs-params" style="line-height: 26px;">(cs&nbsp;*csrf)</span>&nbsp;<span class="hljs-title" style="color: #61aeee; line-height: 26px;">ServeHTTP</span><span class="hljs-params" style="line-height: 26px;">(w&nbsp;http.ResponseWriter,&nbsp;r&nbsp;*http.Request)</span></span><br></code></pre> <p style="padding-top: 8px; padding-bottom: 8px; line-height: 26px; color: #2b2b2b; margin: 10px 0px; letter-spacing: 2px; font-size: 16px; word-spacing: 2px;">在Go中,我们知道ServeHTTP是在内建包net/http中定义的一个请求处理器的接口:</p> <pre class="custom" style="margin-top: 10px; margin-bottom: 10px; border-radius: 5px; box-shadow: rgba(0, 0, 0, 0.55) 0px 2px 10px;"><span style="display: block; background: url(https://files.mdnice.com/user/3441/876cad08-0422-409d-bb5a-08afec5da8ee.svg); height: 30px; width: 100%; background-size: 40px; background-repeat: no-repeat; background-color: #282c34; margin-bottom: -7px; border-radius: 5px; background-position: 10px 10px;"></span><code class="hljs" style="overflow-x: auto; padding: 16px; color: #abb2bf; display: -webkit-box; font-family: Operator Mono, Consolas, Monaco, Menlo, monospace; font-size: 12px; -webkit-overflow-scrolling: touch; letter-spacing: 0px; padding-top: 15px; background: #282c34; border-radius: 5px;"><span class="hljs-keyword" style="color: #c678dd; line-height: 26px;">type</span>&nbsp;Handler&nbsp;<span class="hljs-keyword" style="color: #c678dd; line-height: 26px;">interface</span>&nbsp;{<br>&nbsp;ServeHTTP(ResponseWriter,&nbsp;*Request)<br>}<br></code></pre> <p style="padding-top: 8px; padding-bottom: 8px; line-height: 26px; color: #2b2b2b; margin: 10px 0px; letter-spacing: 2px; font-size: 16px; word-spacing: 2px;">凡是实现了该接口的结构体就能作为请求的处理器。在go的所有web框架中,处理器本质上也都是基于该接口实现的。</p> <p style="padding-top: 8px; padding-bottom: 8px; line-height: 26px; color: #2b2b2b; margin: 10px 0px; letter-spacing: 2px; font-size: 16px; word-spacing: 2px;">好了,现在我们来分析下csrf这个结构体的成员:</p> <ul style="margin-top: 8px; margin-bottom: 8px; padding-left: 25px; font-size: 15px; color: #595959; list-style-type: circle;"> <li><section style="margin-top: 5px; margin-bottom: 5px; line-height: 26px; text-align: left; font-size: 16px; font-weight: normal; color: #595959;"><strong style="color: #399003; font-weight: bold;"><span>「</span>h<span>」</span></strong>:是一个http.Handler,作为实际处理请求的处理器。该h的来源是经Protect函数返回值包装后的,即开始示例中CSRF(muxServer)中的muxServer。又因为csrf也是一个请求处理器,请求就会先执行csrf的ServeHTTP方法的逻辑,如果通过了,再执行h的ServeHTTP逻辑。</section></li><li><section style="margin-top: 5px; margin-bottom: 5px; line-height: 26px; text-align: left; font-size: 16px; font-weight: normal; color: #595959;"><strong style="color: #399003; font-weight: bold;"><span>「</span>sc<span>」</span></strong>:类型是*securecookie.SecureCookie,第三方包,该包的作用是对cookie的值进行加密/解密。在调用csrf.Protect方法时,传递的第一个32字节长的参数就是用于该包进行对称加密用的秘钥。下一篇文章我们会详细介绍该包是如何实现对cookie内容进行/加解密的。</section></li><li><section style="margin-top: 5px; margin-bottom: 5px; line-height: 26px; text-align: left; font-size: 16px; font-weight: normal; color: #595959;"><strong style="color: #399003; font-weight: bold;"><span>「</span>st<span>」</span></strong>:类型是store,是csrf包中定义的一个接口类型。该属性的作用是将token存储在什么地方。默认是使用cookieStore类型。即将token存储在cookie中。</section></li><li><section style="margin-top: 5px; margin-bottom: 5px; line-height: 26px; text-align: left; font-size: 16px; font-weight: normal; color: #595959;"><strong style="color: #399003; font-weight: bold;"><span>「</span>opts<span>」</span></strong>:Options属性,用于设置csrf的选项的。比如token存储在cookie中的名字,token在表单中的名字等。</section></li></ul> <p style="padding-top: 8px; padding-bottom: 8px; line-height: 26px; color: #2b2b2b; margin: 10px 0px; letter-spacing: 2px; font-size: 16px; word-spacing: 2px;">这里大家可能有这样一个疑问:csrf攻击就是基于cookie来进行攻击的,为什么还要把token存储在cookie中呢?在一次请求中,会有两个地方存储token:一个是cookie中,一个是请求体中(query中,header中,或form中),当服务端收到请求时,会同时取出这两个地方的token,进而进行比较。所以如果攻击者伪造了一个请求,服务器能接收到cookie中的token,但不能接收到请求体中的token,所以伪造的攻击还是无效的。</p> <h4 style="margin-top: 30px; margin-bottom: 15px; padding: 0px; font-weight: bold; color: black; font-size: 18px;"><span class="prefix" style="display: none;"></span><span class="content" style="height: 16px; line-height: 16px; font-size: 16px;">csrf包的工作流程</span><span class="suffix" style="display: none;"></span></h4> <p style="padding-top: 8px; padding-bottom: 8px; line-height: 26px; color: #2b2b2b; margin: 10px 0px; letter-spacing: 2px; font-size: 16px; word-spacing: 2px;">在开始的“使用net/http包启动的服务”示例中,我们先调用了Protect方法,然后又用返回值对muxServer进行了包装。大家是不是有点云里雾里,为什么要这么调用呢?接下来咱们就来分析下Protect这个函数以及csrf包的工作流程。</p> <p style="padding-top: 8px; padding-bottom: 8px; line-height: 26px; color: #2b2b2b; margin: 10px 0px; letter-spacing: 2px; font-size: 16px; word-spacing: 2px;">在使用csrf的时候,首先要调用的就是Protect函数。Protect的定义如下:</p> <pre class="custom" style="margin-top: 10px; margin-bottom: 10px; border-radius: 5px; box-shadow: rgba(0, 0, 0, 0.55) 0px 2px 10px;"><span style="display: block; background: url(https://files.mdnice.com/user/3441/876cad08-0422-409d-bb5a-08afec5da8ee.svg); height: 30px; width: 100%; background-size: 40px; background-repeat: no-repeat; background-color: #282c34; margin-bottom: -7px; border-radius: 5px; background-position: 10px 10px;"></span><code class="hljs" style="overflow-x: auto; padding: 16px; color: #abb2bf; display: -webkit-box; font-family: Operator Mono, Consolas, Monaco, Menlo, monospace; font-size: 12px; -webkit-overflow-scrolling: touch; letter-spacing: 0px; padding-top: 15px; background: #282c34; border-radius: 5px;"><span class="hljs-function" style="line-height: 26px;"><span class="hljs-keyword" style="color: #c678dd; line-height: 26px;">func</span>&nbsp;<span class="hljs-title" style="color: #61aeee; line-height: 26px;">Protect</span><span class="hljs-params" style="line-height: 26px;">(authKey&nbsp;[]<span class="hljs-keyword" style="color: #c678dd; line-height: 26px;">byte</span>,&nbsp;opts&nbsp;...Option)</span>&nbsp;<span class="hljs-title" style="color: #61aeee; line-height: 26px;">func</span><span class="hljs-params" style="line-height: 26px;">(http.Handler)</span>&nbsp;<span class="hljs-title" style="color: #61aeee; line-height: 26px;">http</span>.<span class="hljs-title" style="color: #61aeee; line-height: 26px;">Handler</span></span><br></code></pre> <p style="padding-top: 8px; padding-bottom: 8px; line-height: 26px; color: #2b2b2b; margin: 10px 0px; letter-spacing: 2px; font-size: 16px; word-spacing: 2px;">该函数接收一个秘钥和一个选项切片参数。返回值是一个函数类型:func(http.Handler) http.Handler。实际的执行逻辑是在返回的函数中。如下:</p> <pre class="custom" style="margin-top: 10px; margin-bottom: 10px; border-radius: 5px; box-shadow: rgba(0, 0, 0, 0.55) 0px 2px 10px;"><span style="display: block; background: url(https://files.mdnice.com/user/3441/876cad08-0422-409d-bb5a-08afec5da8ee.svg); height: 30px; width: 100%; background-size: 40px; background-repeat: no-repeat; background-color: #282c34; margin-bottom: -7px; border-radius: 5px; background-position: 10px 10px;"></span><code class="hljs" style="overflow-x: auto; padding: 16px; color: #abb2bf; display: -webkit-box; font-family: Operator Mono, Consolas, Monaco, Menlo, monospace; font-size: 12px; -webkit-overflow-scrolling: touch; letter-spacing: 0px; padding-top: 15px; background: #282c34; border-radius: 5px;">CSRF&nbsp;:=&nbsp;csrf.Protect([]<span class="hljs-keyword" style="color: #c678dd; line-height: 26px;">byte</span>(<span class="hljs-string" style="color: #98c379; line-height: 26px;">"32-byte-long-auth-key"</span>))<br><br>http.ListenAndServe(<span class="hljs-string" style="color: #98c379; line-height: 26px;">":8000"</span>,&nbsp;CSRF(muxServer))<br><br><span class="hljs-comment" style="color: #5c6370; font-style: italic; line-height: 26px;">//&nbsp;Protect源码</span><br><span class="hljs-function" style="line-height: 26px;"><span class="hljs-keyword" style="color: #c678dd; line-height: 26px;">func</span>&nbsp;<span class="hljs-title" style="color: #61aeee; line-height: 26px;">Protect</span><span class="hljs-params" style="line-height: 26px;">(authKey&nbsp;[]<span class="hljs-keyword" style="color: #c678dd; line-height: 26px;">byte</span>,&nbsp;opts&nbsp;...Option)</span>&nbsp;<span class="hljs-title" style="color: #61aeee; line-height: 26px;">func</span><span class="hljs-params" style="line-height: 26px;">(http.Handler)</span>&nbsp;<span class="hljs-title" style="color: #61aeee; line-height: 26px;">http</span>.<span class="hljs-title" style="color: #61aeee; line-height: 26px;">Handler</span></span>&nbsp;{<br>&nbsp;<span class="hljs-keyword" style="color: #c678dd; line-height: 26px;">return</span>&nbsp;<span class="hljs-function" style="line-height: 26px;"><span class="hljs-keyword" style="color: #c678dd; line-height: 26px;">func</span><span class="hljs-params" style="line-height: 26px;">(h&nbsp;http.Handler)</span>&nbsp;<span class="hljs-title" style="color: #61aeee; line-height: 26px;">http</span>.<span class="hljs-title" style="color: #61aeee; line-height: 26px;">Handler</span></span>&nbsp;{<br>&nbsp;&nbsp;cs&nbsp;:=&nbsp;parseOptions(h,&nbsp;opts...)<br><br>&nbsp;&nbsp;<span class="hljs-comment" style="color: #5c6370; font-style: italic; line-height: 26px;">//&nbsp;Set&nbsp;the&nbsp;defaults&nbsp;if&nbsp;no&nbsp;options&nbsp;have&nbsp;been&nbsp;specified</span><br>&nbsp;&nbsp;<span class="hljs-keyword" style="color: #c678dd; line-height: 26px;">if</span>&nbsp;cs.opts.ErrorHandler&nbsp;==&nbsp;<span class="hljs-literal" style="color: #56b6c2; line-height: 26px;">nil</span>&nbsp;{<br>&nbsp;&nbsp;&nbsp;cs.opts.ErrorHandler&nbsp;=&nbsp;http.HandlerFunc(unauthorizedHandler)<br>&nbsp;&nbsp;}<br><br>&nbsp;&nbsp;<span class="hljs-keyword" style="color: #c678dd; line-height: 26px;">if</span>&nbsp;cs.opts.MaxAge&nbsp;&lt;&nbsp;<span class="hljs-number" style="color: #d19a66; line-height: 26px;">0</span>&nbsp;{<br>&nbsp;&nbsp;&nbsp;<span class="hljs-comment" style="color: #5c6370; font-style: italic; line-height: 26px;">//&nbsp;Default&nbsp;of&nbsp;12&nbsp;hours</span><br>&nbsp;&nbsp;&nbsp;cs.opts.MaxAge&nbsp;=&nbsp;defaultAge<br>&nbsp;&nbsp;}<br><br>&nbsp;&nbsp;<span class="hljs-keyword" style="color: #c678dd; line-height: 26px;">if</span>&nbsp;cs.opts.FieldName&nbsp;==&nbsp;<span class="hljs-string" style="color: #98c379; line-height: 26px;">""</span>&nbsp;{<br>&nbsp;&nbsp;&nbsp;cs.opts.FieldName&nbsp;=&nbsp;fieldName<br>&nbsp;&nbsp;}<br><br>&nbsp;&nbsp;<span class="hljs-keyword" style="color: #c678dd; line-height: 26px;">if</span>&nbsp;cs.opts.CookieName&nbsp;==&nbsp;<span class="hljs-string" style="color: #98c379; line-height: 26px;">""</span>&nbsp;{<br>&nbsp;&nbsp;&nbsp;cs.opts.CookieName&nbsp;=&nbsp;cookieName<br>&nbsp;&nbsp;}<br><br>&nbsp;&nbsp;<span class="hljs-keyword" style="color: #c678dd; line-height: 26px;">if</span>&nbsp;cs.opts.RequestHeader&nbsp;==&nbsp;<span class="hljs-string" style="color: #98c379; line-height: 26px;">""</span>&nbsp;{<br>&nbsp;&nbsp;&nbsp;cs.opts.RequestHeader&nbsp;=&nbsp;headerName<br>&nbsp;&nbsp;}<br><br>&nbsp;&nbsp;<span class="hljs-comment" style="color: #5c6370; font-style: italic; line-height: 26px;">//&nbsp;Create&nbsp;an&nbsp;authenticated&nbsp;securecookie&nbsp;instance.</span><br>&nbsp;&nbsp;<span class="hljs-keyword" style="color: #c678dd; line-height: 26px;">if</span>&nbsp;cs.sc&nbsp;==&nbsp;<span class="hljs-literal" style="color: #56b6c2; line-height: 26px;">nil</span>&nbsp;{<br>&nbsp;&nbsp;&nbsp;cs.sc&nbsp;=&nbsp;securecookie.New(authKey,&nbsp;<span class="hljs-literal" style="color: #56b6c2; line-height: 26px;">nil</span>)<br>&nbsp;&nbsp;&nbsp;<span class="hljs-comment" style="color: #5c6370; font-style: italic; line-height: 26px;">//&nbsp;Use&nbsp;JSON&nbsp;serialization&nbsp;(faster&nbsp;than&nbsp;one-off&nbsp;gob&nbsp;encoding)</span><br>&nbsp;&nbsp;&nbsp;cs.sc.SetSerializer(securecookie.JSONEncoder{})<br>&nbsp;&nbsp;&nbsp;<span class="hljs-comment" style="color: #5c6370; font-style: italic; line-height: 26px;">//&nbsp;Set&nbsp;the&nbsp;MaxAge&nbsp;of&nbsp;the&nbsp;underlying&nbsp;securecookie.</span><br>&nbsp;&nbsp;&nbsp;cs.sc.MaxAge(cs.opts.MaxAge)<br>&nbsp;&nbsp;}<br><br>&nbsp;&nbsp;<span class="hljs-keyword" style="color: #c678dd; line-height: 26px;">if</span>&nbsp;cs.st&nbsp;==&nbsp;<span class="hljs-literal" style="color: #56b6c2; line-height: 26px;">nil</span>&nbsp;{<br>&nbsp;&nbsp;&nbsp;<span class="hljs-comment" style="color: #5c6370; font-style: italic; line-height: 26px;">//&nbsp;Default&nbsp;to&nbsp;the&nbsp;cookieStore</span><br>&nbsp;&nbsp;&nbsp;cs.st&nbsp;=&nbsp;&amp;cookieStore{<br>&nbsp;&nbsp;&nbsp;&nbsp;name:&nbsp;&nbsp;&nbsp;&nbsp;&nbsp;cs.opts.CookieName,<br>&nbsp;&nbsp;&nbsp;&nbsp;maxAge:&nbsp;&nbsp;&nbsp;cs.opts.MaxAge,<br>&nbsp;&nbsp;&nbsp;&nbsp;secure:&nbsp;&nbsp;&nbsp;cs.opts.Secure,<br>&nbsp;&nbsp;&nbsp;&nbsp;httpOnly:&nbsp;cs.opts.HttpOnly,<br>&nbsp;&nbsp;&nbsp;&nbsp;sameSite:&nbsp;cs.opts.SameSite,<br>&nbsp;&nbsp;&nbsp;&nbsp;path:&nbsp;&nbsp;&nbsp;&nbsp;&nbsp;cs.opts.Path,<br>&nbsp;&nbsp;&nbsp;&nbsp;domain:&nbsp;&nbsp;&nbsp;cs.opts.Domain,<br>&nbsp;&nbsp;&nbsp;&nbsp;sc:&nbsp;&nbsp;&nbsp;&nbsp;&nbsp;&nbsp;&nbsp;cs.sc,<br>&nbsp;&nbsp;&nbsp;}<br>&nbsp;&nbsp;}<br><br>&nbsp;&nbsp;<span class="hljs-keyword" style="color: #c678dd; line-height: 26px;">return</span>&nbsp;cs<br>&nbsp;}<br>}<br></code></pre> <p style="padding-top: 8px; padding-bottom: 8px; line-height: 26px; color: #2b2b2b; margin: 10px 0px; letter-spacing: 2px; font-size: 16px; word-spacing: 2px;">Protect的实现源码起始很简单,就是在一个闭包中初始化了一个csrf结构体。示例中CSRF就是返回来的<code style="font-size: 14px; word-wrap: break-word; margin: 0 2px; background-color: rgba(27,31,35,.05); font-family: Operator Mono, Consolas, Monaco, Menlo, monospace; word-break: break-all; color: #0bb712; background: rgba(127, 226, 159, 0.48); display: inline-block; padding: 0 2px; border-radius: 2px; height: 21px; line-height: 22px;">func(http.Handler) http.Handler</code>函数。 再调用CSRF(muxServer),执行初始化csrf结构体的实例,同时将muxServer包装到csrf结构体的h属性上,最后将该csrf结构体对象返回。因为csrf结构体也实现了ServeHTTP接口,所以csrf自然也就是可以处理请求的http.Handler类型了。</p> <p style="padding-top: 8px; padding-bottom: 8px; line-height: 26px; color: #2b2b2b; margin: 10px 0px; letter-spacing: 2px; font-size: 16px; word-spacing: 2px;">当一个请求来了之后,先执行csrf结构体中的ServeHTTP方法,然后再执行实际的http.Handler。以最开始的请求为例,csrf包的工作流程如下: ![算法反作弊系统流程图-请求处理流程.png](https://static.golangjob.cn/221028/7482d13d5285977cfa3f53c506d4ad97.png) </p> <p style="padding-top: 8px; padding-bottom: 8px; line-height: 26px; color: #2b2b2b; margin: 10px 0px; letter-spacing: 2px; font-size: 16px; word-spacing: 2px;">大致了解了csrf的工作流程后,我们再来分析各个环节的实现。</p> <ul style="margin-top: 8px; margin-bottom: 8px; padding-left: 25px; font-size: 15px; color: #595959; list-style-type: circle;"> <li><section style="margin-top: 5px; margin-bottom: 5px; line-height: 26px; text-align: left; font-size: 16px; font-weight: normal; color: #595959;"><strong style="color: #399003; font-weight: bold;"><span>「</span>生成唯一的token<span>」</span></strong></section></li></ul> <p style="padding-top: 8px; padding-bottom: 8px; line-height: 26px; color: #2b2b2b; margin: 10px 0px; letter-spacing: 2px; font-size: 16px; word-spacing: 2px;">在该包中生成随机、唯一的token是通过随机数来生成的。主要生成逻辑如下:</p> <pre class="custom" style="margin-top: 10px; margin-bottom: 10px; border-radius: 5px; box-shadow: rgba(0, 0, 0, 0.55) 0px 2px 10px;"><span style="display: block; background: url(https://files.mdnice.com/user/3441/876cad08-0422-409d-bb5a-08afec5da8ee.svg); height: 30px; width: 100%; background-size: 40px; background-repeat: no-repeat; background-color: #282c34; margin-bottom: -7px; border-radius: 5px; background-position: 10px 10px;"></span><code class="hljs" style="overflow-x: auto; padding: 16px; color: #abb2bf; display: -webkit-box; font-family: Operator Mono, Consolas, Monaco, Menlo, monospace; font-size: 12px; -webkit-overflow-scrolling: touch; letter-spacing: 0px; padding-top: 15px; background: #282c34; border-radius: 5px;"><span class="hljs-function" style="line-height: 26px;"><span class="hljs-keyword" style="color: #c678dd; line-height: 26px;">func</span>&nbsp;<span class="hljs-title" style="color: #61aeee; line-height: 26px;">generateRandomBytes</span><span class="hljs-params" style="line-height: 26px;">(n&nbsp;<span class="hljs-keyword" style="color: #c678dd; line-height: 26px;">int</span>)</span>&nbsp;<span class="hljs-params" style="line-height: 26px;">([]<span class="hljs-keyword" style="color: #c678dd; line-height: 26px;">byte</span>,&nbsp;error)</span></span>&nbsp;{<br>&nbsp;b&nbsp;:=&nbsp;<span class="hljs-built_in" style="color: #e6c07b; line-height: 26px;">make</span>([]<span class="hljs-keyword" style="color: #c678dd; line-height: 26px;">byte</span>,&nbsp;n)<br>&nbsp;_,&nbsp;err&nbsp;:=&nbsp;rand.Read(b)<br>&nbsp;<span class="hljs-comment" style="color: #5c6370; font-style: italic; line-height: 26px;">//&nbsp;err&nbsp;==&nbsp;nil&nbsp;only&nbsp;if&nbsp;len(b)&nbsp;==&nbsp;n</span><br>&nbsp;<span class="hljs-keyword" style="color: #c678dd; line-height: 26px;">if</span>&nbsp;err&nbsp;!=&nbsp;<span class="hljs-literal" style="color: #56b6c2; line-height: 26px;">nil</span>&nbsp;{<br>&nbsp;&nbsp;<span class="hljs-keyword" style="color: #c678dd; line-height: 26px;">return</span>&nbsp;<span class="hljs-literal" style="color: #56b6c2; line-height: 26px;">nil</span>,&nbsp;err<br>&nbsp;}<br><br>&nbsp;<span class="hljs-keyword" style="color: #c678dd; line-height: 26px;">return</span>&nbsp;b,&nbsp;<span class="hljs-literal" style="color: #56b6c2; line-height: 26px;">nil</span><br><br>}<br></code></pre> <p style="padding-top: 8px; padding-bottom: 8px; line-height: 26px; color: #2b2b2b; margin: 10px 0px; letter-spacing: 2px; font-size: 16px; word-spacing: 2px;">crypto/rand包中的rand.Read函数可以随机生成指定字节个数的随机数。但这里出的随机数是字节值,如果序列化成字符串则会是乱码。 那如何将字节序列序列化成可见的字符编码呢? 那就是对字节进行编码。这里使用的是标准库中的encoding/json包。该包能够对各种类型进行可视化编码。如果对字节序列进行编码,本质上是使用了base64的标准编码。如下:</p> <pre class="custom" style="margin-top: 10px; margin-bottom: 10px; border-radius: 5px; box-shadow: rgba(0, 0, 0, 0.55) 0px 2px 10px;"><span style="display: block; background: url(https://files.mdnice.com/user/3441/876cad08-0422-409d-bb5a-08afec5da8ee.svg); height: 30px; width: 100%; background-size: 40px; background-repeat: no-repeat; background-color: #282c34; margin-bottom: -7px; border-radius: 5px; background-position: 10px 10px;"></span><code class="hljs" style="overflow-x: auto; padding: 16px; color: #abb2bf; display: -webkit-box; font-family: Operator Mono, Consolas, Monaco, Menlo, monospace; font-size: 12px; -webkit-overflow-scrolling: touch; letter-spacing: 0px; padding-top: 15px; background: #282c34; border-radius: 5px;">realToken&nbsp;:=&nbsp;generateRandomBytes(<span class="hljs-number" style="color: #d19a66; line-height: 26px;">32</span>)<br><br><span class="hljs-comment" style="color: #5c6370; font-style: italic; line-height: 26px;">//编码后,encodeToken是base64编码的字符串</span><br>encodeToken&nbsp;:=&nbsp;json.Encode(realToken)<br></code></pre> <ul style="margin-top: 8px; margin-bottom: 8px; padding-left: 25px; font-size: 15px; color: #595959; list-style-type: circle;"> <li><section style="margin-top: 5px; margin-bottom: 5px; line-height: 26px; text-align: left; font-size: 16px; font-weight: normal; color: #595959;"><strong style="color: #399003; font-weight: bold;"><span>「</span>token的存储位置<span>」</span></strong></section></li></ul> <p style="padding-top: 8px; padding-bottom: 8px; line-height: 26px; color: #2b2b2b; margin: 10px 0px; letter-spacing: 2px; font-size: 16px; word-spacing: 2px;">生成token之后,token会存储在两个位置:</p> <ul style="margin-top: 8px; margin-bottom: 8px; padding-left: 25px; font-size: 15px; color: #595959; list-style-type: circle;"> <li><section style="margin-top: 5px; margin-bottom: 5px; line-height: 26px; text-align: left; font-size: 16px; font-weight: normal; color: #595959;">一个是随响应将token写入cookie中。在cookie中的token将用于下次请求的基准token和请求中携带的token进行比较。该实现是通过csrf中的cookieStore来存储到cookie中的(store类型)。在cookie中name默认是 <code style="font-size: 14px; word-wrap: break-word; margin: 0 2px; background-color: rgba(27,31,35,.05); font-family: Operator Mono, Consolas, Monaco, Menlo, monospace; word-break: break-all; color: #0bb712; background: rgba(127, 226, 159, 0.48); display: inline-block; padding: 0 2px; border-radius: 2px; height: 21px; line-height: 22px;">_gorilla_csrf</code>。同时,通过cookieStore类型存储到cookie的值是经过加密的,加密使用的是securecookie.SecureCookie包</section></li><li><section style="margin-top: 5px; margin-bottom: 5px; line-height: 26px; text-align: left; font-size: 16px; font-weight: normal; color: #595959;">一个是存储在请求的上下文中。存在这里的token是原始token经过转码的,会随着响应下发给客户端,以便下次请求时随请求体一起发送。该实现是通过context.ValueContext存储在请求的上下文中。</section></li></ul> <p style="padding-top: 8px; padding-bottom: 8px; line-height: 26px; color: #2b2b2b; margin: 10px 0px; letter-spacing: 2px; font-size: 16px; word-spacing: 2px;">生成token后为什么要存在cookie中呢?CSRF的攻击原理不就是基于浏览器自动发送cookie造成的吗?攻击者伪造的请求还是会直接从cookie中获取token,附带在请求中不就行了吗?答案是否定的。在请求中保存的token,是经过转码后的,跟cookie中的token不一样。在收到请求时,再对token进行解码,然后再和cookie中的token进行比较。看下下面的实现:</p> <pre class="custom" style="margin-top: 10px; margin-bottom: 10px; border-radius: 5px; box-shadow: rgba(0, 0, 0, 0.55) 0px 2px 10px;"><span style="display: block; background: url(https://files.mdnice.com/user/3441/876cad08-0422-409d-bb5a-08afec5da8ee.svg); height: 30px; width: 100%; background-size: 40px; background-repeat: no-repeat; background-color: #282c34; margin-bottom: -7px; border-radius: 5px; background-position: 10px 10px;"></span><code class="hljs" style="overflow-x: auto; padding: 16px; color: #abb2bf; display: -webkit-box; font-family: Operator Mono, Consolas, Monaco, Menlo, monospace; font-size: 12px; -webkit-overflow-scrolling: touch; letter-spacing: 0px; padding-top: 15px; background: #282c34; border-radius: 5px;"><span class="hljs-function" style="line-height: 26px;"><span class="hljs-keyword" style="color: #c678dd; line-height: 26px;">func</span>&nbsp;<span class="hljs-title" style="color: #61aeee; line-height: 26px;">mask</span><span class="hljs-params" style="line-height: 26px;">(realToken&nbsp;[]<span class="hljs-keyword" style="color: #c678dd; line-height: 26px;">byte</span>,&nbsp;r&nbsp;*http.Request)</span>&nbsp;<span class="hljs-title" style="color: #61aeee; line-height: 26px;">string</span></span>&nbsp;{<br>&nbsp;otp,&nbsp;err&nbsp;:=&nbsp;generateRandomBytes(tokenLength)<br>&nbsp;<span class="hljs-keyword" style="color: #c678dd; line-height: 26px;">if</span>&nbsp;err&nbsp;!=&nbsp;<span class="hljs-literal" style="color: #56b6c2; line-height: 26px;">nil</span>&nbsp;{<br>&nbsp;&nbsp;<span class="hljs-keyword" style="color: #c678dd; line-height: 26px;">return</span>&nbsp;<span class="hljs-string" style="color: #98c379; line-height: 26px;">""</span><br>&nbsp;}<br><br>&nbsp;<span class="hljs-comment" style="color: #5c6370; font-style: italic; line-height: 26px;">//&nbsp;XOR&nbsp;the&nbsp;OTP&nbsp;with&nbsp;the&nbsp;real&nbsp;token&nbsp;to&nbsp;generate&nbsp;a&nbsp;masked&nbsp;token.&nbsp;Append&nbsp;the</span><br>&nbsp;<span class="hljs-comment" style="color: #5c6370; font-style: italic; line-height: 26px;">//&nbsp;OTP&nbsp;to&nbsp;the&nbsp;front&nbsp;of&nbsp;the&nbsp;masked&nbsp;token&nbsp;to&nbsp;allow&nbsp;unmasking&nbsp;in&nbsp;the&nbsp;subsequent</span><br>&nbsp;<span class="hljs-comment" style="color: #5c6370; font-style: italic; line-height: 26px;">//&nbsp;request.</span><br>&nbsp;<span class="hljs-keyword" style="color: #c678dd; line-height: 26px;">return</span>&nbsp;base64.StdEncoding.EncodeToString(<span class="hljs-built_in" style="color: #e6c07b; line-height: 26px;">append</span>(otp,&nbsp;xorToken(otp,&nbsp;realToken)...))<br>}<br></code></pre> <p style="padding-top: 8px; padding-bottom: 8px; line-height: 26px; color: #2b2b2b; margin: 10px 0px; letter-spacing: 2px; font-size: 16px; word-spacing: 2px;">这里我们看到,先生成一个和token一样长度的随机值otp,然后让实际的realToken和opt通过xorToken进行异或操作,将异或操作的结果放到随机值的末尾,然后再进行base64编码产生的。</p> <figure style="margin: 0; margin-top: 10px; margin-bottom: 10px; display: flex; flex-direction: column; justify-content: center; align-items: center;"> ![算法反作弊系统流程图-token编码过程.png](https://static.golangjob.cn/221028/1791665a7fef244c9220407a3257700e.png) </figcaption></figure> <p style="padding-top: 8px; padding-bottom: 8px; line-height: 26px; color: #2b2b2b; margin: 10px 0px; letter-spacing: 2px; font-size: 16px; word-spacing: 2px;">假设一个token是32位的字节,那么最终的maskToken由64位组成。前32位是otp的随机值,后32位是异或之后的token。两个组合起来就是最终的maskToken。如下图: ![算法反作弊系统流程图-masktoken的组成.png](https://static.golangjob.cn/221028/f0f85a1e3754e43906b4e956ad9305d8.png) 这里利用了异或操作的原理来进行转码和解码。我们假设<code style="font-size: 14px; word-wrap: break-word; margin: 0 2px; background-color: rgba(27,31,35,.05); font-family: Operator Mono, Consolas, Monaco, Menlo, monospace; word-break: break-all; color: #0bb712; background: rgba(127, 226, 159, 0.48); display: inline-block; padding: 0 2px; border-radius: 2px; height: 21px; line-height: 22px;"> A ^ B = C</code>。那么会有 <code style="font-size: 14px; word-wrap: break-word; margin: 0 2px; background-color: rgba(27,31,35,.05); font-family: Operator Mono, Consolas, Monaco, Menlo, monospace; word-break: break-all; color: #0bb712; background: rgba(127, 226, 159, 0.48); display: inline-block; padding: 0 2px; border-radius: 2px; height: 21px; line-height: 22px;">A = C ^ B</code></p> <p style="padding-top: 8px; padding-bottom: 8px; line-height: 26px; color: #2b2b2b; margin: 10px 0px; letter-spacing: 2px; font-size: 16px; word-spacing: 2px;">所以,要想还原异或前的真实token值,则从maskToken中取出前32个字节和后32字节,再进行异或操作就能得到真实的token了。然后就可以和cookie中存储的真实的token进行比较了。同时因为经过异或转码的token,攻击者想要进行伪造就很难了。</p> <ul style="margin-top: 8px; margin-bottom: 8px; padding-left: 25px; font-size: 15px; color: #595959; list-style-type: circle;"> <li><section style="margin-top: 5px; margin-bottom: 5px; line-height: 26px; text-align: left; font-size: 16px; font-weight: normal; color: #595959;"><strong style="color: #399003; font-weight: bold;"><span>「</span>输出token<span>」</span></strong></section></li></ul> <p style="padding-top: 8px; padding-bottom: 8px; line-height: 26px; color: #2b2b2b; margin: 10px 0px; letter-spacing: 2px; font-size: 16px; word-spacing: 2px;">在上述我们已经知道经过异或操作对原始token进行了转码,我们叫做maskToken。该token要下发给客户端(HEADER、form或其他位置)。那么,客户端用什么字段来接收呢?</p> <p style="padding-top: 8px; padding-bottom: 8px; line-height: 26px; color: #2b2b2b; margin: 10px 0px; letter-spacing: 2px; font-size: 16px; word-spacing: 2px;">默认情况下,maskToken是存储在以下位置的:</p> <ul style="margin-top: 8px; margin-bottom: 8px; padding-left: 25px; font-size: 15px; color: #595959; list-style-type: circle;"> <li><section style="margin-top: 5px; margin-bottom: 5px; line-height: 26px; text-align: left; font-size: 16px; font-weight: normal; color: #595959;">若在HEADER头中,则保存在名为 X-CSRF-Token 的字段中。</section></li><li><section style="margin-top: 5px; margin-bottom: 5px; line-height: 26px; text-align: left; font-size: 16px; font-weight: normal; color: #595959;">若在form表单,则保存在名为 gorilla.csrf.Token 的input中。</section></li></ul> <p style="padding-top: 8px; padding-bottom: 8px; line-height: 26px; color: #2b2b2b; margin: 10px 0px; letter-spacing: 2px; font-size: 16px; word-spacing: 2px;">当然,我们在初始化csrf的实例时,可以指定保存的位置。例如,我们指定HEADER头中的字段名为 X-CSRF-Token-Request中,则可以使用如下代码:</p> <pre class="custom" style="margin-top: 10px; margin-bottom: 10px; border-radius: 5px; box-shadow: rgba(0, 0, 0, 0.55) 0px 2px 10px;"><span style="display: block; background: url(https://files.mdnice.com/user/3441/876cad08-0422-409d-bb5a-08afec5da8ee.svg); height: 30px; width: 100%; background-size: 40px; background-repeat: no-repeat; background-color: #282c34; margin-bottom: -7px; border-radius: 5px; background-position: 10px 10px;"></span><code class="hljs" style="overflow-x: auto; padding: 16px; color: #abb2bf; display: -webkit-box; font-family: Operator Mono, Consolas, Monaco, Menlo, monospace; font-size: 12px; -webkit-overflow-scrolling: touch; letter-spacing: 0px; padding-top: 15px; background: #282c34; border-radius: 5px;">csrf.Protect([]<span class="hljs-keyword" style="color: #c678dd; line-height: 26px;">byte</span>(<span class="hljs-string" style="color: #98c379; line-height: 26px;">"32-byte-long-auth-key"</span>),&nbsp;<br>&nbsp;&nbsp;&nbsp;&nbsp;&nbsp;&nbsp;&nbsp;&nbsp;&nbsp;&nbsp;&nbsp;&nbsp;&nbsp;RequestHeader(<span class="hljs-string" style="color: #98c379; line-height: 26px;">"X-CSRF-Token-Request"</span>))<br></code></pre> <p style="padding-top: 8px; padding-bottom: 8px; line-height: 26px; color: #2b2b2b; margin: 10px 0px; letter-spacing: 2px; font-size: 16px; word-spacing: 2px;">csrf中可以指定的选项如下:</p> <ul style="margin-top: 8px; margin-bottom: 8px; padding-left: 25px; font-size: 15px; color: #595959; list-style-type: circle;"> <li><section style="margin-top: 5px; margin-bottom: 5px; line-height: 26px; text-align: left; font-size: 16px; font-weight: normal; color: #595959;"><p style="padding-top: 8px; padding-bottom: 8px; line-height: 26px; color: #2b2b2b; margin: 10px 0px; letter-spacing: 2px; font-size: 16px; word-spacing: 2px;">RequestHeader选项函数:指定在HEADER中存储token的字段名称。</p> </section></li><li><section style="margin-top: 5px; margin-bottom: 5px; line-height: 26px; text-align: left; font-size: 16px; font-weight: normal; color: #595959;"><p style="padding-top: 8px; padding-bottom: 8px; line-height: 26px; color: #2b2b2b; margin: 10px 0px; letter-spacing: 2px; font-size: 16px; word-spacing: 2px;">FieldName选项函数:指定form表中存储token的input的name</p> </section></li><li><section style="margin-top: 5px; margin-bottom: 5px; line-height: 26px; text-align: left; font-size: 16px; font-weight: normal; color: #595959;"><p style="padding-top: 8px; padding-bottom: 8px; line-height: 26px; color: #2b2b2b; margin: 10px 0px; letter-spacing: 2px; font-size: 16px; word-spacing: 2px;">MaxAge选项函数:指定cookie中值的有效期</p> </section></li><li><section style="margin-top: 5px; margin-bottom: 5px; line-height: 26px; text-align: left; font-size: 16px; font-weight: normal; color: #595959;"><p style="padding-top: 8px; padding-bottom: 8px; line-height: 26px; color: #2b2b2b; margin: 10px 0px; letter-spacing: 2px; font-size: 16px; word-spacing: 2px;">Domain选项函数:指定cookie的存储域名</p> </section></li><li><section style="margin-top: 5px; margin-bottom: 5px; line-height: 26px; text-align: left; font-size: 16px; font-weight: normal; color: #595959;"><p style="padding-top: 8px; padding-bottom: 8px; line-height: 26px; color: #2b2b2b; margin: 10px 0px; letter-spacing: 2px; font-size: 16px; word-spacing: 2px;">Path选项函数:指定cookie的存储路径</p> </section></li><li><section style="margin-top: 5px; margin-bottom: 5px; line-height: 26px; text-align: left; font-size: 16px; font-weight: normal; color: #595959;"><p style="padding-top: 8px; padding-bottom: 8px; line-height: 26px; color: #2b2b2b; margin: 10px 0px; letter-spacing: 2px; font-size: 16px; word-spacing: 2px;">HttpOnly选项函数:指定cookie的值只能在服务端设置,禁止在客户端使用javascript修改</p> </section></li><li><section style="margin-top: 5px; margin-bottom: 5px; line-height: 26px; text-align: left; font-size: 16px; font-weight: normal; color: #595959;"><p style="padding-top: 8px; padding-bottom: 8px; line-height: 26px; color: #2b2b2b; margin: 10px 0px; letter-spacing: 2px; font-size: 16px; word-spacing: 2px;">SameSite选项函数:指定cookie的SameSite属性</p> </section></li><li><section style="margin-top: 5px; margin-bottom: 5px; line-height: 26px; text-align: left; font-size: 16px; font-weight: normal; color: #595959;"><p style="padding-top: 8px; padding-bottom: 8px; line-height: 26px; color: #2b2b2b; margin: 10px 0px; letter-spacing: 2px; font-size: 16px; word-spacing: 2px;">ErrorHandler选项函数:指定当token校验不通过或生成token失败时的错误响应的handler</p> </section></li><li><section style="margin-top: 5px; margin-bottom: 5px; line-height: 26px; text-align: left; font-size: 16px; font-weight: normal; color: #595959;"><p style="padding-top: 8px; padding-bottom: 8px; line-height: 26px; color: #2b2b2b; margin: 10px 0px; letter-spacing: 2px; font-size: 16px; word-spacing: 2px;"><strong style="color: #399003; font-weight: bold;"><span>「</span>更新token<span>」</span></strong></p> </section></li></ul> <p style="padding-top: 8px; padding-bottom: 8px; line-height: 26px; color: #2b2b2b; margin: 10px 0px; letter-spacing: 2px; font-size: 16px; word-spacing: 2px;">在调用csrf.ServeHTTP函数中,每次都会生成一个新的token,存储在对应的位置上,同时下发给客户端,以便该请求的后续请求携带token值给服务端进行验证。所以,该请求之前的token也就失效了。</p> <h4 style="margin-top: 30px; margin-bottom: 15px; padding: 0px; font-weight: bold; color: black; font-size: 18px;"><span class="prefix" style="display: none;"></span><span class="content" style="height: 16px; line-height: 16px; font-size: 16px;">为什么GET、HEAD、OPTIONS、TRACE的请求方法不需要token验证</span><span class="suffix" style="display: none;"></span></h4> <p style="padding-top: 8px; padding-bottom: 8px; line-height: 26px; color: #2b2b2b; margin: 10px 0px; letter-spacing: 2px; font-size: 16px; word-spacing: 2px;">在csrf包中,我们还看到有这么一段判断逻辑:</p> <pre class="custom" style="margin-top: 10px; margin-bottom: 10px; border-radius: 5px; box-shadow: rgba(0, 0, 0, 0.55) 0px 2px 10px;"><span style="display: block; background: url(https://files.mdnice.com/user/3441/876cad08-0422-409d-bb5a-08afec5da8ee.svg); height: 30px; width: 100%; background-size: 40px; background-repeat: no-repeat; background-color: #282c34; margin-bottom: -7px; border-radius: 5px; background-position: 10px 10px;"></span><code class="hljs" style="overflow-x: auto; padding: 16px; color: #abb2bf; display: -webkit-box; font-family: Operator Mono, Consolas, Monaco, Menlo, monospace; font-size: 12px; -webkit-overflow-scrolling: touch; letter-spacing: 0px; padding-top: 15px; background: #282c34; border-radius: 5px;"><span class="hljs-comment" style="color: #5c6370; font-style: italic; line-height: 26px;">//&nbsp;Idempotent&nbsp;(safe)&nbsp;methods&nbsp;as&nbsp;defined&nbsp;by&nbsp;RFC7231&nbsp;section&nbsp;4.2.2.</span><br>safeMethods&nbsp;=&nbsp;[]<span class="hljs-keyword" style="color: #c678dd; line-height: 26px;">string</span>{<span class="hljs-string" style="color: #98c379; line-height: 26px;">"GET"</span>,&nbsp;<span class="hljs-string" style="color: #98c379; line-height: 26px;">"HEAD"</span>,&nbsp;<span class="hljs-string" style="color: #98c379; line-height: 26px;">"OPTIONS"</span>,&nbsp;<span class="hljs-string" style="color: #98c379; line-height: 26px;">"TRACE"</span>}<br><br><span class="hljs-keyword" style="color: #c678dd; line-height: 26px;">if</span>&nbsp;!contains(safeMethods,&nbsp;r.Method)&nbsp;{<br>&nbsp;<span class="hljs-comment" style="color: #5c6370; font-style: italic; line-height: 26px;">//这里进行token的校验</span><br>}<br></code></pre> <p style="padding-top: 8px; padding-bottom: 8px; line-height: 26px; color: #2b2b2b; margin: 10px 0px; letter-spacing: 2px; font-size: 16px; word-spacing: 2px;">为什么GET、HEAD、OPTIONS、TRACE方法的请求不需求token验证呢? 因为根据RFC7231文档的规定,这些方法的请求本质上是一种 幂等 的访问方法,这说明开发web的时候g这些请求不应该用于修改数据库状态,而只作为一个请求访问或者链接跳转。通俗地讲,发送一个GET请求不应该引起任何数据状态的改变。用于修改状态更加合适的是post方法,特别是对用户信息状态改变的情况。</p> <p style="padding-top: 8px; padding-bottom: 8px; line-height: 26px; color: #2b2b2b; margin: 10px 0px; letter-spacing: 2px; font-size: 16px; word-spacing: 2px;">所以,如果严格按照RFC的规定来开发的话,这些请求不应该修改数据,而只是获取数据。获取数据对于攻击者来说也没实际价值。</p> <h2 style="margin-top: 30px; margin-bottom: 15px; padding: 0px; font-weight: bold; color: black; font-size: 22px; display: block; border-bottom: 4px solid #4CAF50;"><span class="prefix" style="display: none;"></span><span class="content" style="display: flex; color: #4CAF50; font-size: 20px;">总结</span><span class="suffix" style="display: flex; box-sizing: border-box; width: 20px; height: 10px; border-top-left-radius: 20px; border-top-right-radius: 20px; background: RGBA(76, 175, 80, .5); color: rgb(255, 255, 255); font-size: 16px; letter-spacing: 0.544px; justify-content: flex-end; float: right; margin-top: -10px; box-sizing: border-box !important; overflow-wrap: break-word !important;"></span></h2> <p style="padding-top: 8px; padding-bottom: 8px; line-height: 26px; color: #2b2b2b; margin: 10px 0px; letter-spacing: 2px; font-size: 16px; word-spacing: 2px;">CSRF攻击是基于将验证信息存储于cookie中,同时浏览器在发送请求时会自动携带cookie的原理进行的。所以,其预防原理也就是验证请求来源的真实性。csrf包就是利用了token校验的原理,让前后连续的请求签发token、下次请求验证token的方式进行预防的。</p> <h4 style="margin-top: 30px; margin-bottom: 15px; padding: 0px; font-weight: bold; color: black; font-size: 18px;"><span class="prefix" style="display: none;"></span><span class="content" style="height: 16px; line-height: 16px; font-size: 16px;">---特别推荐---</span><span class="suffix" style="display: none;"></span></h4> <p style="padding-top: 8px; padding-bottom: 8px; line-height: 26px; color: #2b2b2b; margin: 10px 0px; letter-spacing: 2px; font-size: 16px; word-spacing: 2px;">特别推荐:一个专注go项目实战、项目中踩坑经验及避坑指南、各种好玩的go工具的公众号。「Go学堂」,专注实用性,非常值得大家关注。点击下方公众号卡片,直接关注。关注送《100个go常见的错误》pdf文档。</p> </a></section>

有疑问加站长微信联系(非本文作者))

入群交流(和以上内容无关):加入Go大咖交流群,或添加微信:liuxiaoyan-s 备注:入群;或加QQ群:692541889

7119 次点击  ∙  1 赞  
加入收藏 微博
暂无回复
添加一条新回复 (您需要 登录 后才能回复 没有账号 ?)
  • 请尽量让自己的回复能够对别人有帮助
  • 支持 Markdown 格式, **粗体**、~~删除线~~、`单行代码`
  • 支持 @ 本站用户;支持表情(输入 : 提示),见 Emoji cheat sheet
  • 图片支持拖拽、截图粘贴等方式上传