
community-single
community-single是一个极简版社区的后端服务,主要包括用户的注册、登录、关注等功能,创作内容(文本、图片、视频)的发布、评论、点赞、收藏等功能,这些功能在各个社区平台、视频平台、直播平台等都比较常见,可以作为学习参考用,点击查看完整的项目代码。
community-single项目一开始设计为单体web服务,整个服务由生成代码工具sponge辅助完成,sponge生成web服务代码过程中剥离了业务逻辑与非业务逻辑两部分代码,这里的非业务逻辑代码指的是web服务框架代码,主要包括:
- 经过封装的gin代码
- 服务治理(日志、限流、熔断、链路跟踪、服务注册与发现、指标采集、性能分析、配置中心、资源统计等)
- 编译构建和部署脚本(二进制、docker、k8s)
- CI/CD(jenkins)
除了web服务框架代码,其他都属于业务逻辑代码。
把一个完整web服务代码看作一个鸡蛋,蛋壳表示web服务框架代码,蛋白和蛋黄都表示业务逻辑代码,蛋黄是业务逻辑的核心(需要人工编写的代码),例如定义mysql表、定义api接口、编写具体逻辑代码都属于蛋黄部分。蛋白是业务逻辑核心代码与web框架代码连接的桥梁(自动生成,不需要人工编写),例如根据proto文件生成的注册路由代码、handler方法函数代码、参数校验代码、错误码、swagger文档等都属于蛋白部分。web服务鸡蛋模型剖析图如下图所示:

图1 web服务代码的组成结构图
因此开发一个完整web服务项目聚焦在了定义数据表、定义api接口、在模板代码中编写具体业务逻辑代码这3个节点上,也就是业务逻辑的核心代码(蛋黄),其他代码(蛋壳和蛋白)是由sponge生成,可以帮助你少写很多代码,下面介绍从0开始到完成项目的开发过程。
开发过程依赖工具sponge,需要先安装sponge,点击查看安装说明。
定义数据表和api接口
根据业务需求,首先要定义数据表和api接口,这是业务逻辑代码核心(图1中的蛋黄部分),后面需要根据数据表和api接口(IDL)来生成代码(图1中的蛋壳和蛋白两部分)。
定义数据表
这是已经定义好的mysql表 community.sql
定义api接口
在proto文件定义api接口、输入输出参数、路由等,下面是已经定义好的api接口的proto文件:
开发中不大可能一次性就定义好业务所需的mysql表和api接口,增加或更改是很常见的事,修改mysql表和proto文件后,如何同步更新到代码里,在下面的编写业务逻辑代码章节中介绍。
生成项目代码
定义了数据表和api接口之后,然后在sponge的界面上根据proto文件生成web服务项目代码。进入sponge的UI界面,点击左边菜单栏【protobuf】--> 【Web类型】-->【创建web项目】,填写相关参数生成web项目代码,如下图所示:

解压代码,修改文件夹名称(例如community-single),一个服务只需生成代码一次。 这就完成搭建了一个web服务的基本框架(图1中的蛋壳部分),接着可以在web服务框架内编写业务逻辑代码了。
编写业务逻辑代码
从上面图1中web服务代码鸡蛋模型解剖图看出,经过sponge剥离后的业务逻辑代码包括蛋白和蛋黄两部分,编写业务逻辑代码基本都是围绕这两部分开展。
编写与proto文件相关的业务逻辑代码
进入项目community-single目录,打开终端,执行命令:
make proto
这个命令是根据api/community/v1目录下的proto文件生成了接口模板代码、注册路由代码、api接口错误码、swagger文档这四个部分代码,也就是图1中的蛋白部分。
(1) 生成的接口模板代码,在internal/handler目录下,文件名称与proto文件名一致,后缀名是_logic.go,名称分别有:
collect_logic.go, comment_logic.go, like_logic.go, post_logic.go, relation_logic.go, user_logic.go
在这些文件里面的方法函数与proto文件定义的rpc方法名一一对应,默认每个方法函数下有简单的使用示例,只需在每个方法函数里面编写具体的逻辑代码,上面那些文件代码是已经编写过具体逻辑之后的代码。
(2) 生成注册路由代码,在internal/routers目录下,文件名称与proto文件名一致,后缀名是_handler.pb.go,名称分别有:
collect_handler.pb.go, comment_handler.pb.go, like_handler.pb.go, post_handler.pb.go, relation_handler.pb.go, user_handler.pb.go
在这些文件里面的设置api接口的中间件,例如jwt鉴权,每个接口都已经存在中间件模板代码,只需要取消注释代码就可以使中间件生效,支持路由分组和单独路由来设置中间件。
(3) 生成接口错误码,在internal/ecode目录下,文件名称与proto文件名一致,后缀是_http.go,名称分别有:
collect_http.go, comment_http.go, like_http.go, post_http.go, relation_http.go, user_http.go
在这些文件里面的默认错误码变量与proto文件定义的rpc方法名一一对应,在这里添加或更改业务相关的错误码,注意错误码不能重复,否则会触发panic。
(4) 生成swagger文档,在docs目录下,名称为apis.swagger.json
如果在proto文件添加或更改了api接口,需要重新再执行一次命令make proto更新代码,会发现在internal/handler、internal/routers、internal/ecode目录下出现后缀名为日期时间的代码文件,打开文件,把新增或修改部分代码复制到同名文件代码中即可。复制完新增代码后,执行命令make clean清除这些日期后缀文件。
make proto命令生成的代码是用来连接web框架代码和业务逻辑核心代码的桥梁,也就是蛋白部分,这种分层生成代码的好处是减少编写代码。
编写与mysql表相关的业务逻辑代码
前面生成的web服务框架代码和根据proto文件生成的业务逻辑的部分代码,都还没有包括对mysql表的操作,因此需要根据mysql表生成dao(数据访问对象)代码,dao代码包括了对表的增删改查代码、缓存代码、model代码,这些代码属于图1中的蛋白部分。
进入sponge的UI界面,点击左边菜单栏【Public】--> 【生成dao CRUD代码】,填写相关参数生成dao代码,如下图所示:
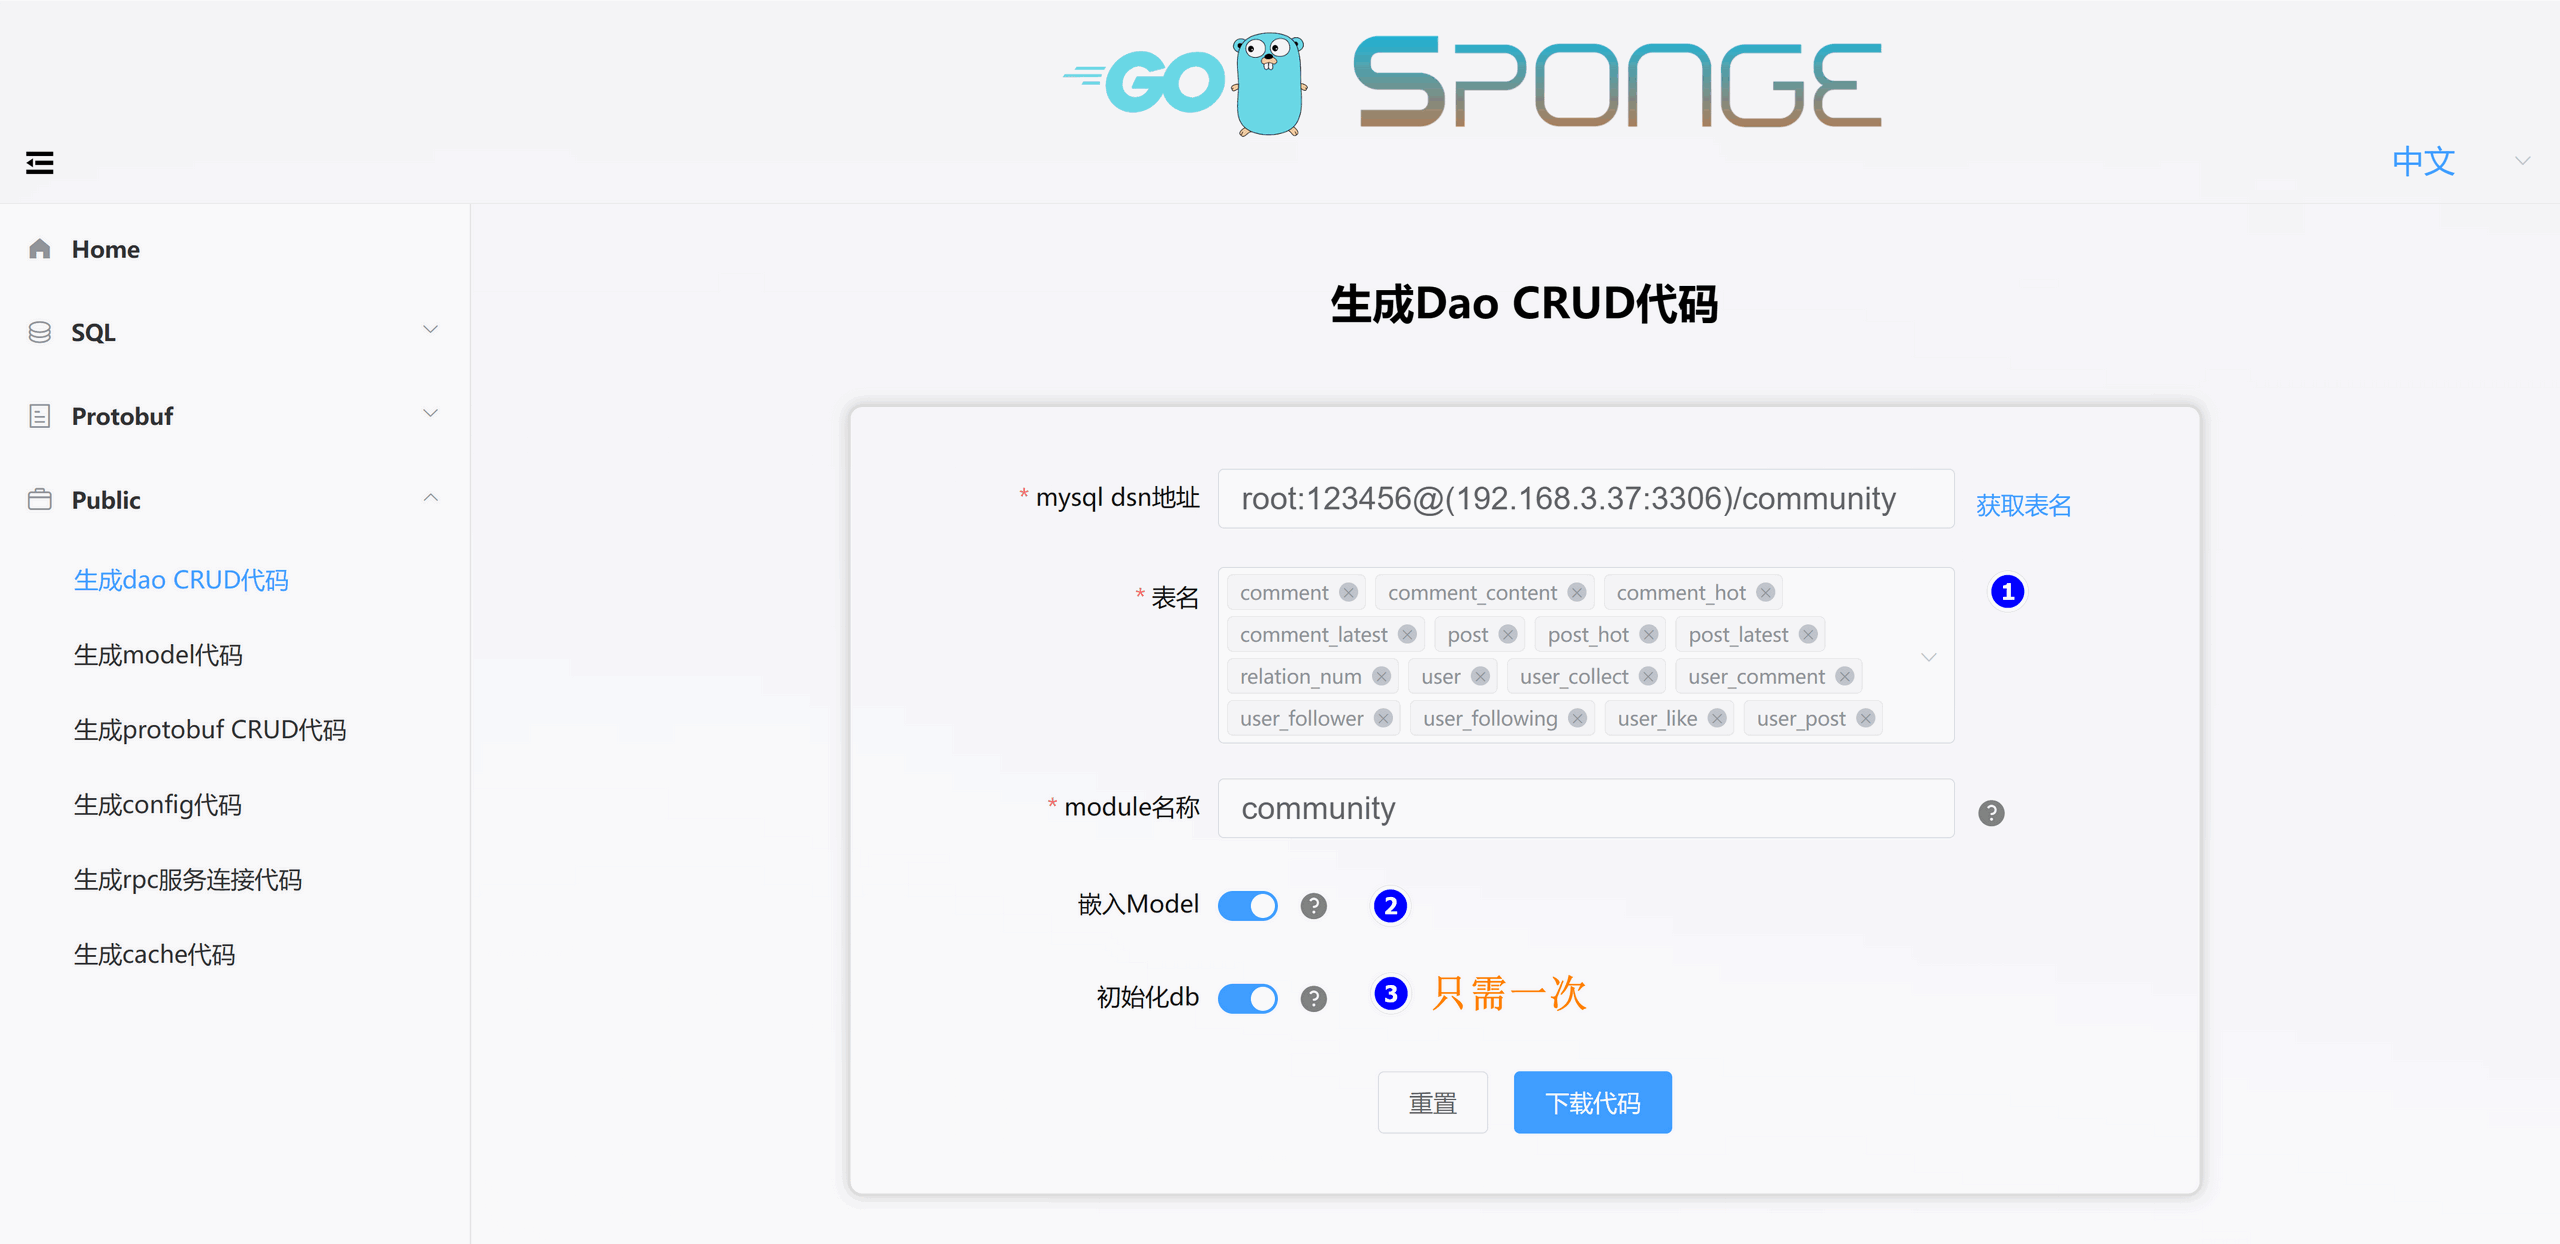
解压dao代码,把internal目录移动到community-single目录下,这样就完成添加了对mysql表的增删改查操作方法。当有新添加的mysql表时,需要再次指定新的mysql表生成dao代码。
指定mysql表生成的dao代码包括三个部分。
(1) 生成model代码,在internal/model目录下,文件名称与mysql表名一致,分别有:
comment.go, commentContent.go, commentHot.go, commentLatest.go, post.go, postHot.go, postLatest.go, relationNum.go, user.go, userCollect.go, userComment.go, userFollower.go, userFollowing.go, userLike.go, userPost.go
这是生成的对应gorm的go结构体代码。
(2) 生成缓存代码,在internal/cache目录下文件,文件名称与mysql表名一致,分别有:
comment.go, commentContent.go, commentHot.go, commentLatest.go, post.go, postHot.go, postLatest.go, relationNum.go, user.go, userCollect.go, userComment.go, userFollower.go, userFollowing.go, userLike.go, userPost.go
编写业务代码过程中,为了提高性能,有可能使用到缓存,有时候对表的默认缓存(CRUD)不能满足要求,需要添加缓存代码,sponge支持一键生成缓存代码,点击左边菜单栏【Public】--> 【生成cache代码】,填写参数生成代码,然后把解压的internal目录移动到community-single目录下,然后在业务逻辑中直接调用缓存接口。
(3) 生成dao代码,在internal/dao目录下,文件名称与mysql表名一致,文件分别有:
comment.go, commentContent.go, commentHot.go, commentLatest.go, post.go, postHot.go, postLatest.go, relationNum.go, user.go, userCollect.go, userComment.go, userFollower.go, userFollowing.go, userLike.go, userPost.go
编写业务代码过程中会涉及到操作mysql表,有时候对表的默认操作(CRUD)不能满足要求,这时需要人工编写自定义操作mysql表的函数方法与实现代码,例如comment.go、post.go等都包含少部分人工定义的操作msyql表的方法函数。
在开发过程中有时会修改或新增mysql表,基于mysql表生成的代码需要同步到项目代码中,分为两种情况处理:
- 修改mysql表之后更新代码处理方式:只需根据修改后的表生成新model代码,替换旧的model代码。点击左边菜单栏【Public】--> 【生成model代码】,填写参数,选择更改的mysql表,然后把解压的internal目录移动到community-single目录下,并确认替换。
- 新增mysql表之后处理方式:只需根据新增的表生成新的dao代码,添加到项目目录下。点击左边菜单栏【Public】--> 【生成dao代码】,填写参数,选择新增的mysql表,然后把解压的internal目录移动到community-single目录下。
测试api接口
编写了业务逻辑代码后,启动服务测试api接口,在第一次启动服务前,先打开配置文件(configs/community.yml)设置mysql和redis地址,然后执行命令编译启动服务:
# 编译、运行服务
make run
在浏览器访问 http://localhost:8080/apis/swagger/index.htm ,进入swagger界面,如下图所示:

从图中看到有些api接口右边有一把锁标记,表示请求头会携带鉴权信息Authorization,服务端接收到请求是否做鉴权,由服务端决定,如果服务端需要做鉴权,可以在internal/routers目录下后缀文件为_handler.pb.go文件中设置,也就是取消鉴权的注释代码,使api接口的鉴权中间件生效。
服务治理
生成的web服务代码中包含了丰富的服务治理插件,有些服务治理插件默认是关闭的,根据实际需要开启使用,统一在配置文件configs/community.yml进行设置。
除了web服务提供的服务治理插件,也可以使用自己的服务治理插件,建议在internal/routers/routers.go引入自己的服务治理插件。
日志
日志插件默认是开启的,默认是输出到终端,默认输出日志格式是console,可以设置输出格式为json,设置日志保存到指定文件,日志文件切割和保留时间。
在配置文件里的字段logger设置:
# logger 设置
logger:
  level: "info"             # 输出日志级别 debug, info, warn, error,默认是debug
  format: "console"     # 输出格式,console或json,默认是console
  isSave: false           # false:输出到终端,true:输出到文件,默认是false
  logFileConfig:          # isSave=true时有效
    filename: "out.log"            # 文件名称,默认值out.log
    maxSize: 20                     # 最大文件大小(MB),默认值10MB
    maxBackups: 50               # 保留旧文件的最大个数,默认值100个
    maxAge: 15                     # 保留旧文件的最大天数,默认值30天
    isCompression: true          # 是否压缩/归档旧文件,默认值false
限流
限流插件默认是关闭的,自适应限流,不需要设置其他参数。
在配置文件里的字段enableLimit设置:
enableLimit: false # 是否开启限流(自适应),true:开启, false:关闭
熔断
熔断插件默认是关闭的,自适应熔断,支持自定义请求返回错误码(默认500和503)进行熔断,在internal/routers/routers.go设置。
在配置文件里的字段enableCircuitBreaker设置:
enableCircuitBreaker: false # 是否开启熔断(自适应),true:开启, false:关闭
链路跟踪
链路跟踪插件默认是关闭的,链路跟踪依赖jaeger服务。
在配置文件里的字段enableTrace设置:
  enableTrace: false    # 是否开启追踪,true:启用,false:关闭,如果是true,必须设置jaeger配置。
  tracingSamplingRate: 1.0      # 链路跟踪采样率, 范围0~1.0浮点数, 0表示不采样, 1.0表示采样所有链路


# jaeger 设置
jaeger:
  agentHost: "192.168.3.37"
  agentPort: 6831
在jaeger界面上查看链路跟踪信息文档说明。
服务注册与发现
服务注册与发现插件默认是关闭的,支持consul、etcd、nacos三种类型。
在配置文件里的字段registryDiscoveryType设置:
  registryDiscoveryType: ""    # 注册和发现类型:consul、etcd、nacos,如果为空表示关闭服务注册与发现。


# 根据字段registryDiscoveryType值来设置参数,例如使用consul作为服务发现,只需设置consul。
# consul 设置
consul:
  addr: "192.168.3.37:8500"

# etcd 设置
etcd:
  addrs: ["192.168.3.37:2379"]

# nacos 设置
nacosRd:
  ipAddr: "192.168.3.37"
  port: 8848
  namespaceID: "3454d2b5-2455-4d0e-bf6d-e033b086bb4c" # namespace id
指标采集
指标采集功能默认是开启的,提供给prometheus采集数据,默认路由是/metrics。
在配置文件里的字段enableMetrics设置:
enableMetrics: true # 是否开启指标采集,true:启用,false:关闭
使用prometheus和grafana采集指标和监控服务的文档说明。
性能分析
性能分析插件默认是关闭的,采集profile的默认路由是/debug/pprof,除了支持go语言本身提供默认的profile分析,还支持io分析,路由是/debug/pprof/profile-io。
在配置文件里的字段enableHTTPProfile设置:
enableHTTPProfile: false # 是否开启性能分析,true:启用,false:关闭
通过路由采集profile进行性能分析方式,通常在开发或测试时使用,如果线上开启会有一点点性能损耗,因为程序后台一直定时记录profile相关信息。sponge生成的web服务对此做了一些改进,平时停止采集profile,用户主动触发系统信号时才开启和关闭采集profile,采集profile保存到/tmp/服务名称_profile目录,默认采集为60秒,60秒后自动停止采集profile,如果只想采集30秒,发送第一次信号开始采集,大概30秒后发送第二次信号表示停止采集profile,类似开关一样。
这是采集profile操作步骤:
# 通过名称查看服务pid
ps aux | grep 服务名称

# 发送信号给服务
kill -trap pid值
注:只支持linux、darwin系统。
资源统计
资源统计插件默认是开启的,默认每分钟统计一次并输出到日志,资源统计了包括系统和服务本身这两部分的cpu和内存相关的数据,资源统计包含了自动触发采集profile功能,当连续3次统计本服务的CPU或内存平均值,CPU或内存平均值占用系统资源超过80%时,自动触发采集profile,默认采集为60秒,采集profile保存到/tmp/服务名称_profile目录,从而实现自适应采集profile,比通过人工发送系统信号来采集profile又改进了一步。
在配置文件里的字段enableHTTPProfile设置:
enableStat: true # 是否开启资源统计,true:启用,false:关闭
配置中心
目前支持nacos作为配置中心,配置中心文件configs/community_cc.yml,配置内容如下:
# nacos 设置
nacos:
  ipAddr: "192.168.3.37"    # 服务地址
  port: 8848                      # 监听端口
  scheme: "http"                # 支持http和https
  contextPath: "/nacos"       # 路径
  namespaceID: "3454d2b5-2455-4d0e-bf6d-e033b086bb4c" # namespace id
  group: "dev"                    # 组名称: dev, prod, test
  dataID: "community.yml"  # 配置文件id
  format: "yaml"                 # 配置文件类型: json,yaml,toml
而服务的配置文件configs/community.yml复制到nacos界面上配置。使用nacos配置中心,启动服务命令需要指定配置中心文件,命令如下:
./community -c configs/community_cc.yml -enable-cc
使用nacos作为配置中心的文档说明。
持续集成与部署
sponge生成的web服务包括了编译和部署脚本,编译支持二进制编译和docker镜像构建,部署支持二进制部署、docker部署、k8s部署三种方式,这些功能都统一集成在Makefile文件里,使用make命令就可以很方便的执行指定编译或部署服务。
除了使用make命令编译和部署,还支持自动化部署工具Jenkins,默认的Jenkins设置在文件Jenkinsfile,支持自动化部署到k8s,如果需要二进制或docker部署,需要对Jenkinsfile进行修改。
使用Jenkins持续集成和部署的文档说明。
服务压测
压测服务时使用的一些工具:
- http压测工具wrk或go-stress-testing。
- 服务开启指标采集功能,使用prometheus采集服务指标和系统指标进行监控。
- 服务本身的自适应采集profile功能。
压测指标:
- 并发度: 逐渐增加并发用户数,找到服务的最大并发度,确定服务能支持的最大用户量。
- 响应时间: 关注并发用户数增加时,服务的平均响应时间和响应时间分布情况。确保即使在高并发下,响应时间也在可接受范围内。
- 错误率: 观察并发增加时,服务出现错误或异常的概率。使用压测工具进行长时间并发测试,统计各并发级别下的错误数量和类型。
- 吞吐量: 找到服务的最大吞吐量,确定服务在高并发下可以支持的最大请求量。这需要不断增加并发,直到找到吞吐量饱和点。
- 资源利用率: 关注并发增加时,CPU、内存、磁盘I/O、网络等资源的利用率,找到服务的资源瓶颈。
- 瓶颈检测: 通过观察高并发情况下服务的性能指标和资源利用率,找到系统和服务的硬件或软件瓶颈,以便进行优化。
- 稳定性: 长时间高并发运行可以检测到服务存在的潜在问题,如内存泄露、连接泄露等,确保服务稳定运行。这需要较长时间的并发压测,观察服务运行指标。
对服务进行压测,主要是为了评估其性能,确定能支持的最大并发和吞吐量,发现当前的瓶颈,并检测服务运行的稳定性,以便进行优化或容量规划。
总结
community-single是使用工具sponge从开发到部署的实战项目示例,具体流程如下:
- 定义mysql表
- 在proto文件定义api接口
- 根据proto文件生成web框架代码
- 根据proto文件生成业务逻辑相关代码
- 根据mysql表生成dao代码
- 在指定模板文件中编写具体逻辑代码
- 在swagger测试验证api接口
- 按需启用服务治理功能
- 持续集成与部署
- 服务压测
看起来流程有点多,真正需要人工编写代码的只有1、2、6这三个核心业务流程,其他流程涉及到的代码或脚本由sponge生成,使用sponge剥离非业务逻辑代码和业务逻辑代码,让开发项目时只需要聚焦在业务逻辑的核心代码上,同时也使得项目代码变得规范统一,不同的程序员都可以迅速上手。再结合编程辅助工具Copilot或Codeium写代码,开发变得更高效、轻松。
community-single是单体web服务,随着需求增加,功能越来越复杂,使得代码维护和开发变得困难,可以拆分成多个微服务,web单体服务拆分成微服务过程,只换了蛋壳(web框架换成gRPC框架)和蛋白(http handler相关代码换成rpc service相关代码),蛋黄(核心业务逻辑代码)不变,核心业务逻辑代码可以无缝的移植到微服务代码中。在下一篇文章介绍使用工具sponge辅助完成把community-single拆分为微服务集群。
有疑问加站长微信联系(非本文作者)


项目不错