
你很可能从某种途径听说过 Go 语言。它越来越受欢迎,并且有充分的理由可以证明。 Go 快速、简单,有强大的社区支持。学习这门语言最令人兴奋的一点是它的并发模型。 Go 的并发原语使创建多线程并发程序变得简单而有趣。我将通过插图介绍 Go 的并发原语,希望能点透相关概念以方便后续学习。本文是写给 Go 语言编程新手以及准备开始学习 Go 并发原语 (goroutines 和 channels) 的同学。
单线程程序 vs. 多线程程序
你可能已经写过一些单线程程序。一个常用的编程模式是组合多个函数来执行一个特定任务,并且只有前一个函数准备好数据,后面的才会被调用。

首先我们将用上述模式编写第一个例子的代码,一个描述挖矿的程序。它包含三个函数,分别负责执行寻矿、挖矿和练矿任务。在本例中,我们用一组字符串表示 rock(矿山) 和 ore(矿石),每个函数都以它们作为输入,并返回一组 “处理过的” 字符串。对于一个单线程的应用而言,该程序可能会按如下方式来设计:
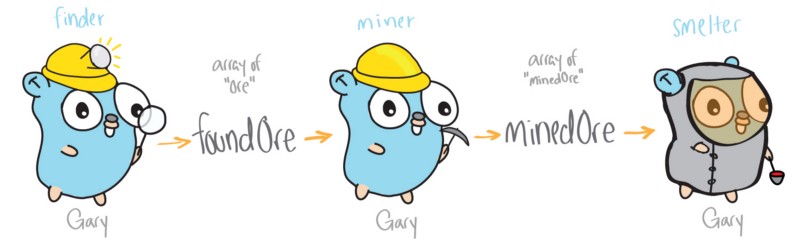
它有三个主要的函数:finder、miner 和 smelter。该版本的程序的所有函数都在单一线程中运行,一个接着一个执行,并且这个线程 (名为 Gary 的 gopher) 需要处理全部工作。
func main() {
    theMine := [5]string{"rock", "ore", "ore", "rock", "ore"}
    foundOre := finder(theMine)
    minedOre := miner(foundOre)
    smelter(minedOre)
}
在每个函数最后打印出 "ore" 处理后的结果,得到如下输出:
From Finder: [ore ore ore]
From Miner: [minedOre minedOre minedOre]
From Smelter: [smeltedOre smeltedOre smeltedOre]
这种编程风格具有易于设计的优点,但是当你想利用多个线程并执行彼此独立的函数时会发生什么呢?这就是并发程序设计发挥作用的地方。
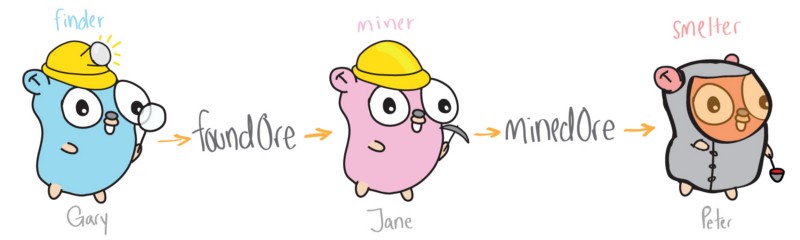
这种设计使得 “挖矿” 更高效。现在多个线程 (gophers) 是独立运行的,从而 Gary 不再承担全部工作。其中一个 gopher 负责寻矿,一个负责挖矿,另一个负责练矿,这些工作可能同时进行。
为了将这种并发特性引入我们的代码,我们需要创建独立运行的 gophers 的方法以及它们之间彼此通信 (传送矿石) 的方法。这就需要用到 Go 的并发原语:goroutines 和 channels。
Goroutines
Goroutines 可以看作是轻量级线程。创建一个 goroutine 非常简单,只需要把 go 关键字放在函数调用语句前。为了说明这有多么简单,我们创建两个 finder 函数,并用 go 调用,让它们每次找到 "ore" 就打印出来。

func main() {
    theMine := [5]string{"rock", "ore", "ore", "rock", "ore"}
    go finder1(theMine)
    go finder2(theMine)
    <-time.After(time.Second * 5) //you can ignore this for now
}
程序的输出如下:
Finder 1 found ore!
Finder 2 found ore!
Finder 1 found ore!
Finder 1 found ore!
Finder 2 found ore!
Finder 2 found ore!
可以看出,两个 finder 是并发运行的。哪一个先找到矿石没有确定的顺序,当执行多次程序时,这个顺序并不总是相同的。
这是一个很大的进步!现在我们有一个简单的方法来创建多线程 (multi-gopher) 程序,但是当我们需要独立的 goroutines 之间彼此通信会发生什么呢?欢迎来到神奇的 channels 世界。
Channels

Channels 允许 go routines 之间相互通信。你可以把 channel 看作管道,goroutines 可以往里面发消息,也可以从中接收其它 go routines 的消息。
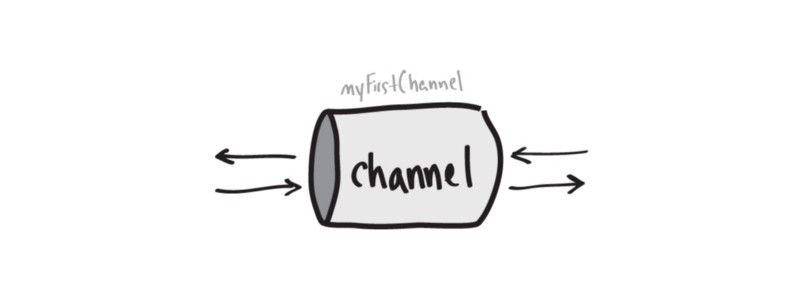
myFirstChannel := make(chan string)
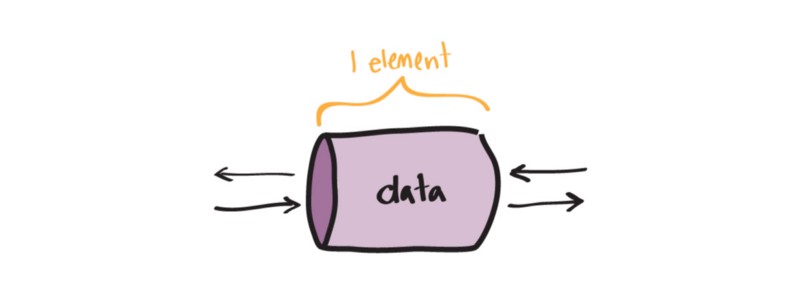
Goroutines 可以往 channel 发送消息,也可以从中接收消息。这是通过箭头操作符 (<-) 完成的,它指示 channel 中的数据流向。
![]()
myFirstChannel <-"hello" // Send
myVariable := <- myFirstChannel // Receive
现在通过 channel 我们可以让寻矿 gopher 一找到矿石就立即传送给开矿 gopher ,而不用等发现所有矿石。

我重写了挖矿程序,把寻矿和开矿函数改写成了未命名函数。如果你从未见过 lambda 函数,不必过多关注这部分,只需要知道每个函数将通过 go 关键字调用并运行在各自的 goroutine 中。重要的是,要注意 goroutine 之间是如何通过 channel oreChan 传递数据的。别担心,我会在最后面解释未命名函数的。
func main() {
    theMine := [5]string{"ore1", "ore2", "ore3"}
    oreChan := make(chan string)

    // Finder
    go func(mine [5]string) {
        for _, item := range mine {
            oreChan <- item //send
        }
    }(theMine)

    // Ore Breaker
    go func() {
        for i := 0; i < 3; i++ {
            foundOre := <-oreChan //receive
            fmt.Println("Miner: Received " + foundOre + " from finder")
        }
    }()
    <-time.After(time.Second * 5) // Again, ignore this for now
}
从下面的输出,可以看到 Miner 从 oreChan 读取了三次,每次接收一块矿石。
Miner: Received ore1 from finder
Miner: Received ore2 from finder
Miner: Received ore3 from finder
太棒了,现在我们能在程序的 goroutines(gophers) 之间发送数据了。在开始用 channels 写复杂的程序之前,我们先来理解它的一些关键特性。
Channel Blocking
Channels 阻塞 goroutines 发生在各种情形下。这能在 goroutines 各自欢快地运行之前,实现彼此之间的短暂同步。
Blocking on a Send

一旦一个 goroutine(gopher) 向一个 channel 发送数据,它就被阻塞了,直到另一个 goroutine 从该 channel 取走数据。
Blocking on a Receive

和发送时情形类似,一个 goroutine 可能阻塞着等待从一个 channel 获取数据,如果还没有其他 goroutine 往该 channel 发送数据。
一开始接触阻塞的概念可能令人有些困惑,但你可以把它想象成两个 goroutines(gophers) 之间的交易。 其中一个 gopher 无论是等着收钱还是送钱,都需要等待交易的另一方出现。
既然已经了解 goroutine 通过 channel 通信可能发生阻塞的不同情形,让我们讨论两种不同类型的 channels: unbuffered 和 buffered 。选择使用哪一种 channel 可能会改变程序的运行表现。
Unbuffered Channels
在前面的例子中我们一直在用 unbuffered channels,它们与众不同的地方在于每次只有一份数据可以通过。
Buffered Channels
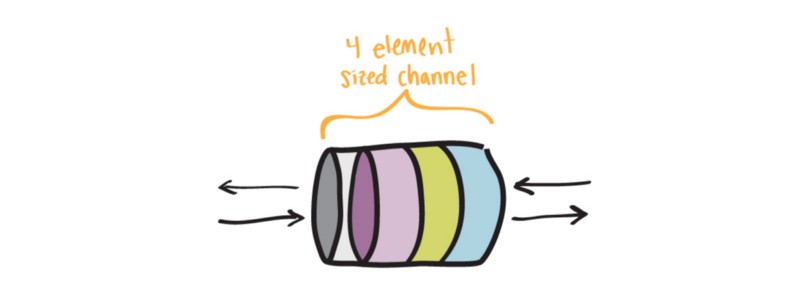
在并发程序中,时间协调并不总是完美的。在挖矿的例子中,我们可能遇到这样的情形:开矿 gopher 处理一块矿石所花的时间,寻矿 gohper 可能已经找到 3 块矿石了。为了不让寻矿 gopher 浪费大量时间等着给开矿 gopher 传送矿石,我们可以使用 buffered channel。我们先创建一个容量为 3 的 buffered channel。
bufferedChan := make(chan string, 3)
buffered 和 unbuffered channels 工作原理类似,但有一点不同—在需要另一个 gorountine 取走数据之前,我们可以向 buffered channel 发送多份数据。

bufferedChan := make(chan string, 3)

go func() {
    bufferedChan <-"first"
    fmt.Println("Sent 1st")
    bufferedChan <-"second"
    fmt.Println("Sent 2nd")
    bufferedChan <-"third"
    fmt.Println("Sent 3rd")
}()

<-time.After(time.Second * 1)

go func() {
    firstRead := <- bufferedChan
    fmt.Println("Receiving..")
    fmt.Println(firstRead)
    secondRead := <- bufferedChan
    fmt.Println(secondRead)
    thirdRead := <- bufferedChan
    fmt.Println(thirdRead)
}()
两个 goroutines 之间的打印顺序如下:
Sent 1st
Sent 2nd
Sent 3rd
Receiving..
first
second
third
为了简单起见,我们在最终的程序中不使用 buffered channels。但知道该使用哪种 channel 是很重要的。
注意: 使用 buffered channels 并不会避免阻塞发生。例如,如果寻矿 gopher 比开矿 gopher 执行速度快 10 倍,并且它们通过一个容量为 2 的 buffered channel 进行通信,那么寻矿 gopher 仍会发生多次阻塞。
把这些都放到一起
现在凭借 goroutines 和 channels 的强大功能,我们可以使用 Go 的并发原语编写一个充分发挥多线程优势的程序了。
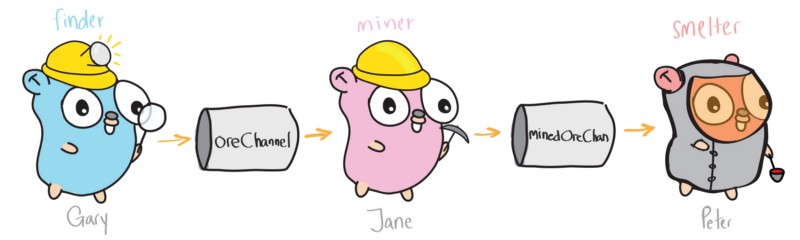
theMine := [5]string{"rock", "ore", "ore", "rock", "ore"}
oreChannel := make(chan string)
minedOreChan := make(chan string)

// Finder
go func(mine [5]string) {
    for _, item := range mine {
        if item == "ore" {
            oreChannel <- item //send item on oreChannel
        }
    }
}(theMine)

// Ore Breaker
go func() {
    for i := 0; i < 3; i++ {
        foundOre := <-oreChannel //read from oreChannel
        fmt.Println("From Finder:", foundOre)
        minedOreChan <-"minedOre" //send to minedOreChan
    }
}()

// Smelter
go func() {
    for i := 0; i < 3; i++ {
        minedOre := <-minedOreChan //read from minedOreChan
        fmt.Println("From Miner:", minedOre)
        fmt.Println("From Smelter: Ore is smelted")
    }
}()

<-time.After(time.Second * 5) // Again, you can ignore this
程序输出如下:
From Finder:  ore
From Finder:  ore
From Miner:  minedOre
From Smelter: Ore is smelted
From Miner:  minedOre
From Smelter: Ore is smelted
From Finder:  ore
From Miner:  minedOre
From Smelter: Ore is smelted
相比最初的例子,已经有了很大改进!现在每个函数都独立地运行在各自的 goroutines 中。此外,每次处理完一块矿石,它就会被带进挖矿流水线的下一个阶段。
为了专注于理解 goroutines 和 channel 的基本概念,上文有些重要的信息我没有提,如果不知道的话,当你开始编程时它们可能会造成一些麻烦。既然你已经理解了 goroutines 和 channel 的工作原理,在开始用它们编写代码之前,让我们先了解一些你应该知道的其他信息。
在开始之前,你应该知道...
匿名的 Goroutines

类似于如何利用 go 关键字使一个函数运行在自己的 goroutine 中,我们可以用如下方式创建一个匿名函数并运行在它的 goroutine 中:
// Anonymous go routine
go func() {
    fmt.Println("I'm running in my own go routine")
}()
如果只需要调用一次函数,通过这种方式我们可以让它在自己的 goroutine 中运行,而不需要创建一个正式的函数声明。
main 函数是一个 goroutine

main 函数确实运行在自己的 goroutine 中!更重要的是要知道,一旦 main 函数返回,它将关掉当前正在运行的其他 goroutines。这就是为什么我们在 main 函数的最后设置了一个定时器—它创建了一个 channel,并在 5 秒后发送一个值。
<-time.After(time.Second * 5) // Receiving from channel after 5 sec
还记得 goroutine 从 channel 中读数据如何被阻塞直到有数据发送到里面吧?通过添加上面这行代码,main routine 将会发生这种情况。它会阻塞,以给其他 goroutines 5 秒的时间来运行。
现在有更好的方式阻塞 main 函数直到其他所有 goroutines 都运行完。通常的做法是创建一个 done channel, main 函数在等待读取它时被阻塞。一旦完成工作,向这个 channel 发送数据,程序就会结束了。

func main() {
    doneChan := make(chan string)

    go func() {
        // Do some work…
        doneChan <- "I'm all done!"
    }()

    <-doneChan // block until go routine signals work is done
}
你可以遍历 channel
在前面的例子中我们让 miner 在 for 循环中迭代 3 次从 channel 中读取数据。如果我们不能确切知道将从 finder 接收多少块矿石呢?
好吧,类似于对集合数据类型 (注: 如 slice) 进行遍历,你也可以遍历一个 channel。
更新前面的 miner 函数,我们可以这样写:
// Ore Breaker
go func() {
    for foundOre := range oreChan {
        fmt.Println("Miner: Received " + foundOre + " from finder")
    }
}()
由于 miner 需要读取 finder 发送给它的所有数据,遍历 channel 能确保我们接收到已经发送的所有数据。
遍历 channel 会阻塞,直到有新数据被发送到 channel。在所有数据发送完之后避免 go routine 阻塞的唯一方法就是用 "close(channel)" 关掉 channel。
对 channel 进行非阻塞读
但你刚刚告诉我们 channel 如何阻塞 goroutine 的各种情形?!没错,不过还有一个技巧,利用 Go 的 select case 语句可以实现对 channel 的非阻塞读。通过使用这这种语句,如果 channel 有数据,goroutine 将会从中读取,否则就执行默认的分支。
myChan := make(chan string)

go func(){
    myChan <- "Message!"
}()

select {
    case msg := <- myChan:
        fmt.Println(msg)
    default:
        fmt.Println("No Msg")
}
<-time.After(time.Second * 1)

select {
    case msg := <- myChan:
        fmt.Println(msg)
    default:
        fmt.Println("No Msg")
}
程序输出如下:
No Msg
Message!
对 channel 进行非阻塞写
非阻塞写也是使用同样的 select case 语句来实现,唯一不同的地方在于,case 语句看起来像是发送而不是接收。
select {
    case myChan <- "message":
        fmt.Println("sent the message")
    default:
        fmt.Println("no message sent")
}
接下来去哪儿学

有许多讲座和博客更详细地介绍了 channels 和 goroutines。 既然已经对这些工具的目的和应用有了深刻的理解,那么你应该能够充分利用下面的文章和演讲了。
Google I/O 2012 — Go Concurrency Patterns
谢谢您花时间阅读本文。我希望你能够理解 goroutines 和 channels 基本概念,以及使用它们给编写并发程序带来的好处。
via: https://medium.com/@trevor4e/learning-gos-concurrency-through-illustrations-8c4aff603b3
作者:Trevor Forrey 译者:mbyd916 校对:polaris1119
本文由 GCTT 原创翻译,Go语言中文网 首发。也想加入译者行列,为开源做一些自己的贡献么?欢迎加入 GCTT!
翻译工作和译文发表仅用于学习和交流目的,翻译工作遵照 CC-BY-NC-SA 协议规定,如果我们的工作有侵犯到您的权益,请及时联系我们。
欢迎遵照 CC-BY-NC-SA 协议规定 转载,敬请在正文中标注并保留原文/译文链接和作者/译者等信息。
文章仅代表作者的知识和看法,如有不同观点,请楼下排队吐槽
有疑问加站长微信联系(非本文作者))


这小图,萌萌哒
很形象
必须给赞
学习了
好东西必须给赞,给恢复~
非常棒
学习了!!!!!! 必须回复!!!!
继续啊!
赞一个
写的太好了 点赞
666
简单易懂,行文流畅,好评
写得很清楚啊,学习了,谢谢
牛B
简单易懂,感谢作者的分享~
阻塞式的只是在不同线程执行,发送一个 也要等待 接收 都要阻塞 这个例子是不是 跟 单线程实际上是一样的?