Go GC 怎么标记内存?

lxbwolf · · 1561 次点击 · · 开始浏览    
这是一个创建于 的文章,其中的信息可能已经有所发展或是发生改变。

![Illustration created for “A Journey With Go”, made from the original Go Gopher, created by Renee French](https://raw.githubusercontent.com/studygolang/gctt-images2/master/20191103-Go-How-Does-the-Garbage-Collector-Mark-the-Memory/00.png) ℹ️ 本文基于 *Go 1.13*。关于内存管理的概念的讨论在我的文章 [Go 中的内存管理和分配](https://medium.com/a-journey-with-go/go-memory-management-and-allocation-a7396d430f44) 中有详细的解释。 Go GC 的作用是回收不再使用的内存。实现的算法是并发的三色标记和清除回收法。本中文,我们研究三色标记法,以及各个颜色的不同用处。 你可以在 Ken Fox 的 [解读垃圾回收算法](https://spin.atomicobject.com/2014/09/03/visualizing-garbage-collection-algorithms/) 中了解更多关于不同垃圾回收机制的信息。 ## 标记阶段 这个阶段浏览内存来了解哪些块儿是在被我们的代码使用和哪些块儿应该被回收。 然而,因为 GC 和我们的 Go 程序并行,GC 扫描期间内存中某些对象的状态可能被改变,所以需要一个检测这种可能的变化的方法。为了解决这个潜在的问题,实现了 [写屏障](https://en.wikipedia.org/wiki/Write_barrier) 算法,GC 可以追踪到任何的指针修改。使写屏障生效的唯一条件是短暂终止程序,又名 “Stop the World”。 ![](https://raw.githubusercontent.com/studygolang/gctt-images2/master/20191103-Go-How-Does-the-Garbage-Collector-Mark-the-Memory/01.png) 
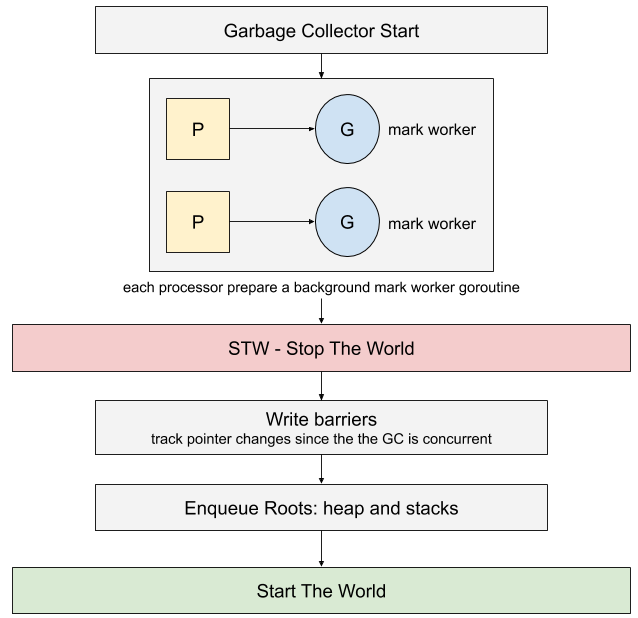
在进程启动时,Go 也在每个 processor 起了一个标记 worker 来辅助标记内存。 然后,当 root 被加入到处理队列中后,标记阶段就开始遍历和用颜色标记内存。 为了了解在标记阶段的每一步,我们来看一个简单的程序示例: ```go type struct1 struct { a, b int64 c, d float64 e *struct2 } type struct2 struct { f, g int64 h, i float64 } func main() { s1 := allocStruct1() s2 := allocStruct2() func () { _ = allocStruct2() }() runtime.GC() fmt.Printf("s1 = %X, s2 = %X\n", &s1, &s2) } //go:noinline func allocStruct1() *struct1 { return &struct1{ e: allocStruct2(), } } //go:noinline func allocStruct2() *struct2 { return &struct2{} } ``` `struct2` 不包含指针,因此它被储存在一个专门存放不引用其他对象的 span(noscan 标记)中。 ![不包含指针的结构体储存在专有的 span 中](https://raw.githubusercontent.com/studygolang/gctt-images2/master/20191103-Go-How-Does-the-Garbage-Collector-Mark-the-Memory/02.png) 
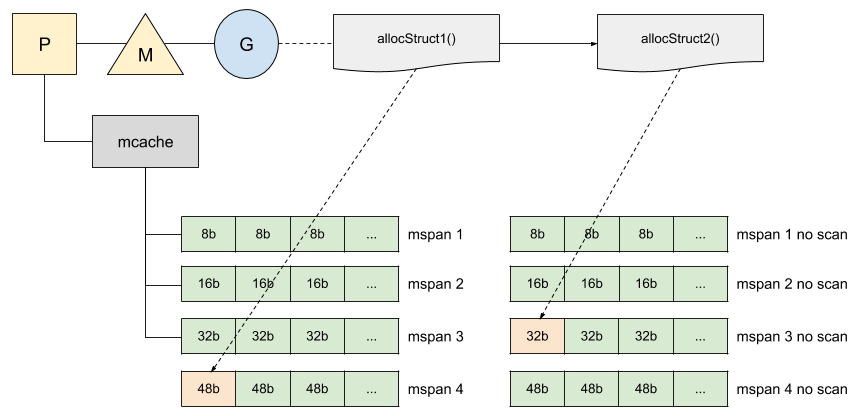
这减少了 GC 的工作,因为标记内存时不需要扫描这个 span。 
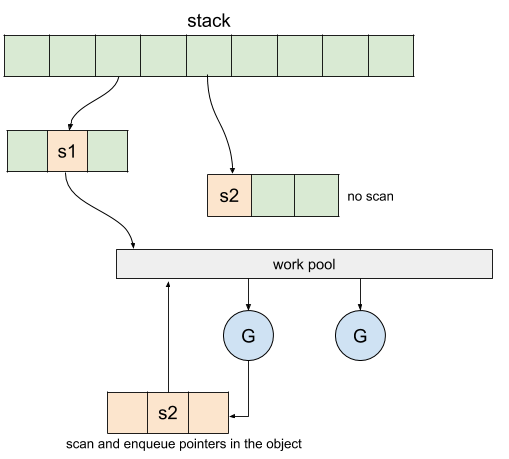
分配工作结束后,我们的程序强迫 GC 重复前面的步骤。下面是流程图: ![扫描内存](https://raw.githubusercontent.com/studygolang/gctt-images2/master/20191103-Go-How-Does-the-Garbage-Collector-Mark-the-Memory/03.png) GC 从栈开始,递归地顺着指针找指针指向的对象,遍历内存。扫描到被标记为 `no scan` 的 span 时,停止扫描。然而,这个工作是在多个协程中完成的,每个指针被加入到一个 work pool 中的队列。然后,后台运行的标记 worker 从这个 work pool 中拿到前面出列的 work,扫描这个对象然后把在这个对象里找到的指针加入到队列。 ![garbage collector work pool](https://raw.githubusercontent.com/studygolang/gctt-images2/master/20191103-Go-How-Does-the-Garbage-Collector-Mark-the-Memory/04.png) ## 颜色标记 worker 需要一种记录哪些内存需要扫描的方法。GC 使用一种 [三色标记算法](https://en.wikipedia.org/wiki/Tracing_garbage_collection#Tri-color_marking),工作流程如下: - 开始时,所有对象都被认为是**白色** - root 对象(栈,堆,全局变量)被标记为**灰色** 这个初始步骤完成后,GC 会: - 选择一个**灰色**的对象,标记为**黑色** - 追踪这个对象的所有指针,把所有引用的对象标记为**灰色** 然后,GC 重复以上两步,直到没有对象可被标记。在这一时刻,对象非黑即白,没有灰色。白色的对象表示没有其他对象引用,可以被回收。
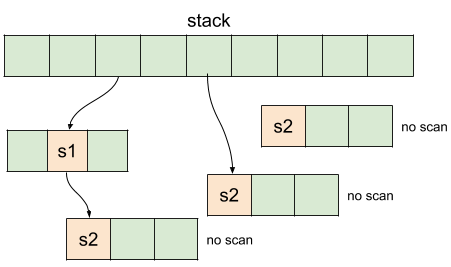
 下面是前面例子的图示: ![](https://raw.githubusercontent.com/studygolang/gctt-images2/master/20191103-Go-How-Does-the-Garbage-Collector-Mark-the-Memory/05.png) 
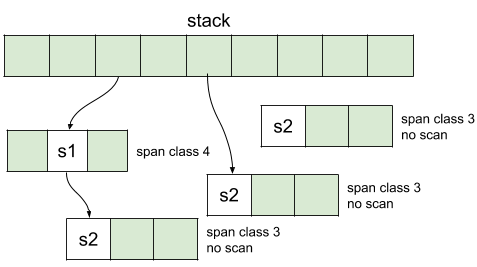
初始状态下,所有的对象被认为是白色的。然后,遍历到的且被其他对象引用的对象,被标记为灰色。如果一个对象在被标记为 `no scan` 的 span 中,因为它不需要被扫描,所以可以标记为黑色。 ![](https://raw.githubusercontent.com/studygolang/gctt-images2/master/20191103-Go-How-Does-the-Garbage-Collector-Mark-the-Memory/06.png) 
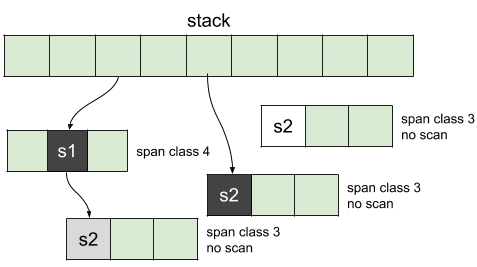
现在灰色的对象被加入到扫描队列并被标记为黑色: ![](https://raw.githubusercontent.com/studygolang/gctt-images2/master/20191103-Go-How-Does-the-Garbage-Collector-Mark-the-Memory/07.png) 对加入到扫描队列的所有对象重复做相同的操作,直到没有对象需要被处理: ![](https://raw.githubusercontent.com/studygolang/gctt-images2/master/20191103-Go-How-Does-the-Garbage-Collector-Mark-the-Memory/08.png) 
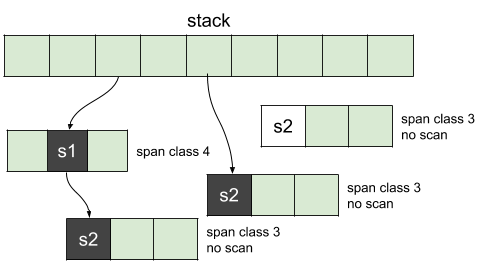
处理结束时,黑色对象表示内存中在使用的对象,白色对象是要被回收的对象。我们可以看到,由于 `struct2` 的实例是在一个匿名函数中创建的且不再存在于栈上,因此它是白色的且可以被回收。 归功于每一个 span 中的名为 `gcmarkBits` 的 bitmap 属性,三色被原生地实现了,bitmap 对 scan 中相应的 bit 设为 1 来追踪 scan。 ![](https://raw.githubusercontent.com/studygolang/gctt-images2/master/20191103-Go-How-Does-the-Garbage-Collector-Mark-the-Memory/09.png) 
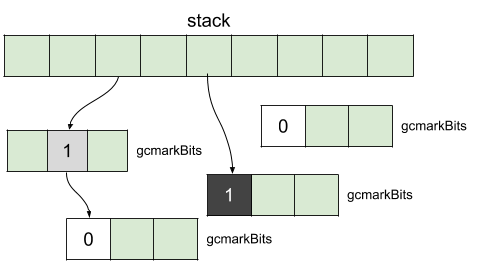
我们可以看到,黑色和灰色表示的意义相同。处理的不同之处在于,标记为灰色时是把对象加入到扫描队列,而标记为黑色时,不再扫描。 GC 最终 STW,清除每一次写屏障对 work pool 做的改变,继续后续的标记。 *你可以在我的文章 [Go GC 怎样监控你的应用](https://medium.com/a-journey-with-go/go-how-does-the-garbage-collector-watch-your-application-dbef99be2c35) 中找到关于并发处理和 GC 的标记阶段更详细的描述*。 ## runtime 分析器 Go 提供的工具使我们可以对每一步进行可视化,观察 GC 在我们的程序中的影响。开启 tracing 运行我们的代码,可以看到前面所有步骤的一个概览。下面是追踪结果: ![traces of the garbage collector](https://raw.githubusercontent.com/studygolang/gctt-images2/master/20191103-Go-How-Does-the-Garbage-Collector-Mark-the-Memory/10.png) 
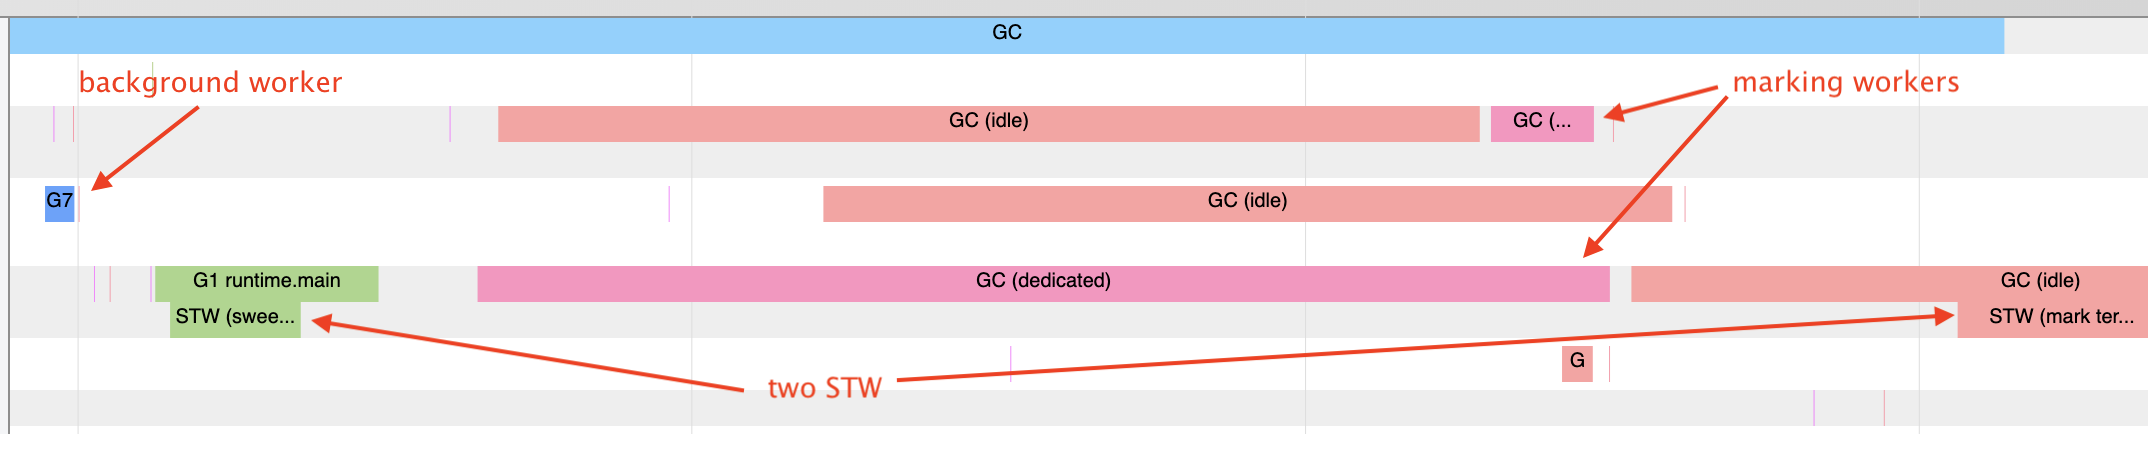
标记 worker 的生命周期也可以在追踪结果中以协程等级可视化。下面是在启动之前先在后台等待标记内存的 Goroutine #33 的例子。 ![marking worker](https://raw.githubusercontent.com/studygolang/gctt-images2/master/20191103-Go-How-Does-the-Garbage-Collector-Mark-the-Memory/11.png)

via: https://medium.com/a-journey-with-go/go-how-does-the-garbage-collector-mark-the-memory-72cfc12c6976

作者:Vincent Blanchon  译者:lxbwolf  校对:polaris1119

本文由 GCTT 原创编译,Go语言中文网 荣誉推出


有疑问加站长微信联系(非本文作者))

入群交流(和以上内容无关):加入Go大咖交流群,或添加微信:liuxiaoyan-s 备注:入群;或加QQ群:692541889

1561 次点击  
加入收藏 微博
被以下专栏收入,发现更多相似内容
1 回复  |  直到 2021-01-29 18:32:19
暂无回复
添加一条新回复 (您需要 登录 后才能回复 没有账号 ?)
  • 请尽量让自己的回复能够对别人有帮助
  • 支持 Markdown 格式, **粗体**、~~删除线~~、`单行代码`
  • 支持 @ 本站用户;支持表情(输入 : 提示),见 Emoji cheat sheet
  • 图片支持拖拽、截图粘贴等方式上传