写在前面
当你对GoLang AST感兴趣时,你会参考什么?文档还是源代码?
虽然阅读文档可以帮助你抽象地理解它,但你无法看到API之间的关系等等。
如果是阅读整个源代码,你会完全看懂,但你想看完整个代码我觉得您应该会很累。
因此,本着高效学习的原则,我写了此文,希望对您能有所帮助。
让我们轻松一点,通过AST来了解我们平时写的Go代码在内部是如何表示的。
本文不深入探讨如何解析源代码,先从AST建立后的描述开始。
如果您对代码如何转换为AST很好奇,请浏览深入挖掘分析Go代码。
让我们开始吧!
接口(Interfaces)
首先,让我简单介绍一下代表AST每个节点的接口。
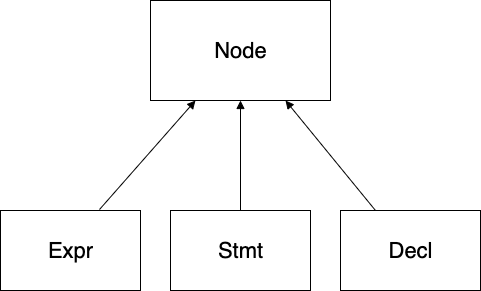
所有的AST节点都实现了ast.Node接口,它只是返回AST中的一个位置。
另外,还有3个主要接口实现了ast.Node。
- ast.Expr - 代表表达式和类型的节点
- ast.Stmt - 代表报表节点
- ast.Decl - 代表声明节点

从定义中你可以看到,每个Node都满足了ast.Node的接口。
// All node types implement the Node interface.
type Node interface {
    Pos() token.Pos // position of first character belonging to the node
    End() token.Pos // position of first character immediately after the node
}

// All expression nodes implement the Expr interface.
type Expr interface {
    Node
    exprNode()
}

// All statement nodes implement the Stmt interface.
type Stmt interface {
    Node
    stmtNode()
}

// All declaration nodes implement the Decl interface.
type Decl interface {
    Node
    declNode()
}
具体实践
下面我们将使用到如下代码:
package hello

import "fmt"

func greet() {
    fmt.Println("Hello World!")
}
首先,我们尝试生成上述这段简单的代码AST:
package main

import (
    "go/ast"
    "go/parser"
    "go/token"
)

func main() {
    src := `
package hello

import "fmt"

func greet() {
    fmt.Println("Hello World!")
}
`
    // Create the AST by parsing src.
    fset := token.NewFileSet() // positions are relative to fset
    f, err := parser.ParseFile(fset, "", src, 0)
    if err != nil {
        panic(err)
    }

    // Print the AST.
    ast.Print(fset, f)
}
执行命令:
F:\hello>go run main.go
上述命令的输出ast.File内容如下:
     0  *ast.File {
     1  .  Package: 2:1
     2  .  Name: *ast.Ident {
     3  .  .  NamePos: 2:9
     4  .  .  Name: "hello"
     5  .  }
     6  .  Decls: []ast.Decl (len = 2) {
     7  .  .  0: *ast.GenDecl {
     8  .  .  .  TokPos: 4:1
     9  .  .  .  Tok: import
    10  .  .  .  Lparen: -
    11  .  .  .  Specs: []ast.Spec (len = 1) {
    12  .  .  .  .  0: *ast.ImportSpec {
    13  .  .  .  .  .  Path: *ast.BasicLit {
    14  .  .  .  .  .  .  ValuePos: 4:8
    15  .  .  .  .  .  .  Kind: STRING
    16  .  .  .  .  .  .  Value: "\"fmt\""
    17  .  .  .  .  .  }
    18  .  .  .  .  .  EndPos: -
    19  .  .  .  .  }
    20  .  .  .  }
    21  .  .  .  Rparen: -
    22  .  .  }
    23  .  .  1: *ast.FuncDecl {
    24  .  .  .  Name: *ast.Ident {
    25  .  .  .  .  NamePos: 6:6
    26  .  .  .  .  Name: "greet"
    27  .  .  .  .  Obj: *ast.Object {
    28  .  .  .  .  .  Kind: func
    29  .  .  .  .  .  Name: "greet"
    30  .  .  .  .  .  Decl: *(obj @ 23)
    31  .  .  .  .  }
    32  .  .  .  }
    33  .  .  .  Type: *ast.FuncType {
    34  .  .  .  .  Func: 6:1
    35  .  .  .  .  Params: *ast.FieldList {
    36  .  .  .  .  .  Opening: 6:11
    37  .  .  .  .  .  Closing: 6:12
    38  .  .  .  .  }
    39  .  .  .  }
    40  .  .  .  Body: *ast.BlockStmt {
    41  .  .  .  .  Lbrace: 6:14
    42  .  .  .  .  List: []ast.Stmt (len = 1) {
    43  .  .  .  .  .  0: *ast.ExprStmt {
    44  .  .  .  .  .  .  X: *ast.CallExpr {
    45  .  .  .  .  .  .  .  Fun: *ast.SelectorExpr {
    46  .  .  .  .  .  .  .  .  X: *ast.Ident {
    47  .  .  .  .  .  .  .  .  .  NamePos: 7:2
    48  .  .  .  .  .  .  .  .  .  Name: "fmt"
    49  .  .  .  .  .  .  .  .  }
    50  .  .  .  .  .  .  .  .  Sel: *ast.Ident {
    51  .  .  .  .  .  .  .  .  .  NamePos: 7:6
    52  .  .  .  .  .  .  .  .  .  Name: "Println"
    53  .  .  .  .  .  .  .  .  }
    54  .  .  .  .  .  .  .  }
    55  .  .  .  .  .  .  .  Lparen: 7:13
    56  .  .  .  .  .  .  .  Args: []ast.Expr (len = 1) {
    57  .  .  .  .  .  .  .  .  0: *ast.BasicLit {
    58  .  .  .  .  .  .  .  .  .  ValuePos: 7:14
    59  .  .  .  .  .  .  .  .  .  Kind: STRING
    60  .  .  .  .  .  .  .  .  .  Value: "\"Hello World!\""
    61  .  .  .  .  .  .  .  .  }
    62  .  .  .  .  .  .  .  }
    63  .  .  .  .  .  .  .  Ellipsis: -
    64  .  .  .  .  .  .  .  Rparen: 7:28
    65  .  .  .  .  .  .  }
    66  .  .  .  .  .  }
    67  .  .  .  .  }
    68  .  .  .  .  Rbrace: 8:1
    69  .  .  .  }
    70  .  .  }
    71  .  }
    72  .  Scope: *ast.Scope {
    73  .  .  Objects: map[string]*ast.Object (len = 1) {
    74  .  .  .  "greet": *(obj @ 27)
    75  .  .  }
    76  .  }
    77  .  Imports: []*ast.ImportSpec (len = 1) {
    78  .  .  0: *(obj @ 12)
    79  .  }
    80  .  Unresolved: []*ast.Ident (len = 1) {
    81  .  .  0: *(obj @ 46)
    82  .  }
    83  }
如何分析
我们要做的就是按照深度优先的顺序遍历这个AST节点,通过递归调用ast.Inspect()来逐一打印每个节点。
如果直接打印AST,那么我们通常会看到一些无法被人类阅读的东西。
为了防止这种情况的发生,我们将使用ast.Print(一个强大的API)来实现对AST的人工读取。
代码如下:
package main

import (
    "fmt"
    "go/ast"
    "go/parser"
    "go/token"
)

func main() {
    fset := token.NewFileSet()
    f, _ := parser.ParseFile(fset, "dummy.go", src, parser.ParseComments)

    ast.Inspect(f, func(n ast.Node) bool {
        // Called recursively.
        ast.Print(fset, n)
        return true
    })
}

var src = `package hello

import "fmt"

func greet() {
    fmt.Println("Hello, World")
}
`
ast.File
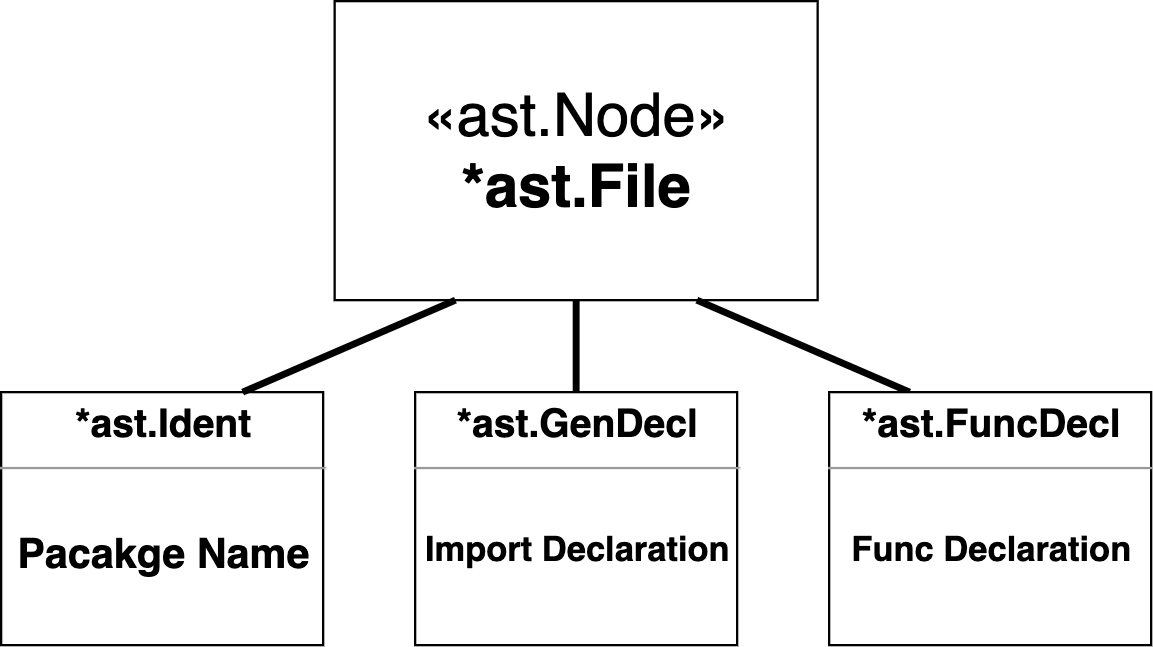
第一个要访问的节点是*ast.File,它是所有AST节点的根。它只实现了ast.Node接口。

ast.File有引用包名、导入声明和函数声明作为子节点。
准确地说,它还有
Comments等,但为了简单起见,我省略了它们。
让我们从包名开始。
注意,带nil值的字段会被省略。每个节点类型的完整字段列表请参见文档。
包名
ast.Indent
*ast.Ident {
.  NamePos: dummy.go:1:9
.  Name: "hello"
}
一个包名可以用AST节点类型*ast.Ident来表示,它实现了ast.Expr接口。
所有的标识符都由这个结构来表示,它主要包含了它的名称和在文件集中的源位置。
从上述所示的代码中,我们可以看到包名是hello,并且是在dummy.go的第一行声明的。
对于这个节点我们不会再深入研究了,让我们再回到
*ast.File.Go中。
导入声明
ast.GenDecl
*ast.GenDecl {
.  TokPos: dummy.go:3:1
.  Tok: import
.  Lparen: -
.  Specs: []ast.Spec (len = 1) {
.  .  0: *ast.ImportSpec {/* Omission */}
.  }
.  Rparen: -
}
ast.GenDecl代表除函数以外的所有声明,即import、const、var和type。
Tok代表一个词性标记--它指定了声明的内容(import或const或type或var)。
这个AST节点告诉我们,import声明在dummy.go的第3行。
让我们从上到下深入地看一下ast.GenDecl的下一个节点*ast.ImportSpec。
ast.ImportSpec
*ast.ImportSpec {
.  Path: *ast.BasicLit {/* Omission */}
.  EndPos: -
}
一个ast.ImportSpec节点对应一个导入声明。它实现了ast.Spec接口,访问路径可以让导入路径更有意义。
ast.BasicLit
*ast.BasicLit {
.  ValuePos: dummy.go:3:8
.  Kind: STRING
.  Value: "\"fmt\""
}
一个ast.BasicLit节点表示一个基本类型的文字,它实现了ast.Expr接口。
它包含一个token类型,可以使用token.INT、token.FLOAT、token.IMAG、token.CHAR或token.STRING。
从ast.ImportSpec和ast.BasicLit中,我们可以看到它导入了名为"fmt "的包。
我们不再深究了,让我们再回到顶层。
函数声明
ast.FuncDecl
*ast.FuncDecl {
.  Name: *ast.Ident {/* Omission */}
.  Type: *ast.FuncType {/* Omission */}
.  Body: *ast.BlockStmt {/* Omission */}
}
一个ast.FuncDecl节点代表一个函数声明,但它只实现了ast.Node接口。我们从代表函数名的Name开始,依次看一下。
ast.Ident
*ast.Ident {
.  NamePos: dummy.go:5:6
.  Name: "greet"
.  Obj: *ast.Object {
.  .  Kind: func
.  .  Name: "greet"
.  .  Decl: *(obj @ 0)
.  }
}
第二次出现这种情况,我就不做基本解释了。
值得注意的是*ast.Object,它代表了标识符所指的对象,但为什么需要这个呢?
大家知道,GoLang有一个scope的概念,就是源文本的scope,其中标识符表示指定的常量、类型、变量、函数、标签或包。
Decl字段表示标识符被声明的位置,这样就确定了标识符的scope。指向相同对象的标识符共享相同的*ast.Object.Label。
ast.FuncType
*ast.FuncType {
.  Func: dummy.go:5:1
.  Params: *ast.FieldList {/* Omission */}
}
一个 ast.FuncType 包含一个函数签名,包括参数、结果和 "func "关键字的位置。
ast.FieldList
*ast.FieldList {
.  Opening: dummy.go:5:11
.  List: nil
.  Closing: dummy.go:5:12
}
ast.FieldList节点表示一个Field的列表,用括号或大括号括起来。如果定义了函数参数,这里会显示,但这次没有,所以没有信息。
列表字段是*ast.Field的一个切片,包含一对标识符和类型。它的用途很广,用于各种Nodes,包括*ast.StructType、*ast.InterfaceType和本文中使用示例。
也就是说,当把一个类型映射到一个标识符时,需要用到它(如以下的代码):
foot int
bar string
让我们再次回到*ast.FuncDecl,再深入了解一下最后一个字段Body。
ast.BlockStmt
*ast.BlockStmt {
.  Lbrace: dummy.go:5:14
.  List: []ast.Stmt (len = 1) {
.  .  0: *ast.ExprStmt {/* Omission */}
.  }
.  Rbrace: dummy.go:7:1
}
一个ast.BlockStmt节点表示一个括号内的语句列表,它实现了ast.Stmt接口。
ast.ExprStmt
*ast.ExprStmt {
.  X: *ast.CallExpr {/* Omission */}
}
ast.ExprStmt在语句列表中表示一个表达式,它实现了ast.Stmt接口,并包含一个ast.Expr。
ast.CallExpr
*ast.CallExpr {
.  Fun: *ast.SelectorExpr {/* Omission */}
.  Lparen: dummy.go:6:13
.  Args: []ast.Expr (len = 1) {
.  .  0: *ast.BasicLit {/* Omission */}
.  }
.  Ellipsis: -
.  Rparen: dummy.go:6:28
}
ast.CallExpr表示一个调用函数的表达式,要查看的字段是:
- Fun
- 要调用的函数和Args
- 要传递给它的参数列表
ast.SelectorExpr
*ast.SelectorExpr {
.  X: *ast.Ident {
.  .  NamePos: dummy.go:6:2
.  .  Name: "fmt"
.  }
.  Sel: *ast.Ident {
.  .  NamePos: dummy.go:6:6
.  .  Name: "Println"
.  }
}
ast.SelectorExpr表示一个带有选择器的表达式。简单地说,它的意思是fmt.Println。
ast.BasicLit
*ast.BasicLit {
.  ValuePos: dummy.go:6:14
.  Kind: STRING
.  Value: "\"Hello, World\""
}
这个就不需要多解释了,就是简单的"Hello, World。
小结
需要注意的是,在介绍的节点类型时,节点类型中的一些字段及很多其它的节点类型都被我省略了。
尽管如此,我还是想说,即使有点粗糙,但实际操作一下还是很有意义的,而且最重要的是,它是相当有趣的。
复制并粘贴本文第一节中所示的代码,在你的电脑上试着实操一下吧。
via: https://nakabonne.dev/posts/take-a-walk-the-go-ast/
作者:nakabonne 译者:double12gzh 校对:polaris1119
本文由 GCTT 原创翻译,Go语言中文网 首发。也想加入译者行列,为开源做一些自己的贡献么?欢迎加入 GCTT!
翻译工作和译文发表仅用于学习和交流目的,翻译工作遵照 CC-BY-NC-SA 协议规定,如果我们的工作有侵犯到您的权益,请及时联系我们。
欢迎遵照 CC-BY-NC-SA 协议规定 转载,敬请在正文中标注并保留原文/译文链接和作者/译者等信息。
文章仅代表作者的知识和看法,如有不同观点,请楼下排队吐槽
有疑问加站长微信联系(非本文作者))


