以电商项目为例,商品详情页面有商品信息、库存信息、商品评价信息,这些信息数据分散在不同的微服务中,通过grpc网关服务组装所需的数据返回给商品详情页面,如下图所示,点击查看完整微服务集群代码 micro-cluster-demo。

依赖工具
(1) 准备proto文件
- comment.proto 文件定义的grpc方法是通过产品id获取评论数据,用来生成评论grpc服务代码。
- inventory.proto 文件定义的grpc方法是通过产品id获取库存数据,用来生成库存grpc服务代码。
- product.proto 文件定义的grpc方法是通过产品id获取详情数据,用来生成商品grpc服务代码。
shop_gw.proto 文件定义的grpc方法是根据产品id组装成商品详情页面所需的数据,用来生成shop grpc网关服务代码。
(2) 安装工具 sponge。
安装完工具sponge后,执行命令打开UI界面:
sponge run
快速生成和启动评论、库存、产品三个微服务
生成评论、库存、产品三个微服务代码
进入sponge的UI界面,点击左边菜单栏【Protobuf】-->【创建微服务项目】,填写评论、库存、产品各自参数,分别生成评论、库存、商品服务代码。
微服务框架使用 grpc,还包含了常用的服务治理功能代码,构建部署脚本等。
快速创建评论(comment)服务如下图所示:

快速创建库存(inventory)服务如下图所示:
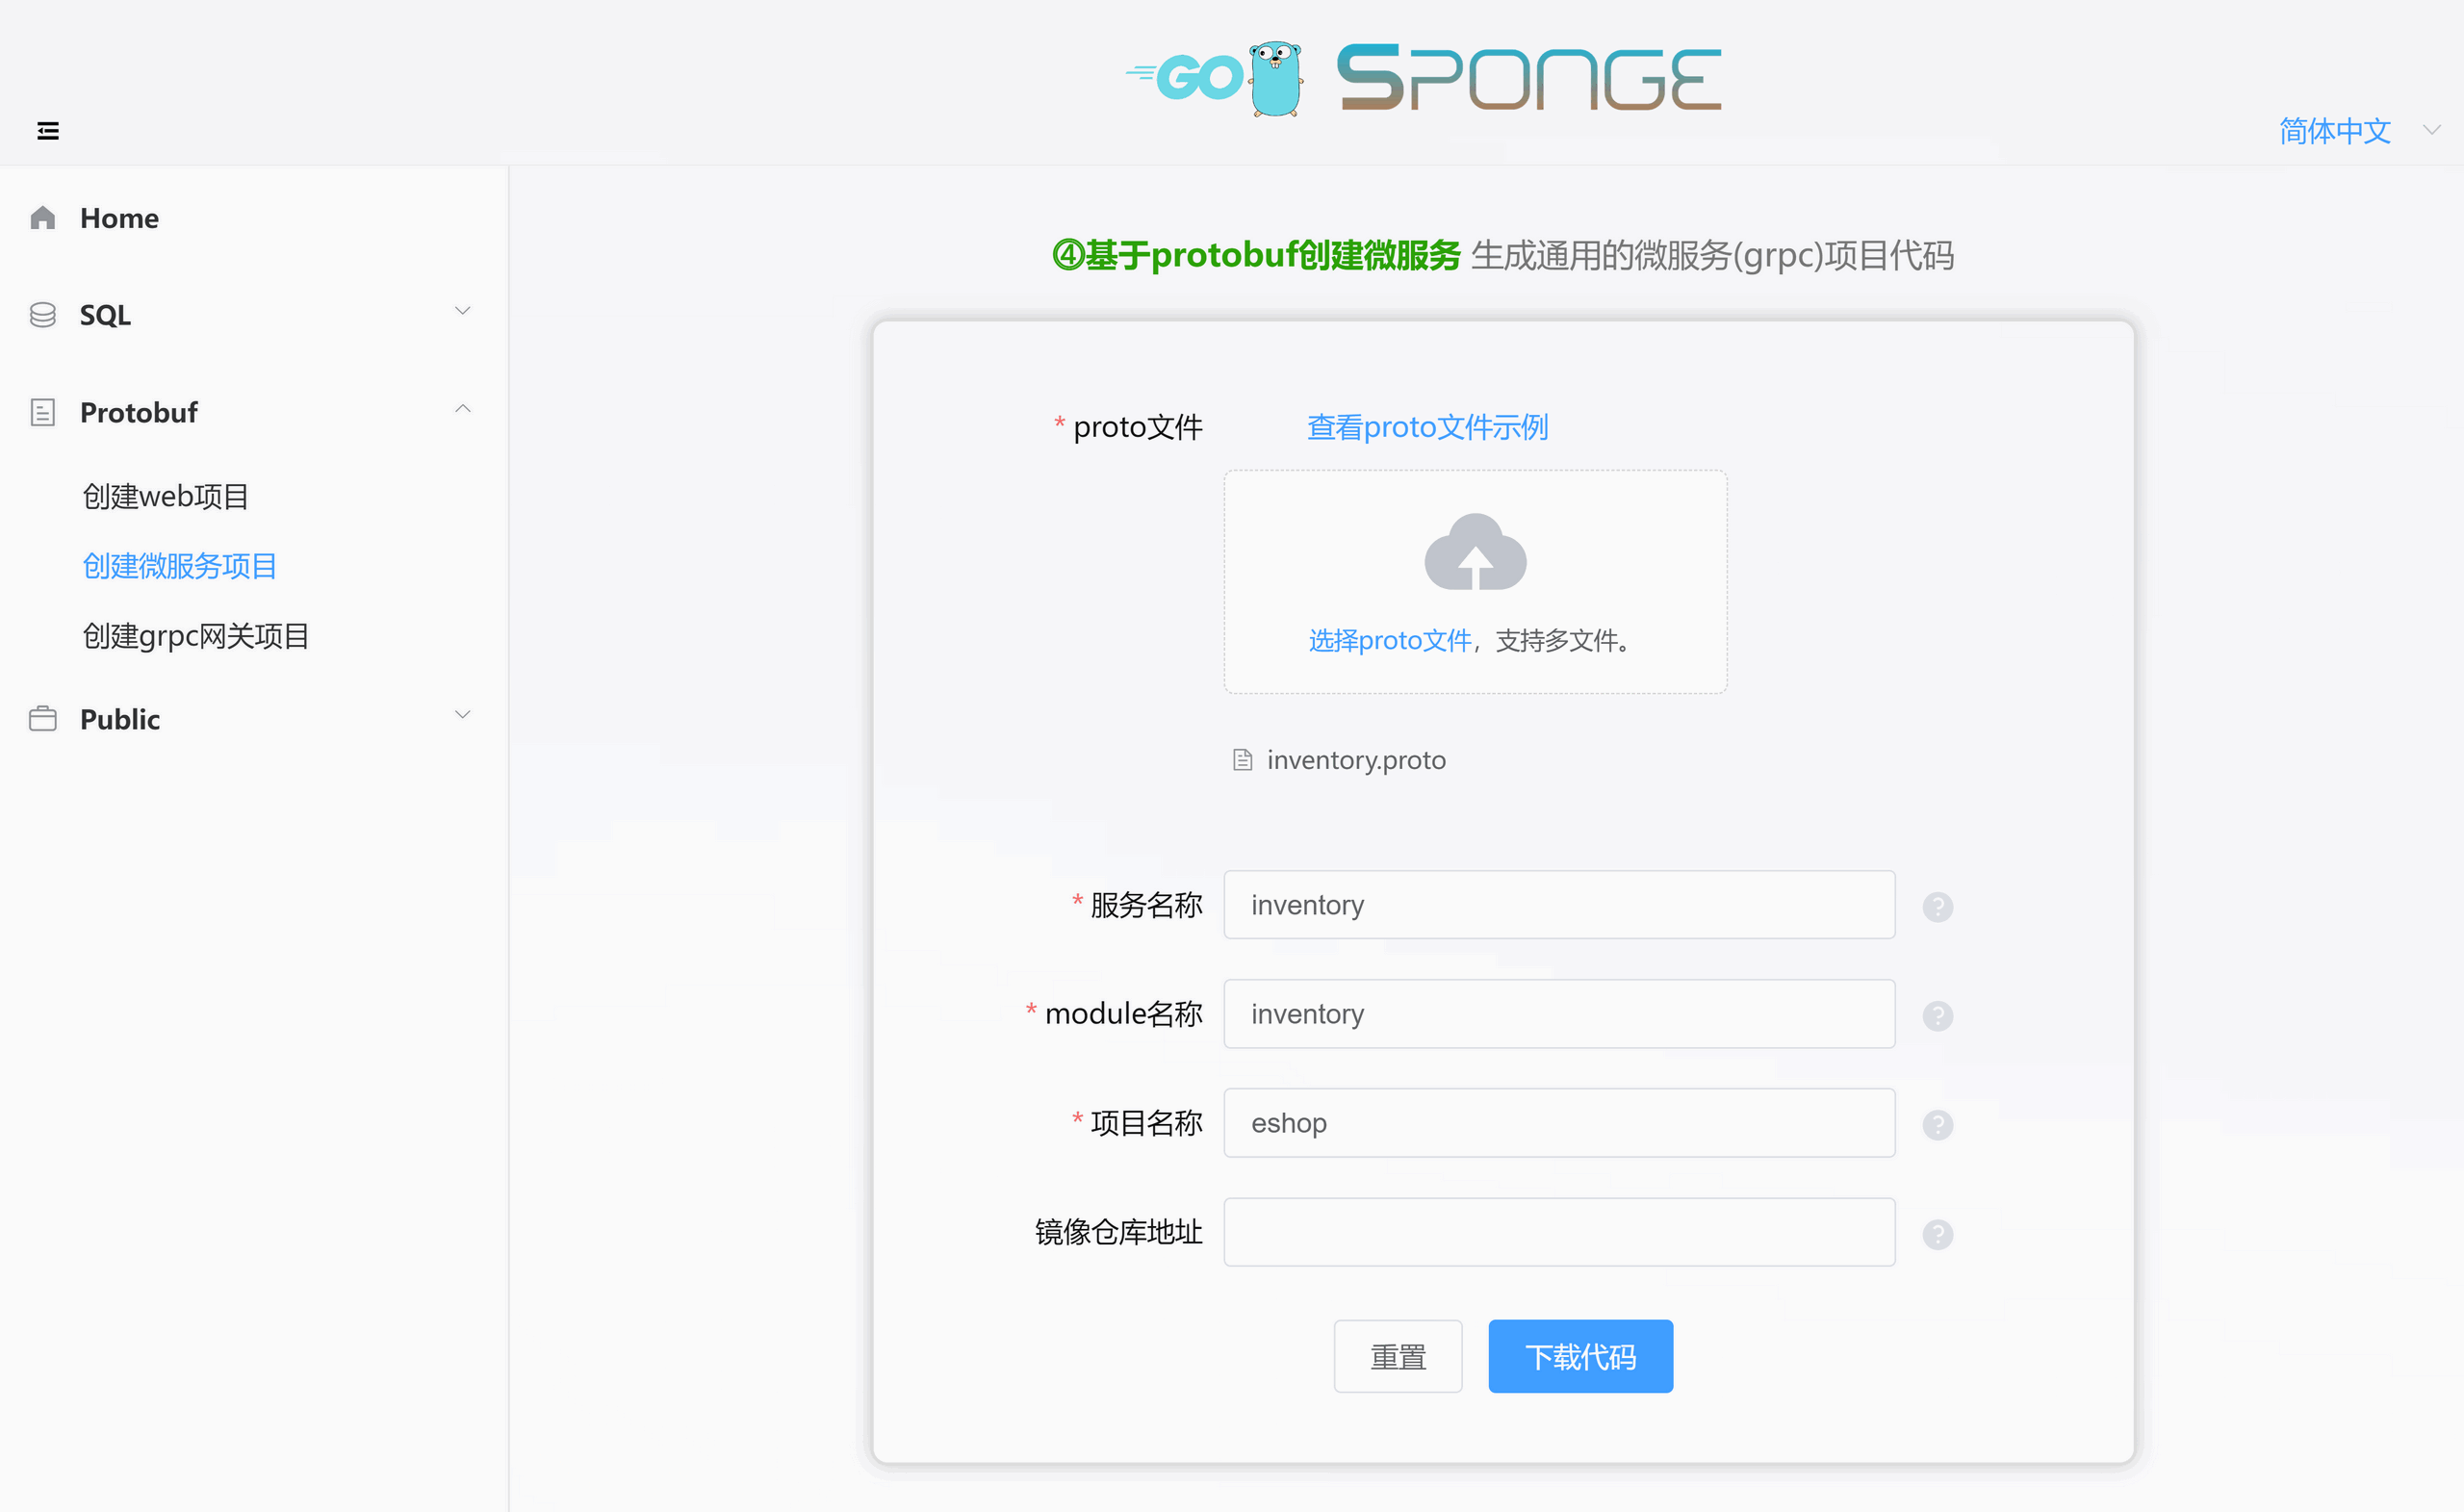
快速创建产品(product)服务如下图所示:

打开三个终端,评论、库存、产品分别对应一个终端。
启动评论(comment)服务
切换到评论(comment)目录,执行步骤:
(1) 生成api接口代码(internal/service目录)、grpc客户端测试代码(internal/service目录)、api接口错误码(internal/ecode目录)、生成pb.go代码(api/comment/v1目录)
make proto
(2) 打开internal/service/comment.go,这是生成的模板代码,里面有一行提示填写业务逻辑代码的panic代码,在这里填写业务逻辑,例如填写返回值:
    return &commentV1.ListByProductIDReply{
        Total:     11,
        ProductID: 1,
        CommentDetails: []*commentV1.CommentDetail{
            {
                Id:       1,
                Username: "Mr Zhang",
                Content:  "good",
            },
            {
                Id:       2,
                Username: "Mr Li",
                Content:  "good",
            },
            {
                Id:       3,
                Username: "Mr Wang",
                Content:  "not good",
            },
        },
    }, nil
(3) 打开configs/comment.yml配置文件,找到grpc,修改下面的port和httpPort两个端口值
grpc:
  port: 18203              # listen port
  httpPort: 18213        # profile and metrics ports
(4) 编译和启动comment服务
make run
启动库存(inventory)服务
切换到库存(inventory)目录,执行和comment一样的步骤:
(1) 生成api接口代码(internal/service目录)、grpc客户端测试代码(internal/service目录)、api接口错误码(internal/ecode目录)、生成pb.go代码(api/inventory/v1目录)
make proto
(2) 打开internal/service/inventory.go,这是生成的模板代码,里面有一行提示填写业务逻辑代码的panic代码,在这里填写业务逻辑,例如填写返回值:
    return &inventoryV1.GetByIDReply{
        InventoryDetail: &inventoryV1.InventoryDetail{
            Id:      1,
            Num:     999,
            SoldNum: 111,
        },
    }, nil
(3) 打开configs/inventory.yml配置文件,找到grpc,修改下面的port和httpPort两个端口值
grpc:
  port: 28203              # listen port
  httpPort: 28213        # profile and metrics ports
(4) 编译和启动inventory服务
make run
启动产品(product)服务
切换到库存(product)目录,执行和comment一样的步骤:
(1) 生成api接口代码(internal/service目录)、grpc客户端测试代码(internal/service目录)、api接口错误码(internal/ecode目录)、生成pb.go代码(api/product/v1目录)
make proto
(2) 打开internal/service/product.go,这是生成的模板代码,里面有一行提示填写业务逻辑代码的panic代码,在这里填写业务逻辑,例如填写返回值:
    return &productV1.GetByIDReply{
        ProductDetail: &productV1.ProductDetail{
            Id:          1,
            Name:        "数据线",
            Price:       10,
            Description: "安卓type c数据线",
        },
        InventoryID: 1,
    }, nil
(3) 打开configs/product.yml配置文件,找到grpc,修改下面的port和httpPort两个端口值
grpc:
  port: 38203              # listen port
  httpPort: 38213        # profile and metrics ports
(4) 编译和启动product服务
make run
评论、库存、产品三个微服务都启动成功后,接下来就可以生成和启动网关服务了。
快速生成和启动grpc网关服务
进入sponge的UI界面,点击左边菜单栏【Protobuf】-->【创建grpc网关项目】,填写一些参数就生成grpc网关项目代码。
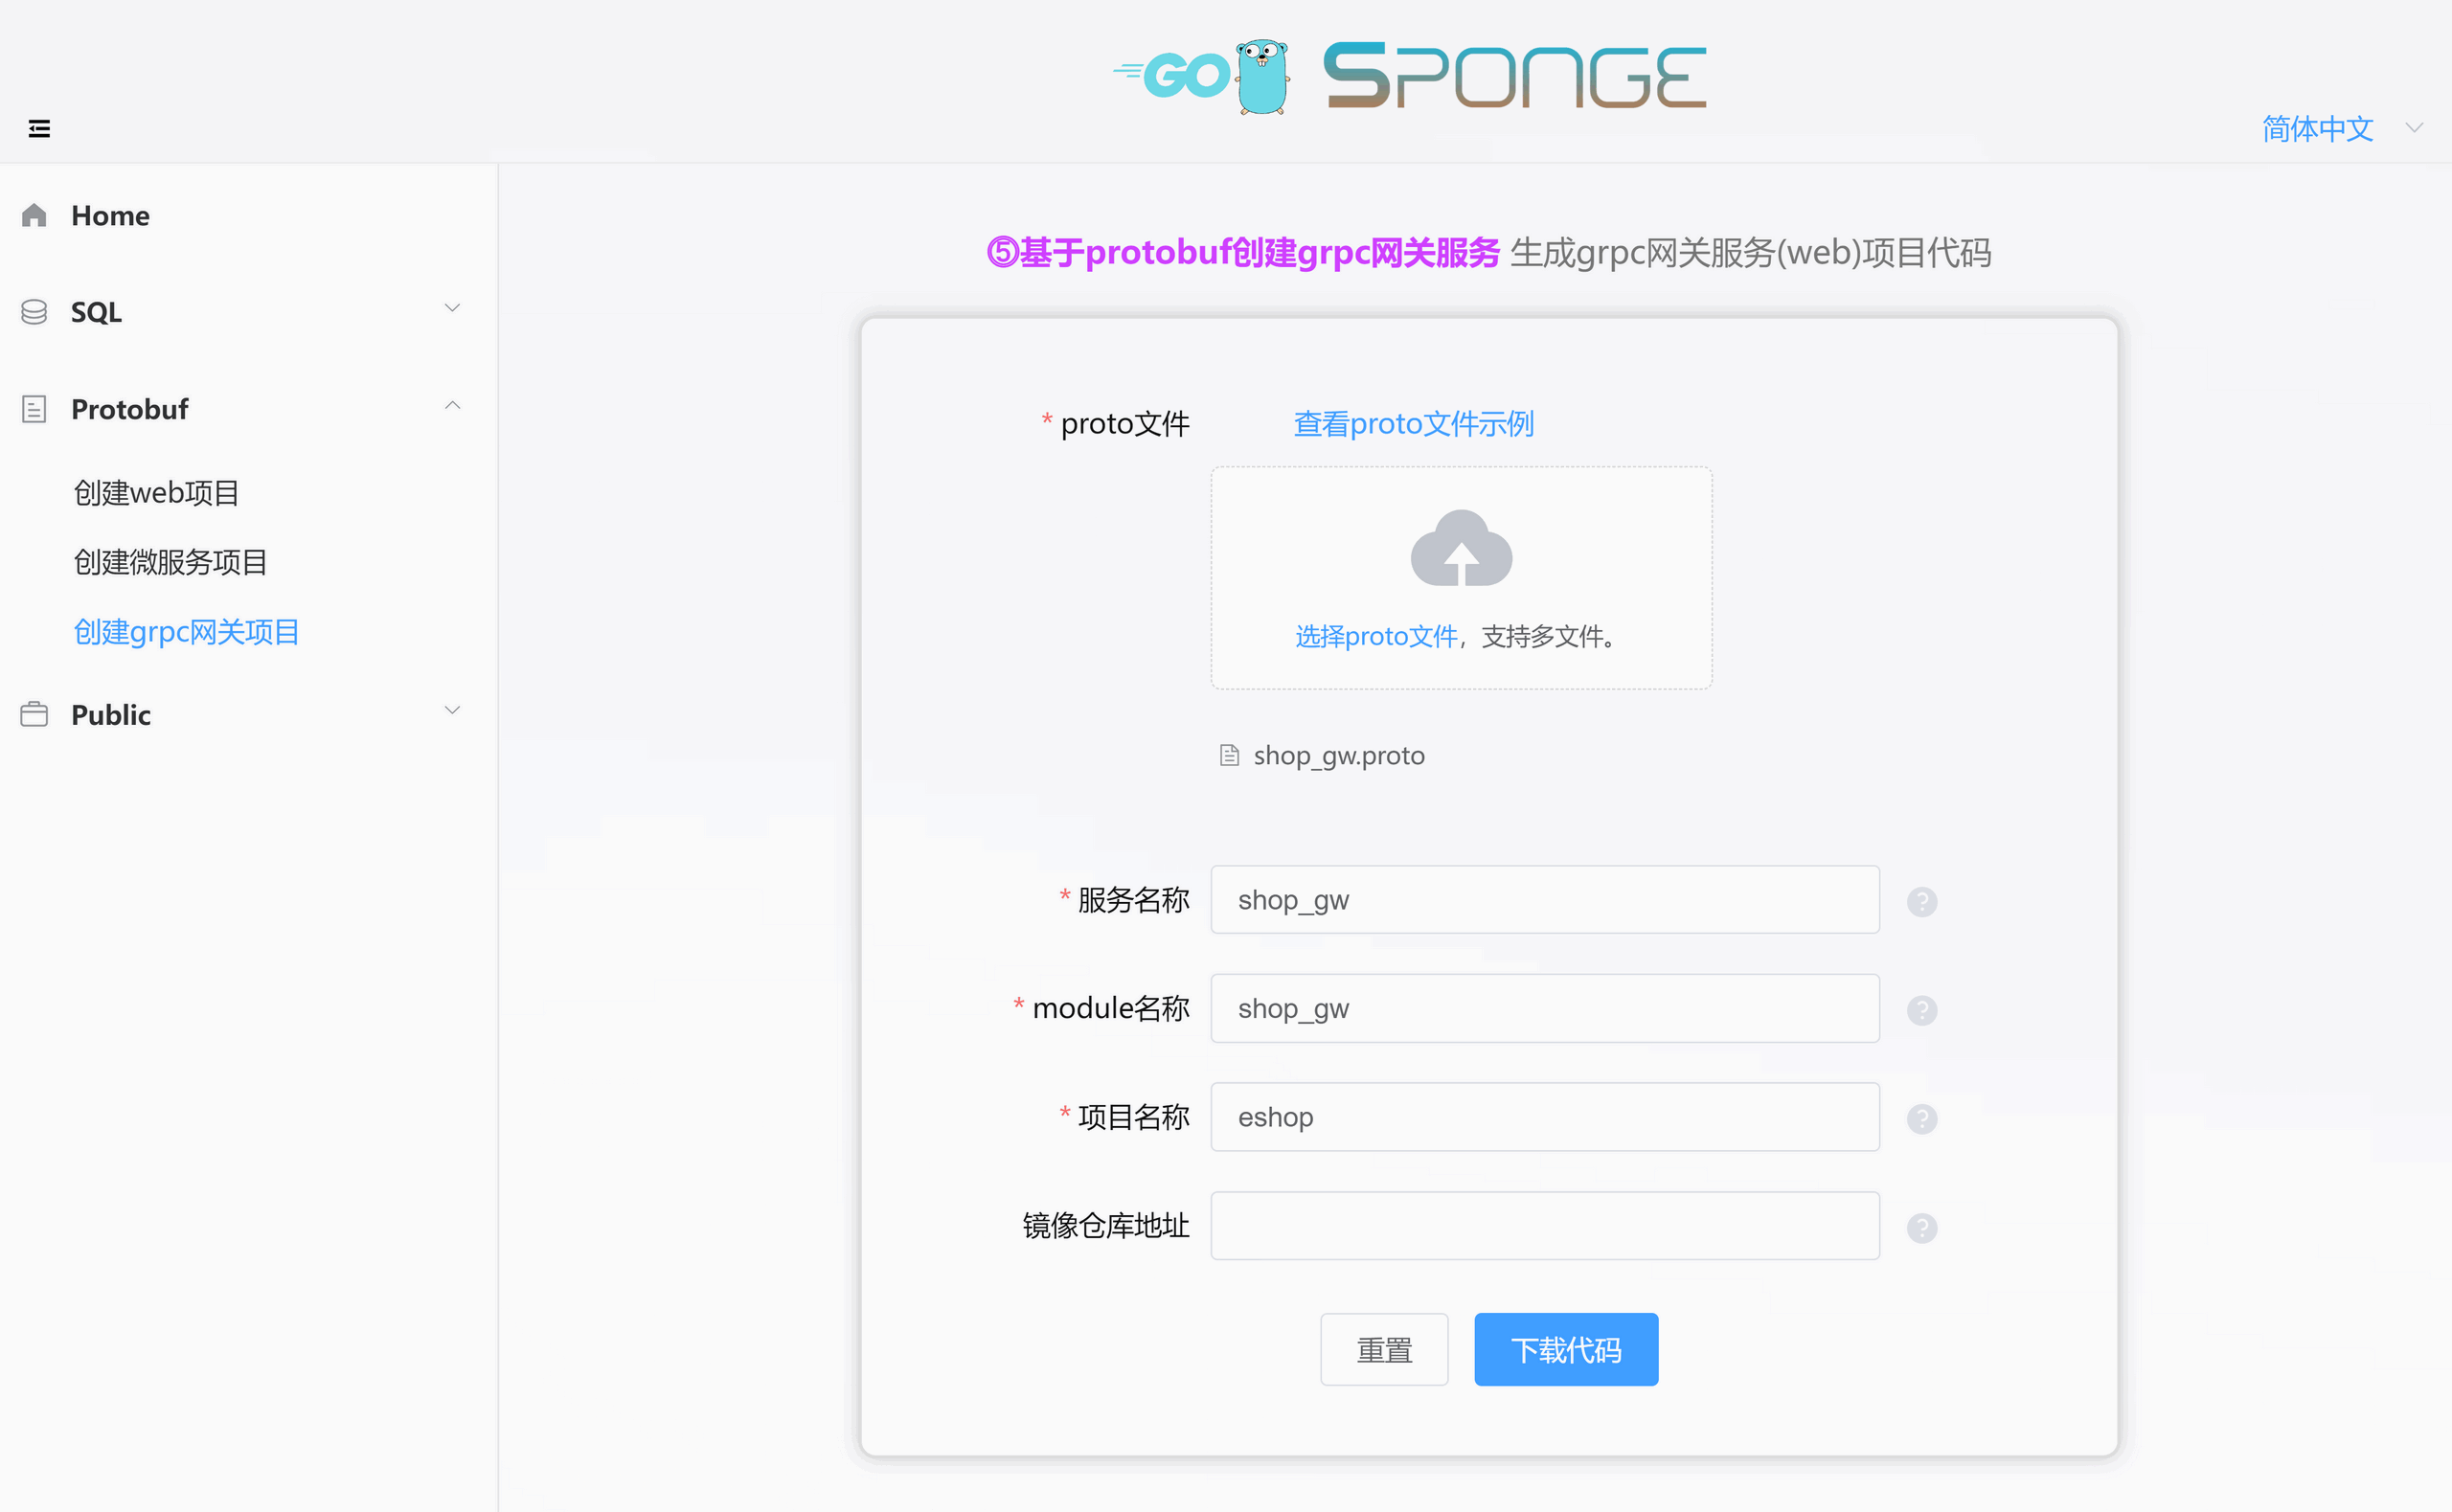
web框架使用 gin,还包含了swagger文档、常用的服务治理功能代码,构建部署脚本等。
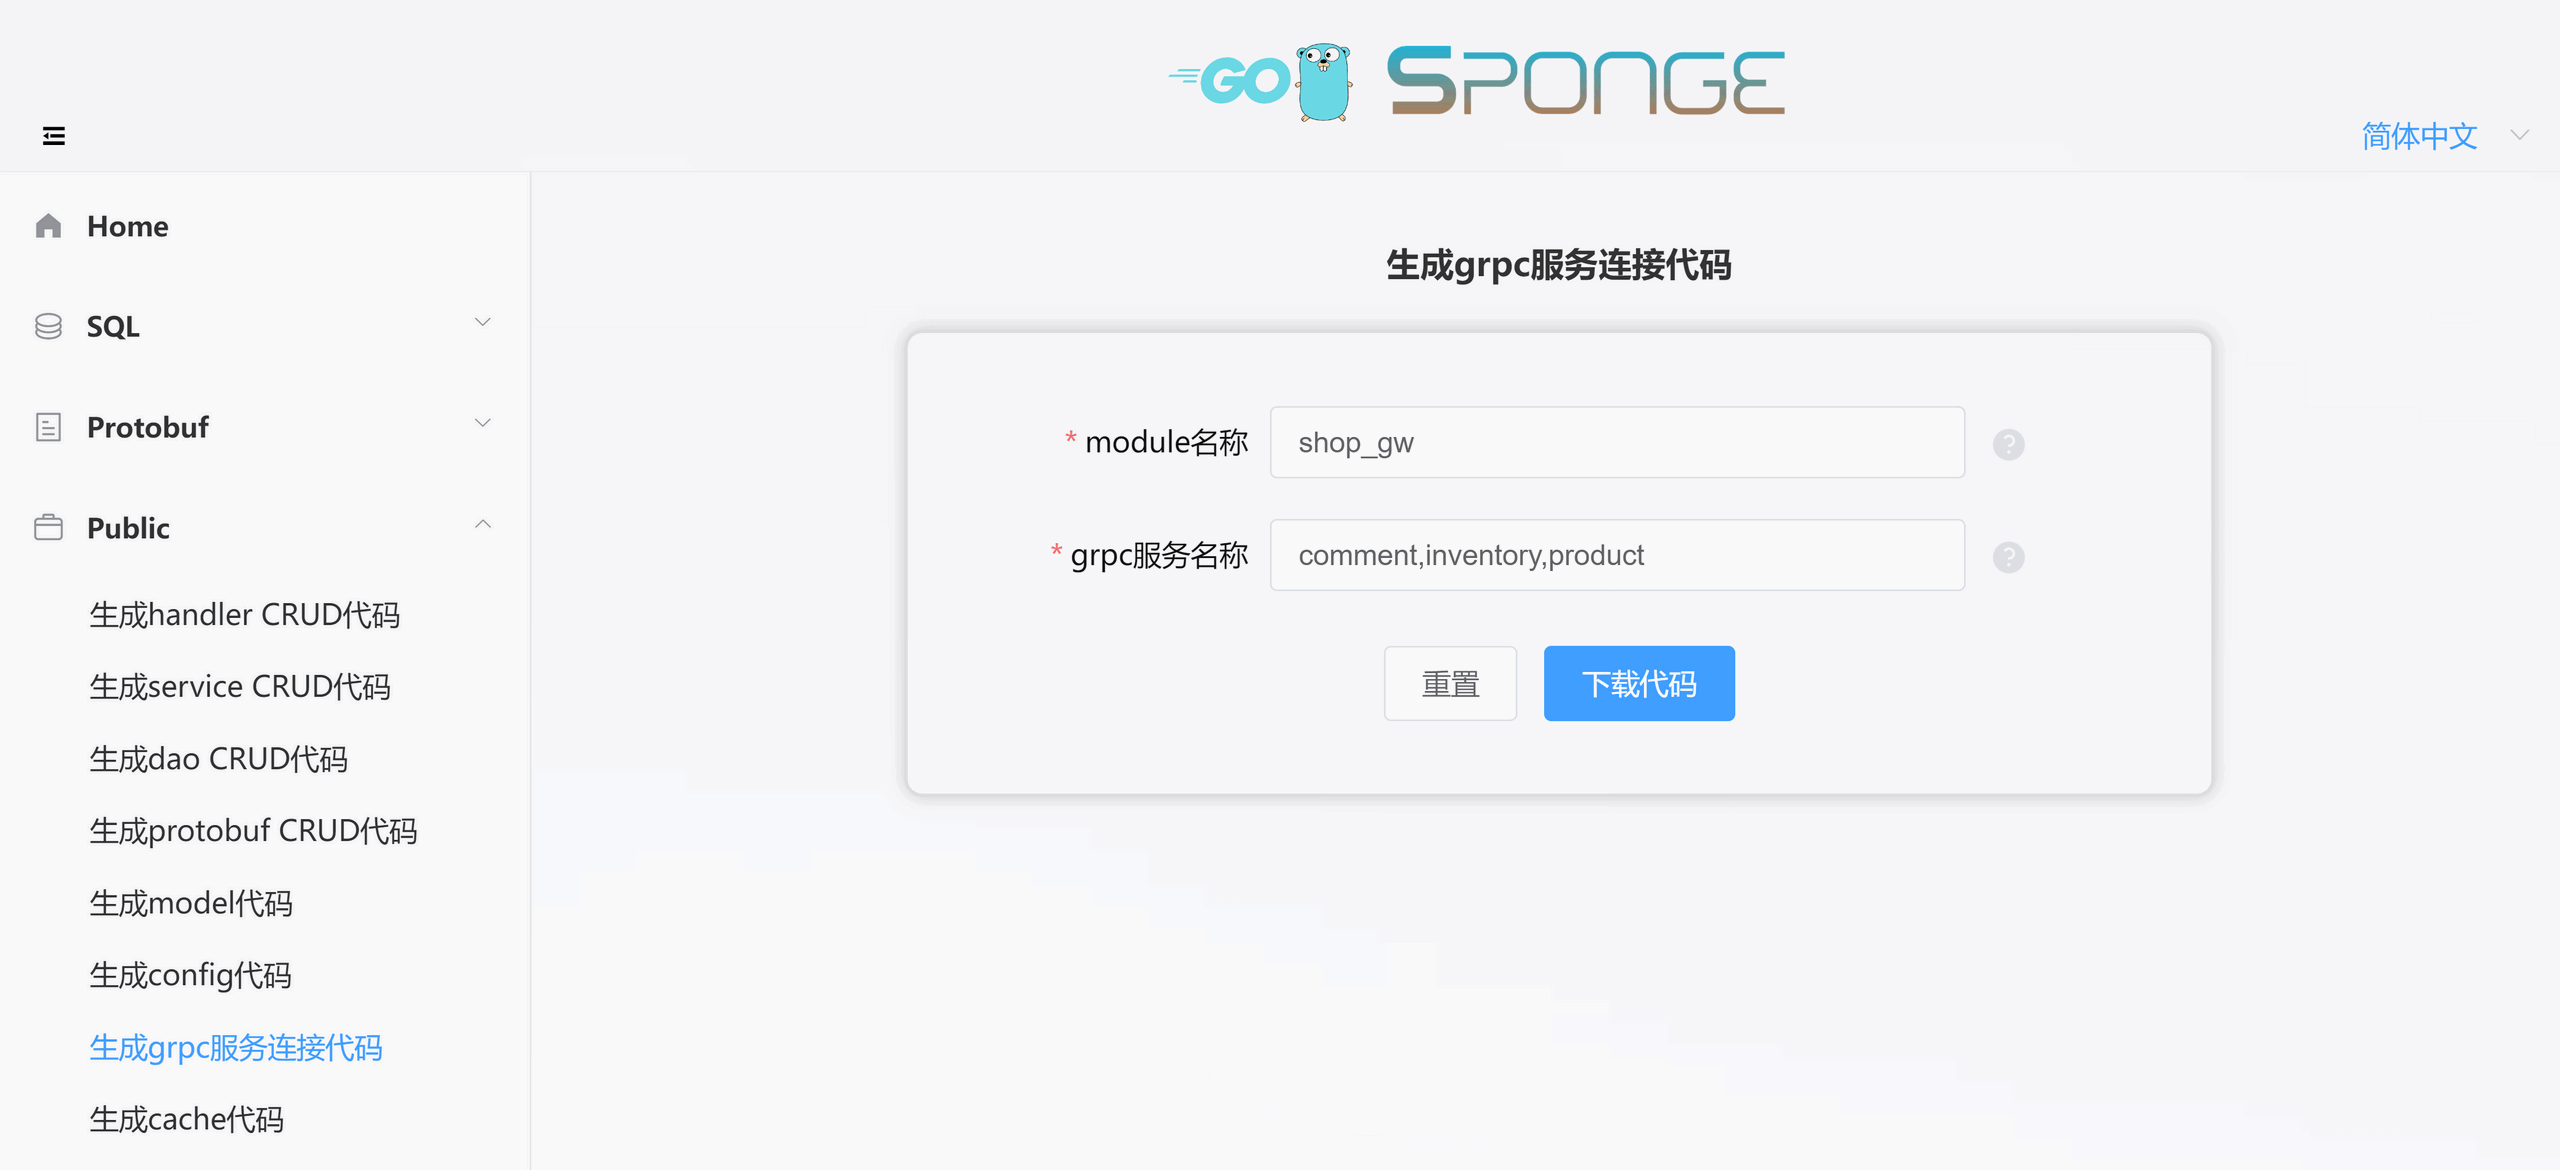
为了连接评论、库存、产品三个grpc服务,需要另外生成连接grpc服务代码,点击左边菜单栏【Public】--> 【生成grpc服务连接代码】,填写参数后生成代码,然后把生成的连接grpc服务代码移动到grpc网关项目代码目录下。
在grpc网关服务中为了能够调用grpc服务的方法,需要把评论、库存、产品三个grpc服务的proto文件复制到grpc网关服务的目录api/shop_gw/v1下。
切换到shop_gw目录,执行步骤:
(1) 从comment,inventory,product服务目录复制proto文件。
make copy-proto SERVER=../comment,../inventory,../product
(2) 打开configs/shop_gw.yml配置文件,找到grpcClient,添加评论、库存、产品三个grpc服务地址:
grpcClient:
  - name: "comment"
    host: "127.0.0.1"
    port: 18282
    registryDiscoveryType: ""
  - name: "inventory"
    host: "127.0.0.1"
    port: 28282
    registryDiscoveryType: ""
  - name: "product"
    host: "127.0.0.1"
    port: 38282
    registryDiscoveryType: ""
(3) 生成api接口代码(internal/service目录)、注册路由代码(internal/routers目录)、api接口错误码(internal/ecode目录)、生成swagger文档(doc目录)、pb.go代码(api/user_gw/v1目录)。
make proto
(4) 打开internal/service/shop_gw.go,这是生成的api接口模板代码,在这里填写具体逻辑代码,填写下面简单业务逻辑代码:
package service

import (
    "context"

    commentV1 "shop_gw/api/comment/v1"
    inventoryV1 "shop_gw/api/inventory/v1"
    productV1 "shop_gw/api/product/v1"
    shop_gwV1 "shop_gw/api/shop_gw/v1"
    "shop_gw/internal/ecode"
    "shop_gw/internal/rpcclient"

    "github.com/zhufuyi/sponge/pkg/grpc/interceptor"
    "github.com/zhufuyi/sponge/pkg/logger"
)

var _ shop_gwV1.ShopGwLogicer = (*shopGwClient)(nil)

type shopGwClient struct {
    commentCli   commentV1.CommentClient
    inventoryCli inventoryV1.InventoryClient
    productCli   productV1.ProductClient
}

// NewShopGwClient create a client
func NewShopGwClient() shop_gwV1.ShopGwLogicer {
    return &shopGwClient{
        commentCli:   commentV1.NewCommentClient(rpcclient.GetCommentRPCConn()),
        inventoryCli: inventoryV1.NewInventoryClient(rpcclient.GetInventoryRPCConn()),
        productCli:   productV1.NewProductClient(rpcclient.GetProductRPCConn()),
    }
}

// GetDetailsByProductID get page detail by product id
func (c *shopGwClient) GetDetailsByProductID(ctx context.Context, req *shop_gwV1.GetDetailsByProductIDRequest) (*shop_gwV1.GetDetailsByProductIDReply, error) {
    err := req.Validate()
    if err != nil {
        logger.Warn("req.Validate error", logger.Err(err), logger.Any("req", req), interceptor.CtxRequestIDField(ctx))
        return nil, ecode.StatusInvalidParams.Err()
    }

    // fill in the business logic code here

    productReply, err := c.productCli.GetByID(ctx, &productV1.GetByIDRequest{
        Id: req.ProductID,
    })
    if err != nil {
        return nil, err
    }
    logger.Info("get product info successfully", interceptor.CtxRequestIDField(ctx))

    inventoryReply, err := c.inventoryCli.GetByID(ctx, &inventoryV1.GetByIDRequest{
        Id: productReply.InventoryID,
    })
    if err != nil {
        return nil, err
    }
    logger.Info("get inventory info successfully", interceptor.CtxRequestIDField(ctx))

    commentReply, err := c.commentCli.ListByProductID(ctx, &commentV1.ListByProductIDRequest{
        ProductID: req.ProductID,
    })
    if err != nil {
        return nil, err
    }
    logger.Info("list comments info successfully", interceptor.CtxRequestIDField(ctx))

    return &shop_gwV1.GetDetailsByProductIDReply{
        ProductDetail:   productReply.ProductDetail,
        InventoryDetail: inventoryReply.InventoryDetail,
        CommentDetails:  commentReply.CommentDetails,
    }, nil
}
(5) 编译和启动shop_gw服务
make run
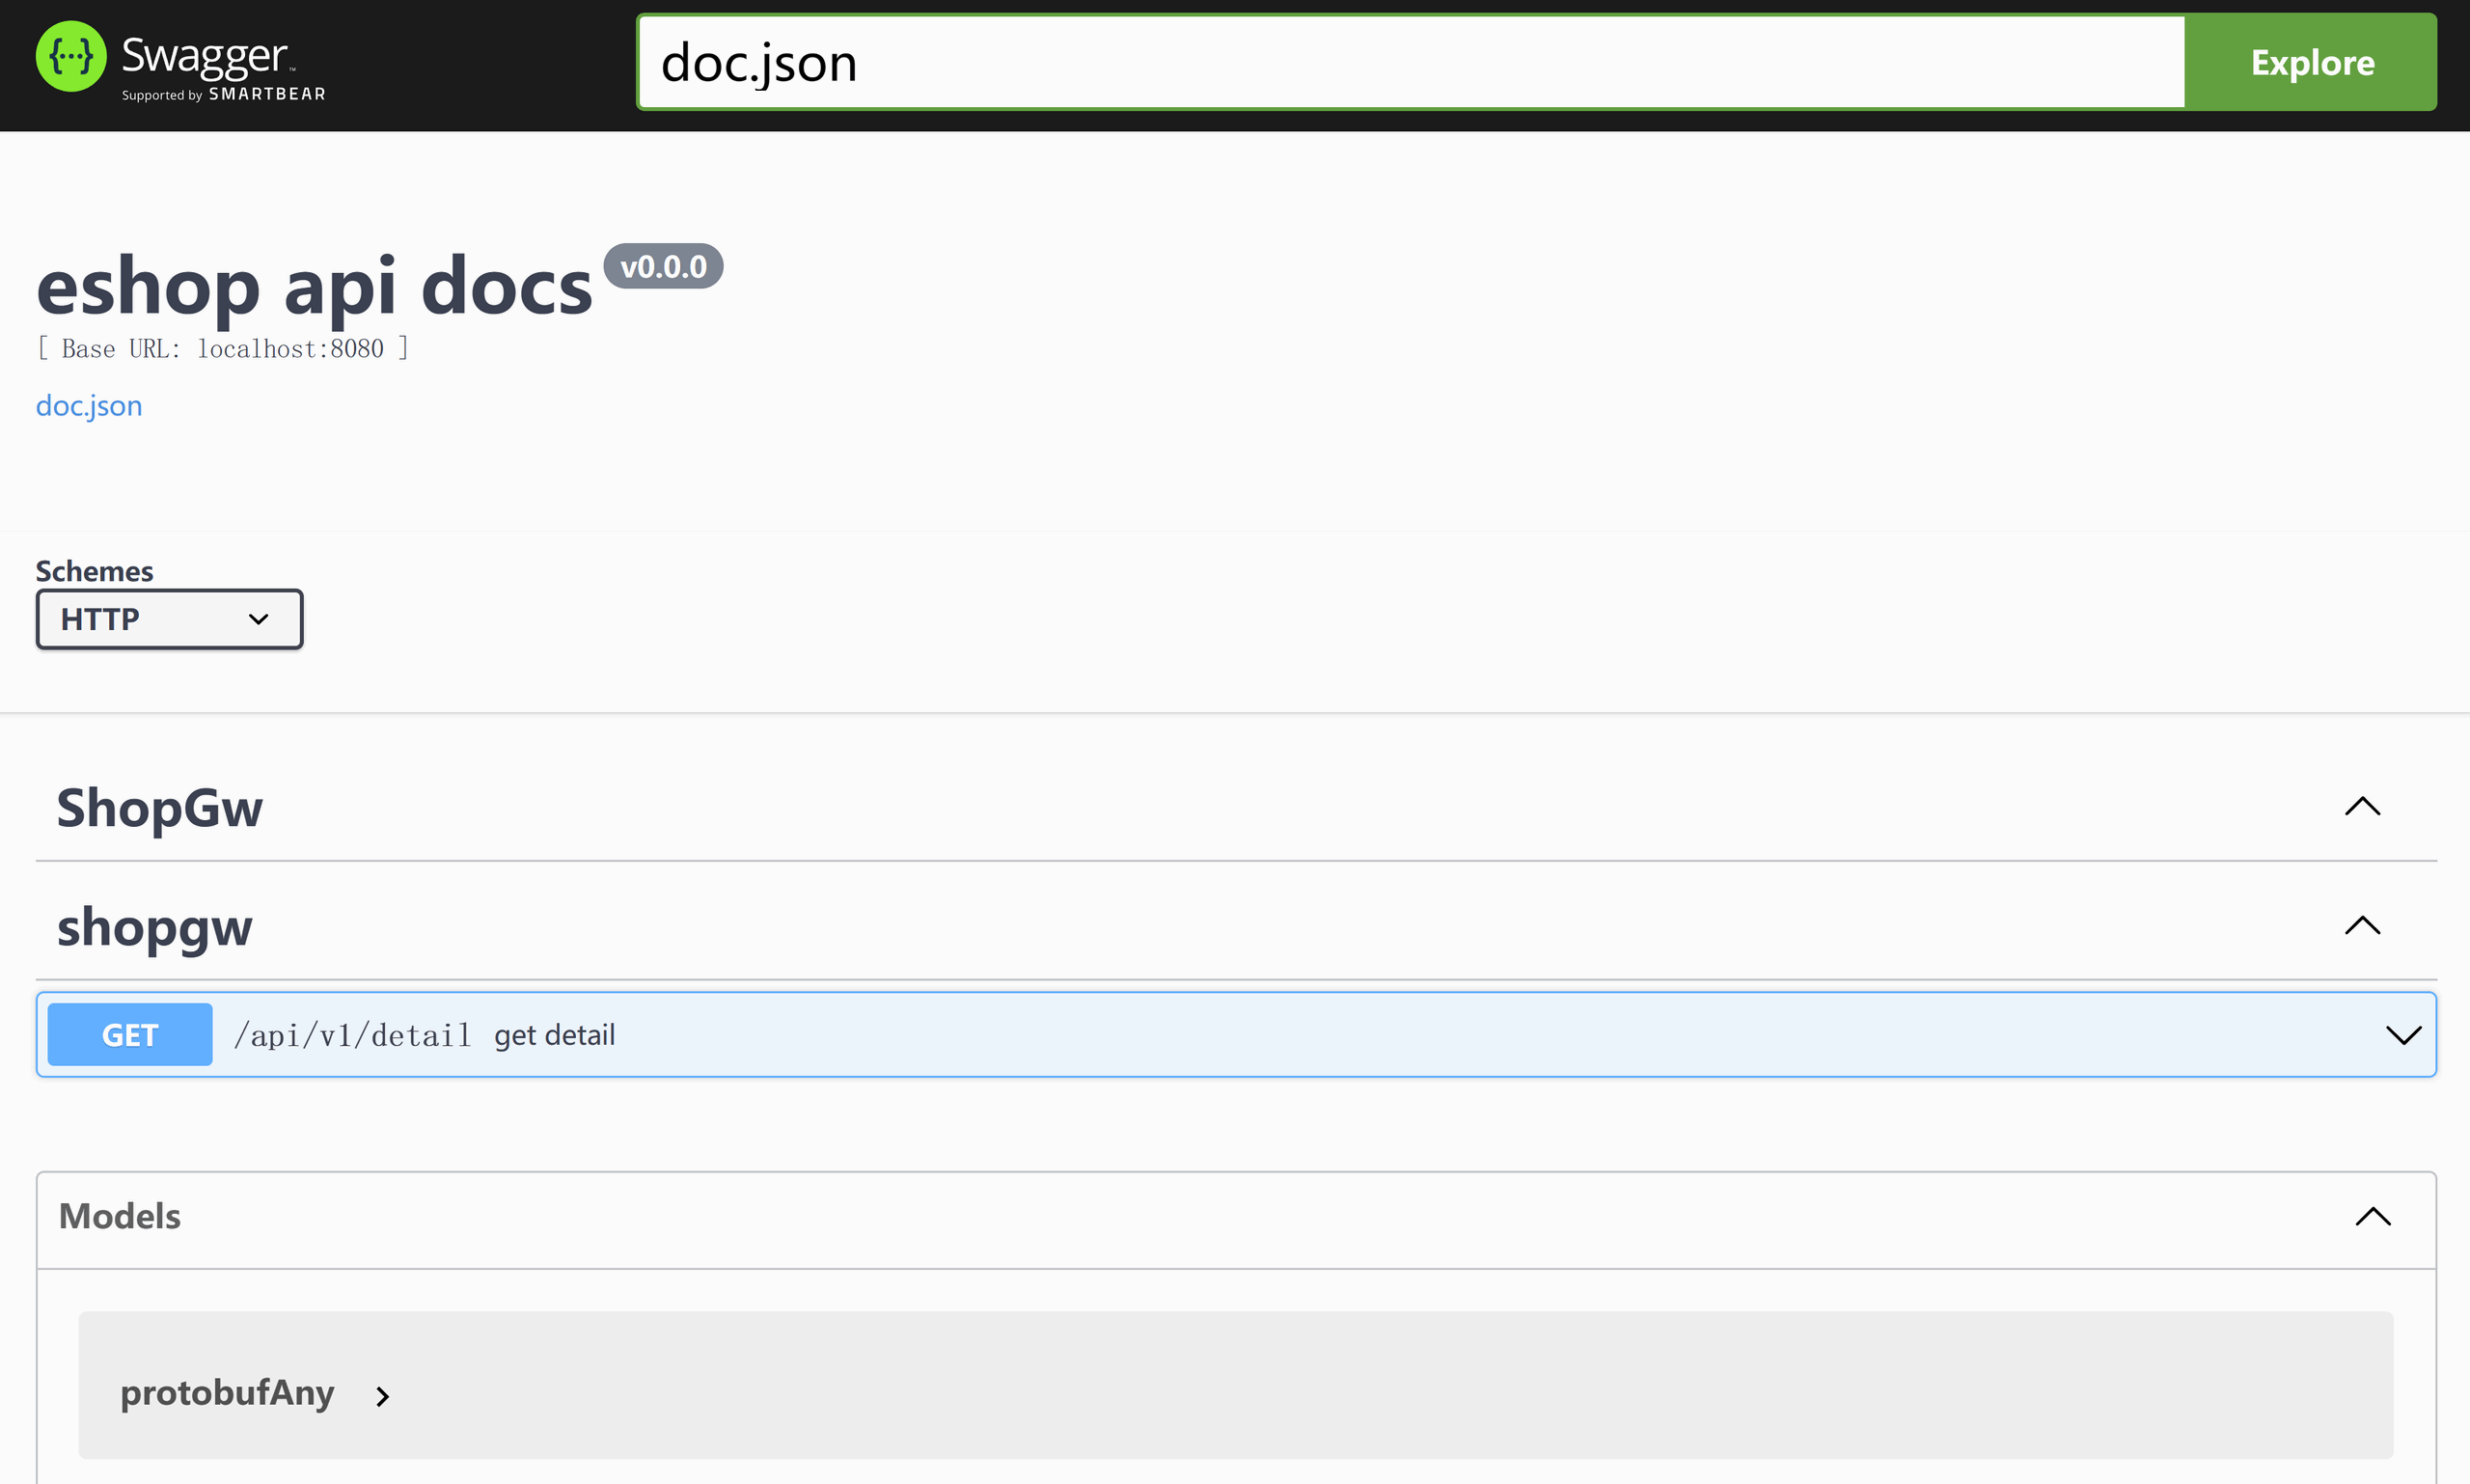
在浏览器打开 http://localhost:8080/apis/swagger/index.html 就可以测试api接口了。
总结
使用工具sponge很容易就搭建出一个微服务集群,集群中各个微服务的常用服务治理功能也是具备的,例如服务注册与发现、限流、熔断、链路跟踪、监控、性能分析、资源统计、CICD等,这些功能统一在yml配置文件开启或关闭。只要在proto文件定义好grpc方法的描述信息,后续的开发基本都是在生成的模板代码填写业务逻辑代码,在生成的测试代码中验证业务逻辑,使得开发简单化,提高开发效率,节省开发时间。
有疑问加站长微信联系(非本文作者))